
Actions (List View)
Package: BASIC
1. General
In all modules – depending on the module – various actions are available.
To the left, above a list view, is the "Actions" button, by which actions can be carried out for several selected records.
Clicking the "Actions" button opens a flyout menu displaying all actions available for that module:
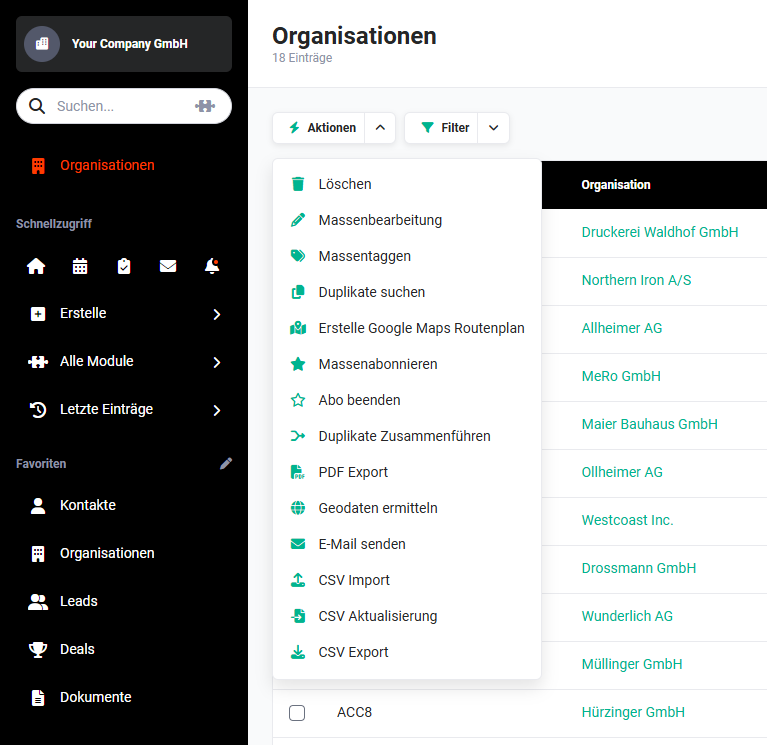 Example: Actions in the Organizations module
The actions
- Edit
- Delete
- Subscribe
can also be executed directly from the list view per individual record. On mouseover, the actions icon "three dots" is displayed in the last column. Clicking it opens a flyout menu with the actions mentioned.
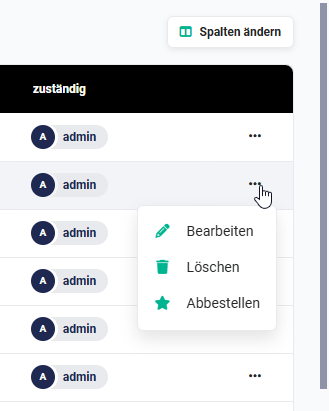 Actions per record
Which actions are available to a user can be configured via the setting in the Profiles.
Actions for which a user does not have permission are not displayed to that user.
2. General actions
In brainX there are actions in the list view of modules that are present in most modules.
Overview of all general actions available in brainX:
| Action | Functionality |
|---|---|
| Delete | The records selected via checkbox are deleted and moved to the Recycle Bin module.The function is described in detail in the section Delete. |
| Bulk edit | The records selected via checkbox can be changed simultaneously by means of bulk edit.The function is described in detail in the section Bulk edit. |
| Bulk tagging | The selected records can be assigned a tag.The function is described in detail in the section Bulk tagging). |
| Find duplicates | A search for duplicates based on the selected fields is started in the respective module.The function is described in detail in the section Find duplicates. |
| Bulk subscribe | Subscribing is activated for the selected records.The function is described in detail in the section Bulk subscribe. |
| End subscription | The subscription of records is ended.The function is described in detail in the section End subscription. |
| PDF export | For the records selected via checkbox, a PDF file is generated based on a template selectable from the Templates module.The function is described in detail in the section PDF export. |
| Merge duplicates | The selected records can be merged in the displayed popup after selecting the respective values that are to be retained.The function is described in detail in the section Merge duplicates. |
| Send email | All email addresses from the selected records are entered as recipients into the create view of a new email.The function is described in detail in the section Send email. |
| CSV import | This action starts the import process based on a CSV file.The function is described in detail in the section CSV import. |
| CSV update | The selected records can be updated based on a CSV file.The function is described in detail in the section CSV update. |
| CSV export | The selected records can be exported as a CSV file.The function is described in detail in the section CSV export. |
Selecting records
In the list views, records can be selected either individually by marking selected records, by marking the entire table, or page by page via checkbox.
If the checkbox in the first column of the header row is ticked, all records on the displayed page are selected. If all records on the page have already been selected, all records can be deselected by clicking the checkbox.
There are additional options for marking or deselecting records. After clicking the actions icon "red angle bracket pointing down", a flyout menu with up to four actions opens:
- Mark all on current page
- Deselect all on current page
- Mark all in the table
- Deselect all in the table
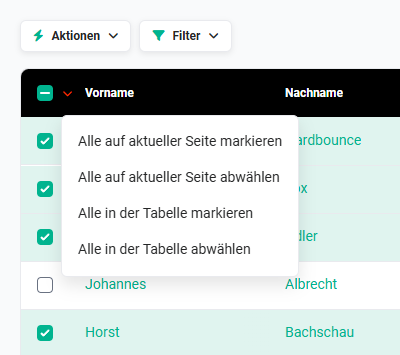 List view – flyout menu for selecting records
Which actions are displayed here depends on whether records have already been selected or whether the table has multiple pages.
Selecting multiple records is only useful if one of the following actions is to be used:
- Delete
- Bulk edit
- Bulk subscribe
- Bulk tagging)
- Create Google Maps route plan
- End subscription
- PDF export
- Determine geodata
- Send email
- CSV export
2.1. Functionalities of the general actions
Which general actions are available in which modules is described in the respective sections of the [Modules]().
2.1.1. Delete
The records selected via checkbox are deleted and moved to the Recycle Bin module.
The function for bulk deleting records is executed in the background. Depending on the number of records to be deleted, it may therefore take a short moment until all records have been deleted.
2.1.2. Bulk edit
The records selected via checkbox can be changed simultaneously by means of bulk edit.
After clicking the "Bulk edit" action, the "Bulk edit" sidebar is displayed on the right.
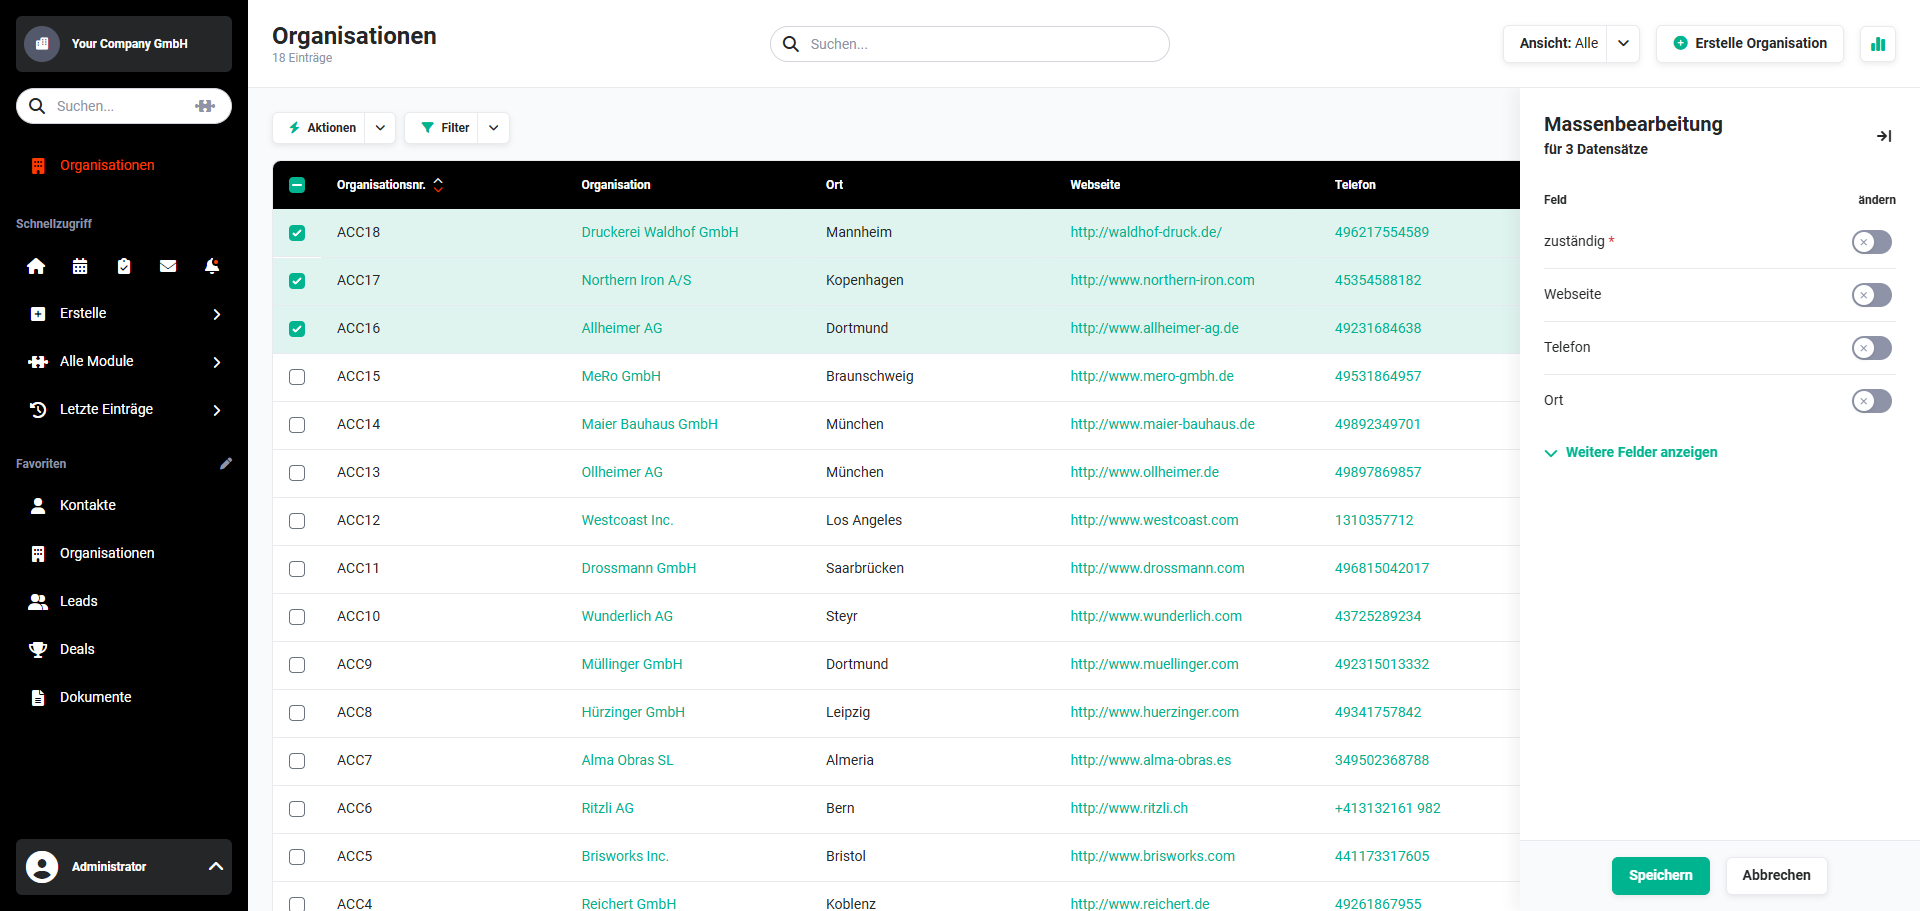 List view – Bulk edit sidebar
In the sidebar, the number of records to be edited is displayed at the top left.
Selected fields – depending on the module – are displayed by default. To display further fields, the actions link "Show more fields" must be clicked.
The "Search" input field enables searching for selected fields.
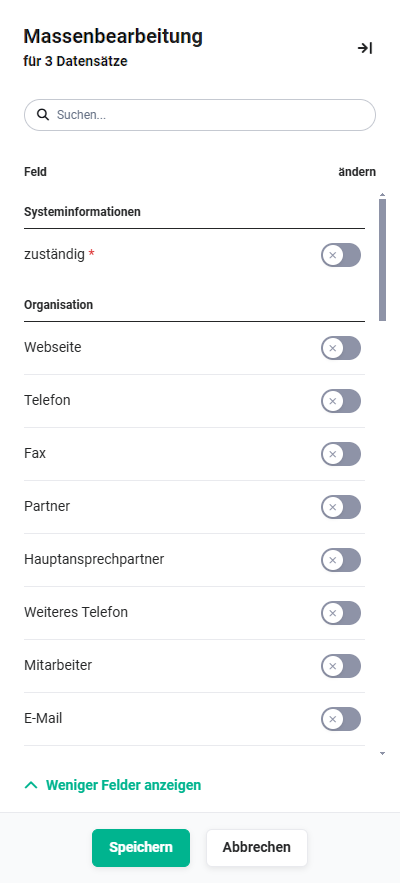 Bulk edit sidebar
The fields to be changed must now be set to "active" using the toggle. The corresponding input or picklist fields are then displayed, in which the new field values must be entered or selected.
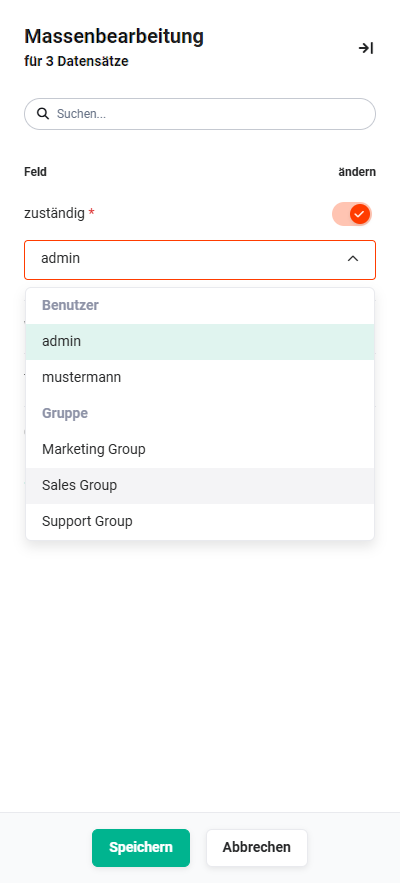 Example: field "responsible" was selected for bulk edit
After entering or selecting the new field value and clicking the "Save" button, the sidebar is hidden and the bulk edit is executed.
For fields of type "Number", "Percent" or "Currency", it is possible to work with relative calculations during bulk edit.
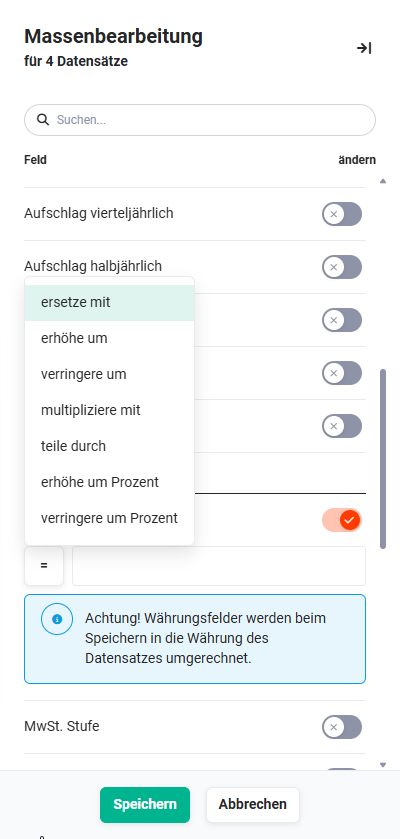 Bulk edit sidebar – relative calculations
The following calculation types are available:
- direct entry
- replace with
- increase by
- decrease by
- multiply by
- divide by
- increase by percent
- decrease by percent
When saving, currency fields are converted into the record's currency.
By clicking the "Cancel" button, the process can be cancelled before the bulk edit is executed.
2.1.3. Bulk tagging
For the records selected via checkbox, tags can be assigned simultaneously by means of bulk tagging.
After clicking the "Bulk tagging" action, the "Tag entries" popup window is displayed.
 "Tag entries" popup
In the "Tag entries" popup window, either an existing tag can be selected, or a new tag can be assigned.
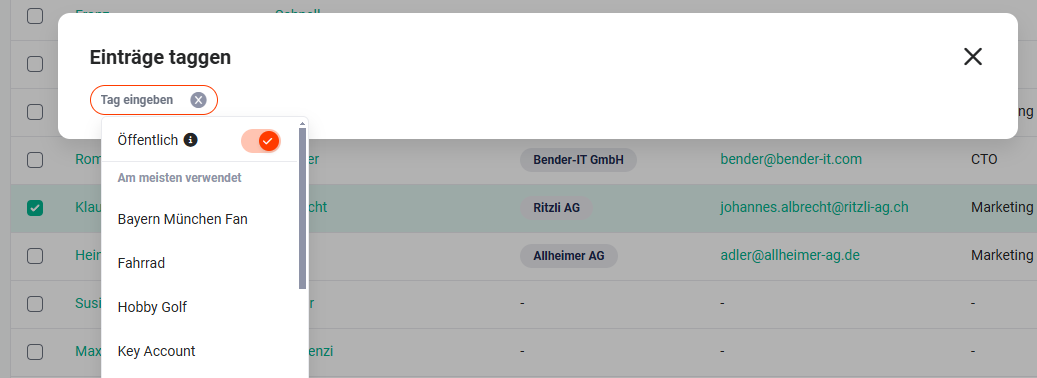 "Tag entries" popup with tags
Using the toggle at "Public", you can set whether a new tag is public or private.
For further information on the topic of "Tags", see the section Tags (List View) and Global Settings - Basic Setup - Managing tags.
2.1.4. Find duplicates
It can happen that "identical" records exist multiple times in brainX. Reasons for this are, e.g., repeated manual creation of contacts, organizations, leads etc. by users, or also through a CSV import.
Duplicates can be merged either through manual selection (checkbox in the list view) and the action Merge duplicates, or through the "Find duplicates" action.
To be able to find and merge records that exist multiple times, the "Find duplicates" function is used.
Records do not need to be selected via checkbox in the list view when using the "Find duplicates" action. A search generally takes place across all existing records in the module. A search is also independent of whether the action was selected in a custom list view or in the "All" view.
If a user does not have the right to delete the relevant records, the duplicates are indeed displayed, but when attempting to merge them, the note "You do not have the rights to perform this operation!" appears.
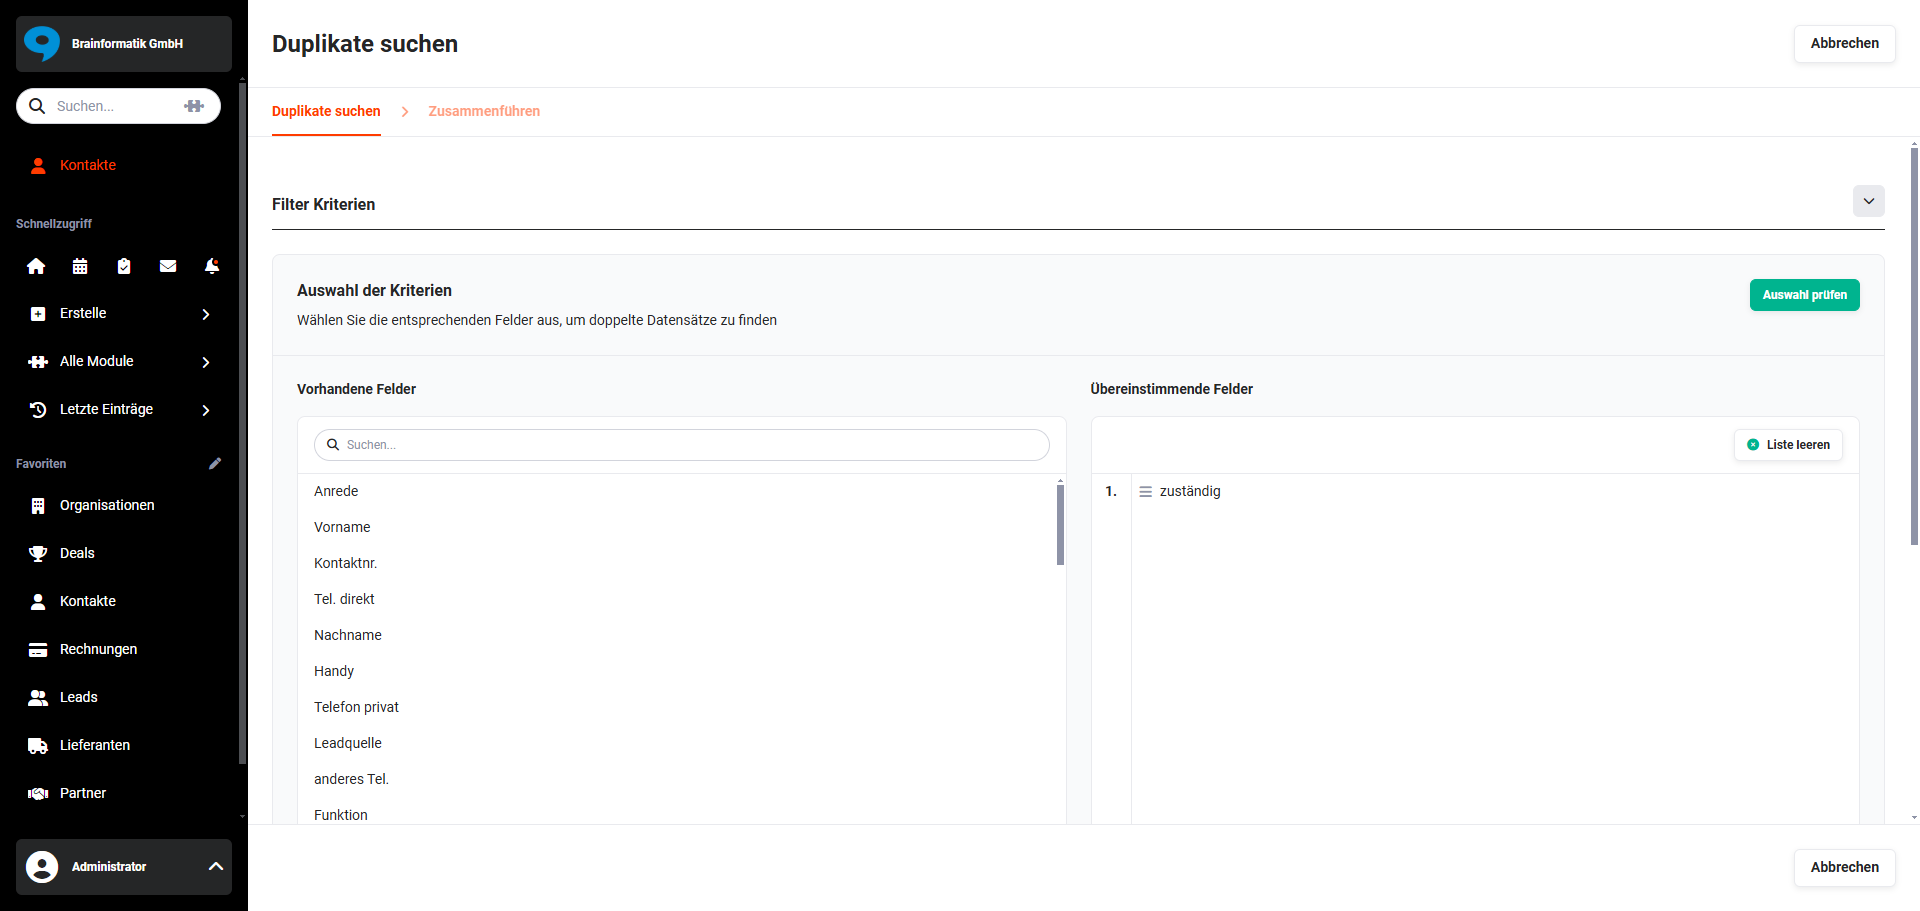 Find duplicates – selecting the filter criteria
In the following screenshots, the process of merging duplicates is explained using the filter criteria "Last name" and "First name" in the Contacts module.
In the left area "Available fields", the fields "Last name" and "First name" were selected by clicking.
Fields that have already been selected can be removed either individually (action "Remove" on mouseover of the field) or entirely by means of the "Clear list" button.
By means of drag & drop – if several fields were selected – they can be sorted in order to change the prioritisation of the fields when searching for duplicates.
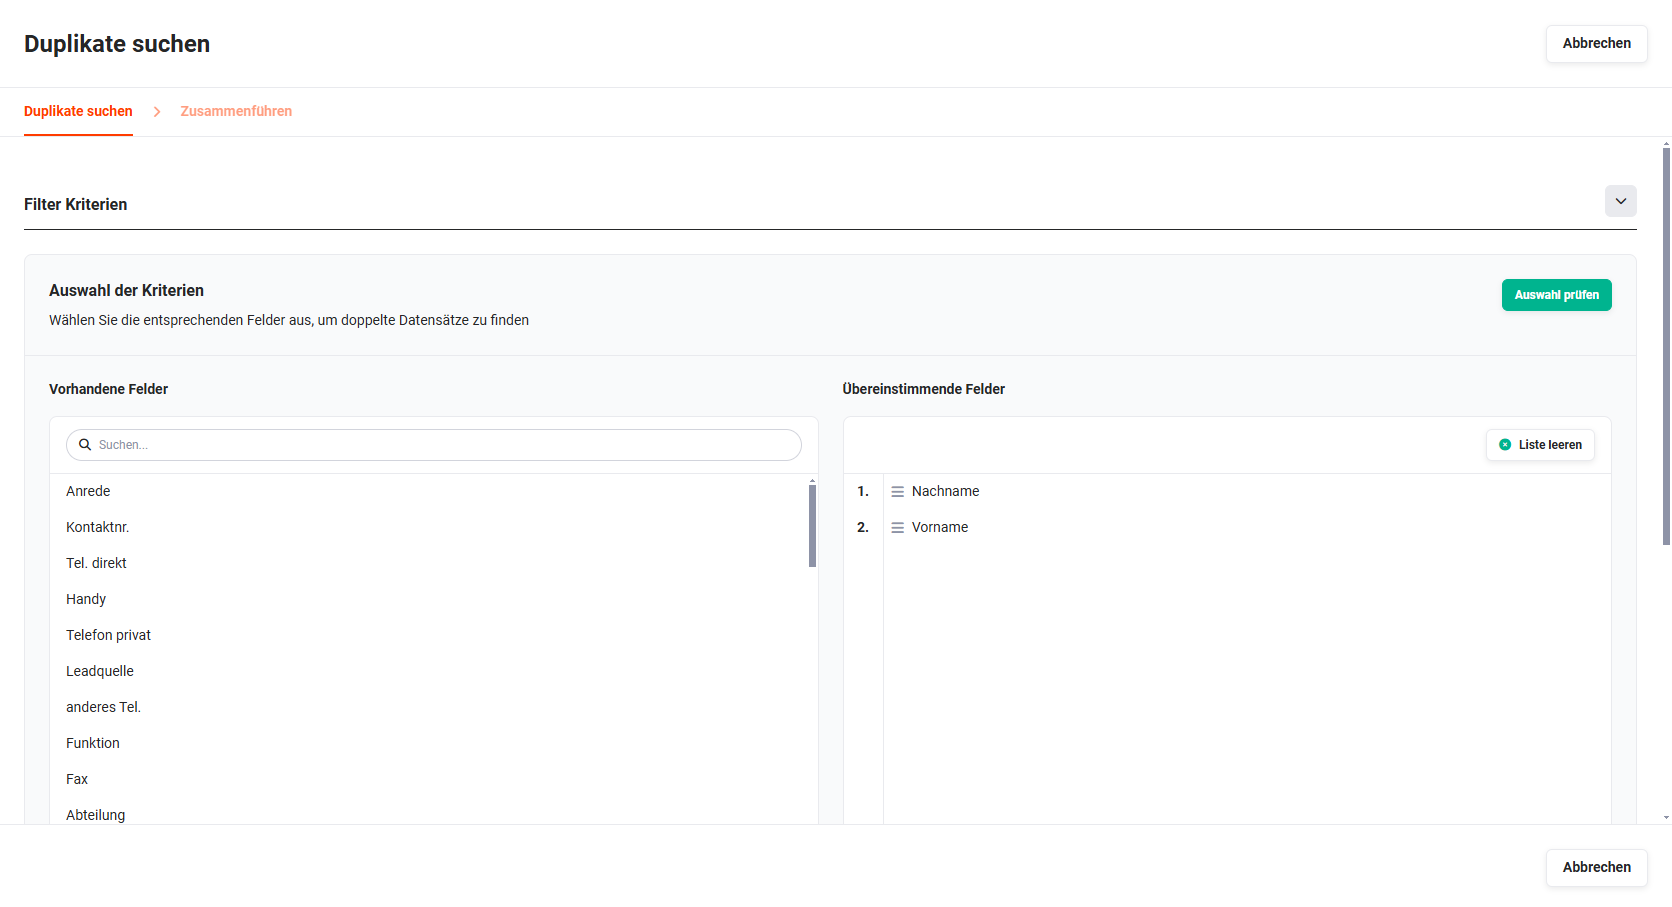 Find duplicates – selecting the criteria (fields)
After clicking the "Check selection" button, the search for duplicates is executed and the found duplicates are displayed.
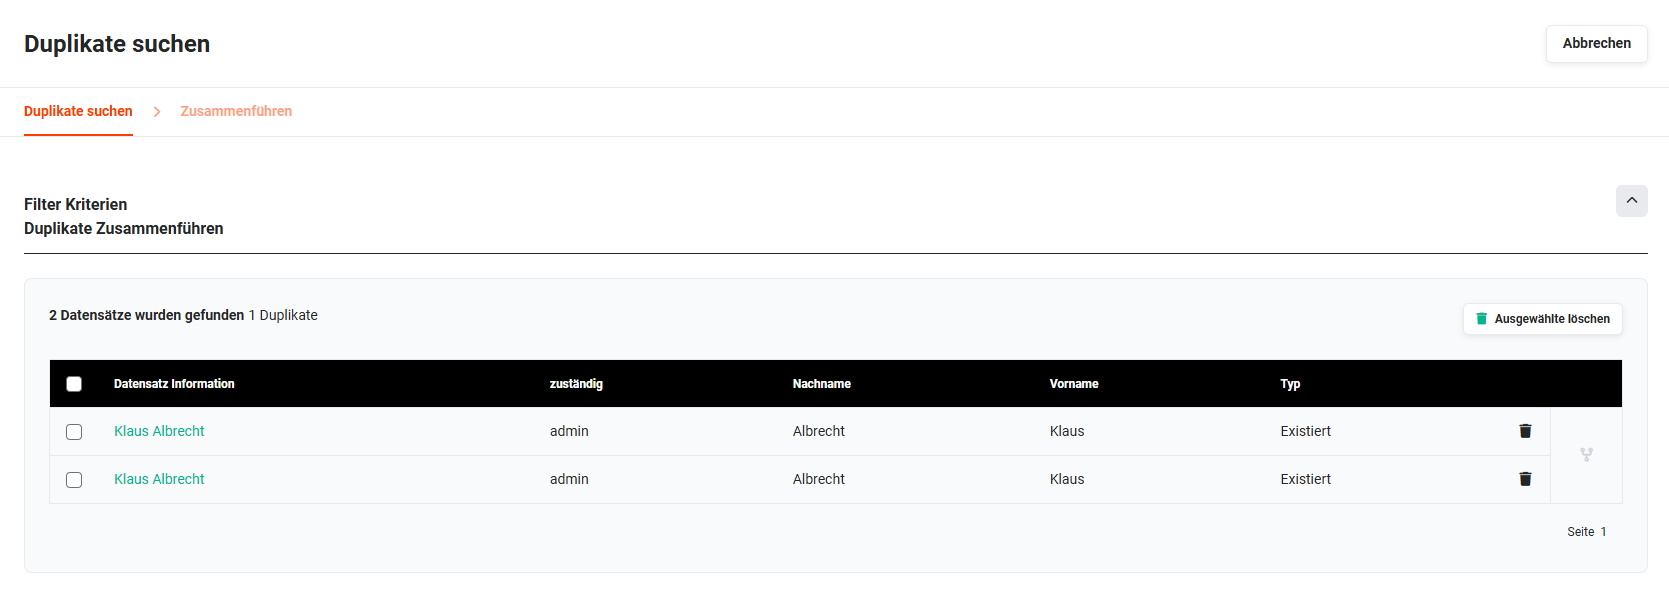 Find duplicates – search result
The records that are to be merged must now be marked via checkbox. After clicking the actions icon "Merge selected" (icon "code fork"), the "Merge" step is displayed, in which it is determined which field values are to be adopted from which record.
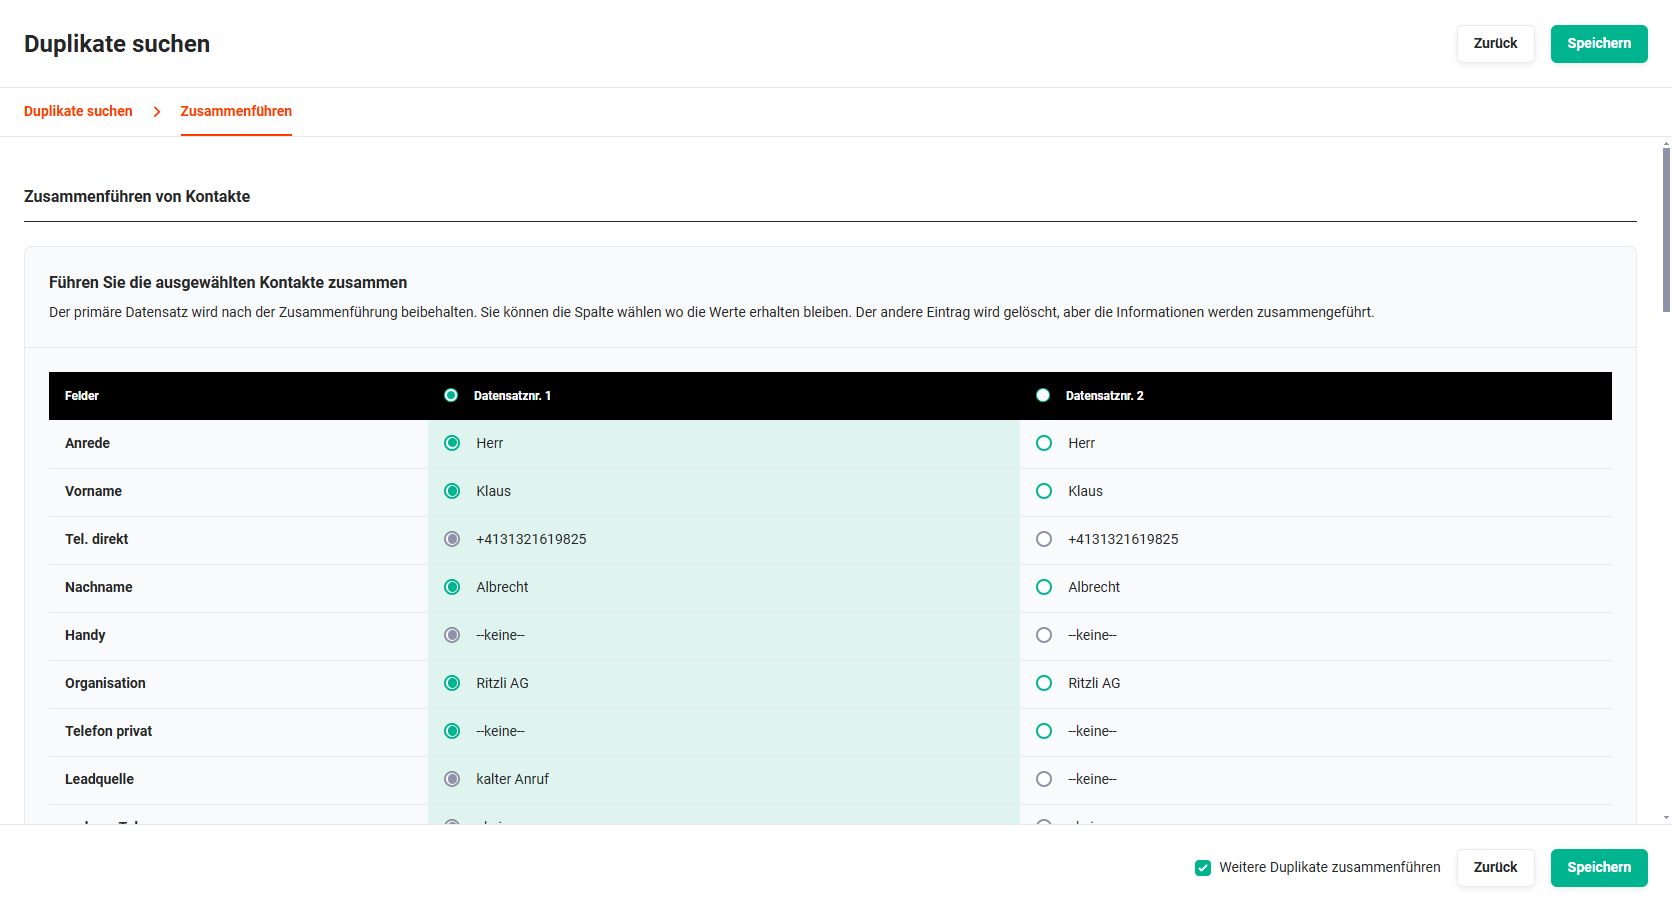 Merge duplicates
After clicking the "Save" button, the merging of the duplicates is executed.
The primary record is retained after the merge. You can choose the column whose values are to be retained. The other record is deleted and the information is merged.
If several records are combined into one record by means of "Merge duplicates", all references are retained!
2.1.5. Bulk subscribe
To be informed about changes to records that are made by other users, there is the "Subscribe" functionality.
There are two options for subscribing to a record:
- Actions icon Subscribe in the detail view of a record. For detailed information on this, see the section Actions (Detail View) - Subscribe.
- "Bulk subscribe" action in the list view of a record
By means of the "Bulk subscribe" action in the list view, one or several records can be subscribed to simultaneously.
After clicking the "Bulk subscribe" action, the "Notification options" popup window opens.
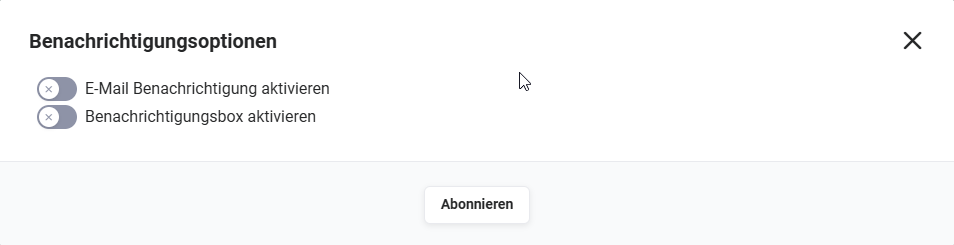 Subscribe – notification options
In the "Notification options" popup window, you can select the manner in which the notification is to take place:
- Activate email notification → When changes are made to records, a corresponding email is sent by brainX (note: In Global Settings - Company information the Central mail server must be configured).
- Activate notification box → When changes are made to records, this is displayed in the Notifications.
After clicking the "Subscribe" button, the selected records are subscribed to. A corresponding confirmation is displayed at the bottom left in brainX.

2.1.6. End subscription
With this action, existing subscriptions of records are ended. The user then no longer receives corresponding notifications when records are changed.
If records that were not previously subscribed to are accidentally selected for the "End subscription" action, this has no effect on those records.
2.1.7. PDF export
For a PDF export to be executed, it is necessary that the background task "PDF export" has the status "active".
For the records selected via checkbox, PDF files can be generated – based on a selectable template from the Templates module.
After selecting the records and clicking the "PDF export" action, the "PDF export" popup window opens.
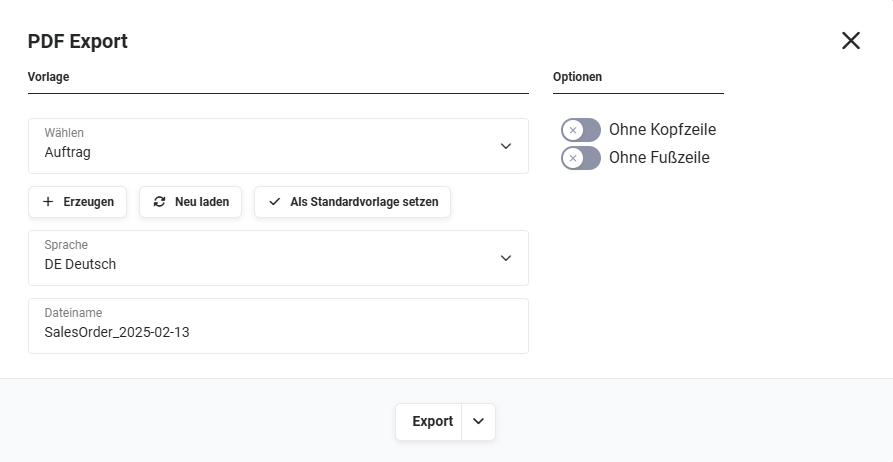 "PDF export" popup
The popup window is divided into the areas "Template" and "Options".
Template
The following fields/functionalities are available:
-
Select → picklist of the PDF templates available for the module
If no PDF templates yet exist for a module, a corresponding note is displayed.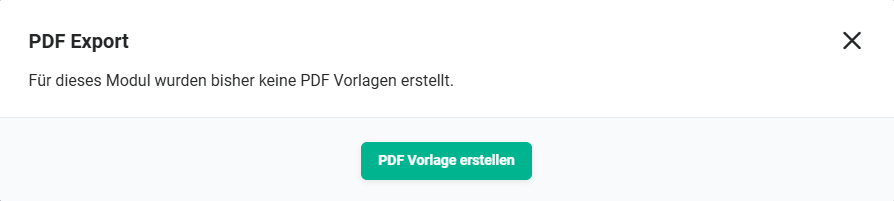 "PDF export" popup – note no PDF templates available
Note: If records of several clients are selected, only PDF templates without a client restriction are offered in the "Select" picklist. A corresponding note is displayed in the "PDF export" popup. Modules without a client field are not affected by this restriction.
-
"Generate" button → the create view of a new PDF template is called up in the Templates module
-
"Reload" button → the selected template is reloaded
-
"Set as default template" button → the selected template is set as the default template
-
Language → picklist of the language used
-
File name → file name(s) of the generated PDF file, can also be changed manually
Options
The following fields/functionalities are available:
- Without header → toggle to set whether the PDF file is to be exported with/without a header
- Without footer → toggle to set whether the PDF file is to be exported with/without a footer
In the next step, the export type is determined. After clicking the "Export" button, a flyout menu opens with the actions for the export type:
- Standard → normal export, which produces a file with all exports as a result
- Export with reference → like the normal export, but with a reference of the individual exports to the records
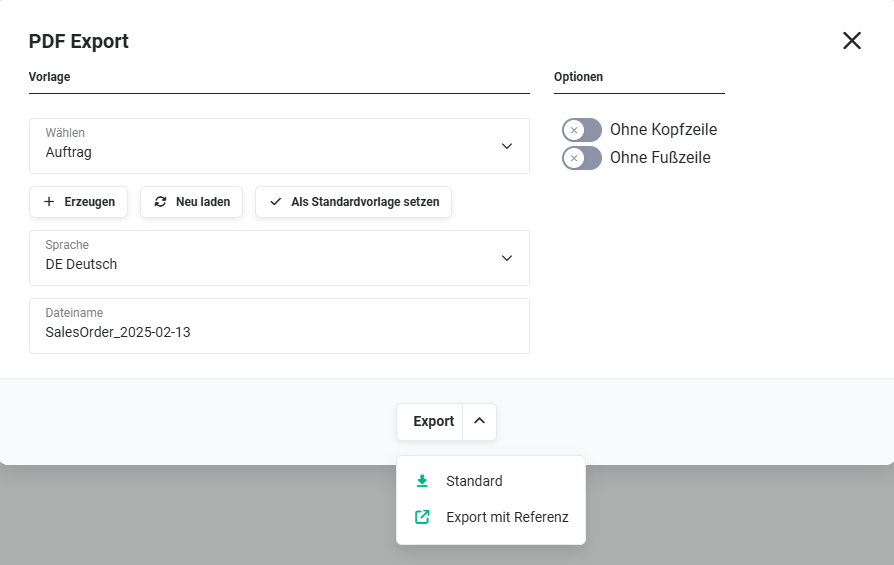 "PDF export" popup – selecting the export type
After the PDF export is started, a corresponding note is displayed.
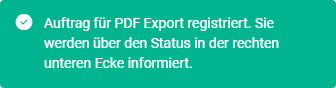 Note PDF export registered
The user can find out about the status by clicking the icon at the bottom right. Once the generation of the PDF file is complete, this is likewise displayed in the "Export PDF" note window.
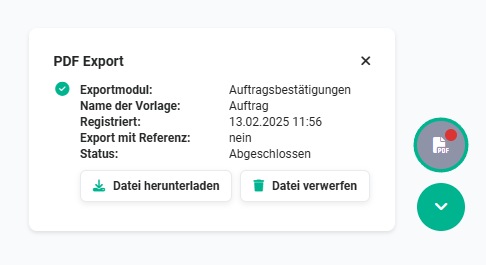 PDF export – popup note
In addition to the information on the PDF export, two further buttons are available:
- Download file → the PDF file is downloaded and is located in the browser's download folder
- Discard file → the PDF file is discarded/deleted
For further information on the topic of "PDF templates", see the section Module Templates - PDF templates.
2.1.8. Merge duplicates
The records selected via checkbox can be merged in the displayed popup after selecting the respective values that are to be retained.
The "Merge duplicates" function is described in detail in the section Find duplicates.
2.1.9. Send email
An email can be sent to the records selected via checkbox, to the email addresses stored in the records.
The function is described in detail in the section Module Emails.
2.1.10. CSV import
For a CSV import to be executed, the background task "CSV/ICS import" must be active. This background task checks at regular intervals whether new imports are pending and then executes them.
Whether a user is allowed to perform a CSV import, i.e. whether the "CSV import" action is available for the user in the list view, can be configured individually for each module via the profile settings.
For the import, it is important that the user executing the action has the necessary rights. With active rights management (e.g. modules are private, functions deactivated), it must be ensured that the target module is active for the user and that the function for importing data from CSV files is activated.
In principle, a user can import records for any users and groups. It should be noted here that, due to the rights settings, not all records may be displayed after the import and are also not taken into account in the manual search for duplicates.
The function is described in detail in the section Importing, exporting and updating data - CSV import.
2.1.11. CSV export
For the CSV export – in contrast to the CSV import or CSV update – no separate background task needs to be activated, since a CSV export is executed "immediately" and not on a scheduled basis.
Whether a user is allowed to perform a CSV export, i.e. whether the "CSV export" action is available for the user in the list view, can be configured individually for each module via the profile settings.
The function is described in detail in the section Importing, exporting and updating data - CSV export.
2.1.12. CSV update
For a CSV update to be executed, the background task "CSV update" must be active. This background task checks at regular intervals whether new imports are pending and then executes them.
Whether a user is allowed to perform a CSV update, i.e. whether the "CSV update" action is available for the user in the list view, can be configured individually for each module via the profile settings.
The function is described in detail in the section Importing, exporting and updating data - CSV update.
3. Module-specific actions
In brainX there are module-specific actions that are only present in certain modules or due to integrations.
Overview of all module-specific actions available in brainX:
| Action | Functionality |
|---|---|
| Create Google Maps route plan | Creation of Google Maps routes.Action available in the modules Leads, Contacts, Organizations and Partner.The function is described in detail in the section Create Google Maps route plan. |
| Determine geodata | Determination of geodata.Action available in the modules Leads, Contacts, Organizations and Partner.The function is described in detail in the section Determine geodata. |
| Migrate to Wiki article | The selected records are converted into Wiki articles.Action available in the Documents module.The function is described in detail in the section Migrate to Wiki article. |
| move document(s) | The selected documents can be moved into another directory.Action available in the Documents module.The function is described in detail in the section move document(s)). |
| Manage directories | Both new directories can be created and existing directories can be edited.Action available in the Documents module.The function is described in detail in the section Manage directories. |
| DATEV export | "DATEV export" is the simplest form of data transfer to DATEV. The export generates a zip file (compressed file), which must be transferred separately to DATEV.Action available in the modules Incoming Invoices, Credits, Invoices and Cancellations.The function is described in detail in the section DATEV export. |
| DATEV Rechnungsdatenservice 1.0 | By means of the "DATEV Rechnungsdatenservice 1.0" action, general ledger accounts and cost centres can also be transferred to DATEV – in addition to the functionalities of the "DATEV export" action.Action available in the modules Incoming Invoices, Credits, Invoices and Cancellations.The function is described in detail in the section DATEV Rechnungsdatenservice 1.0. |
| DATEV Buchungsdatenservice | The "DATEV Buchungsdatenservice" action transfers complete accounting entries/batches directly into the DATEV data centre.Action available in the modules Incoming Invoices, Credits, Invoices and Cancellations.The function is described in detail in the section DATEV Buchungsdatenservice. |
| DATEV Buchungsdatenexport | The "DATEV Buchungsdatenexport" action generates a zip file, which can then be used in accounting software – or transmitted to the tax advisor.Action available in the modules Incoming Invoices, Credits, Invoices and Cancellations.The function is described in detail in the section DATEV Buchungsdatenexport. |
| Manage fonts | By means of this action, fonts can be managed.Action available in the Templates module.The function is described in detail in the section Manage fonts. |
| Add header template | By means of this action, a template of the global header can be created or edited.Action available in the Templates module.The function is described in detail in the section Add header template. |
| Add footer template | By means of this action, a template of the global footer can be created or edited.Action available in the Templates module.The function is described in detail in the section Add footer template. |
| Import template | By means of this action, templates can be imported into brainX.Action available in the Templates module.The function is described in detail in the section Import template. |
| Restore | The selected records are restored. The deletion process can thus be undone.Action available in the Recycle Bin module.The function is described in detail in the section Restore. |
| Delete selected records | The selected records are permanently deleted from brainX.Action available in the Recycle Bin module.The function is described in detail in the section Delete selected records. |
| Delete module records | All records of the selected module are permanently deleted from brainX.Action available in the Recycle Bin module.The function is described in detail in the section Delete module records. |
| Empty entire recycle bin | All records in the Recycle Bin module are permanently deleted from brainX.Action available in the Recycle Bin module.The function is described in detail in the section Empty entire recycle bin. |
| Bulk resolve | For the selected records, synchronisation conflicts can be resolved.Action available in the Sync Conflicts module.The function is described in detail in the section Bulk resolve. |
| ICS import | New appointments and tasks can be imported into brainX by means of ICS import (ICS file).Action available in the modules Appointments and Tasks.The function is described in detail in the section ICS import. |
| ICS export | Appointments and tasks can be exported from brainX by means of ICS export (ICS file).Action available in the modules Appointments and Tasks.The function is described in detail in the section ICS export. |
| Export ZUGFeRD/X-Rechnung | Selected records can be exported as a ZUGFeRD/X-Rechnung document.Action available in the modules Invoices, Cancellations and Credits.The function is described in detail in the section Export ZUGFeRD/XRechnung. |
| Export to time tracking system | Selected records can be exported into a time tracking system.Action available in the modules Services, Organizations (or Contacts), Projects and Timesheets.The function is described in detail in the section Export to time tracking system. |
| Convert lead | By means of the "Convert lead" action in the Leads module, a record can be "converted". Converting means that the lead's record is deleted and a new record is automatically created in the Contacts module.Optionally, additional records can also be created in the modules Organizations, Partner, Deals, Appointments and Tasks.The function is described in detail in the section Convert lead. |
3.1. Functionalities of the module-specific actions
Which module-specific actions are available in which modules is described in the respective sections of the [Modules]().
3.1.1. Create Google Maps route plan
For the records selected via checkbox, a route plan can be created by means of the "Create Google Maps route plan" action.
To be able to use the "Create Google Maps route plan" action, coordinates in the form of longitude and latitude are required. For this data to be collected in brainX, the following settings must be made:
- Global Settings - Additional functions - Geodata determination: The Google Maps Geocoding API key and the Google Maps JavaScript API Key must be stored so that the determination of geodata is possible in principle.
- Global Settings - System Automation - Background tasks: The background task "Geodata determination" must be active. By means of this background task, the cyclic collection of longitude and latitude is carried out.
For brainX in-house installations, which may only have an intranet connection, it must be ensured that brainX also has access to the internet, so that the "Create Google Maps route plan" functionality can be used.
After selecting records via checkbox and clicking the "Create Google Maps route plan" action, the navigation overview appears as follows:
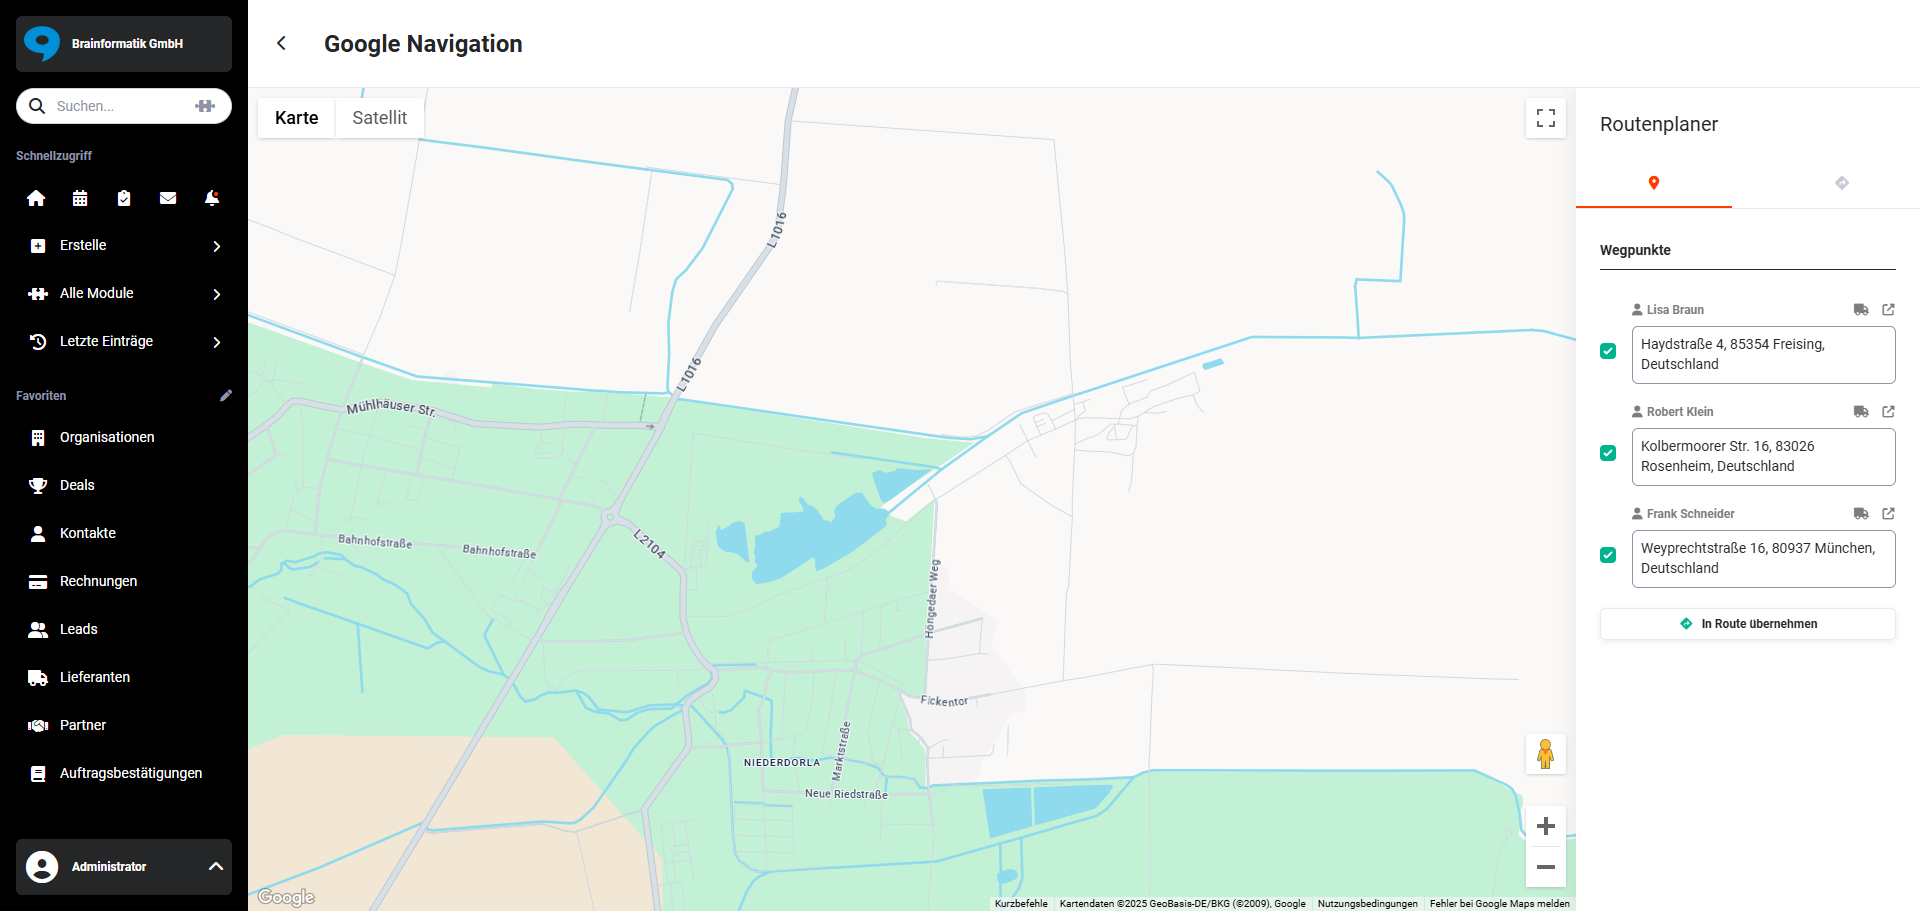 Google Navigation
In the right-hand area "Route planner", the waypoints can now be selected.
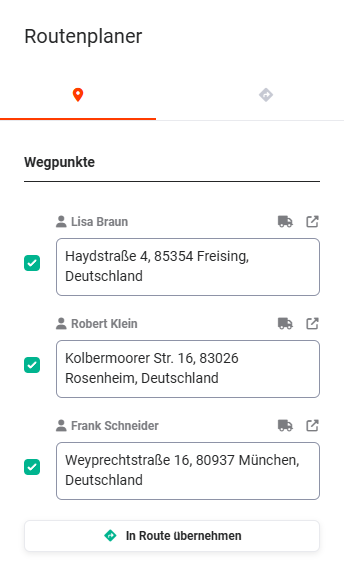 Google Navigation – route planner
After clicking the "Add to route" button, these are adopted.
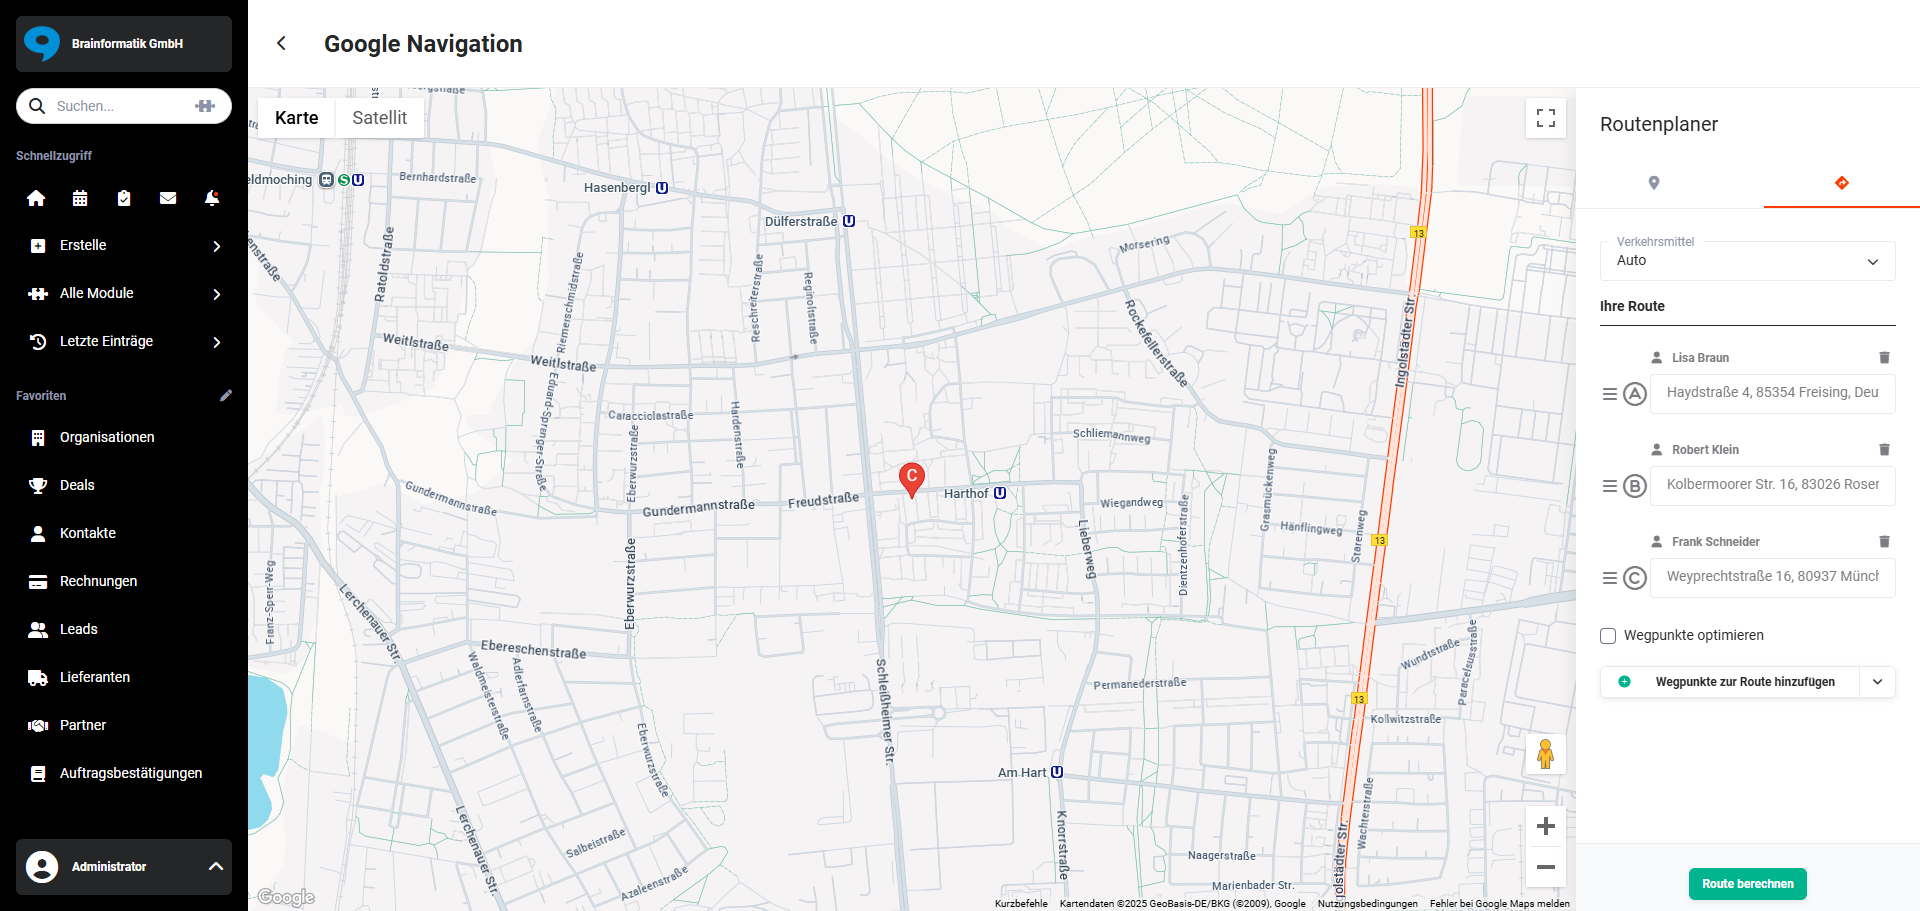 Google Navigation – route planner with route
By means of the "Add waypoints to route" button, e.g. a "starting point" of the route, or also further waypoints (addresses), can be added.
All available addresses (waypoints) are displayed as markers on the map.
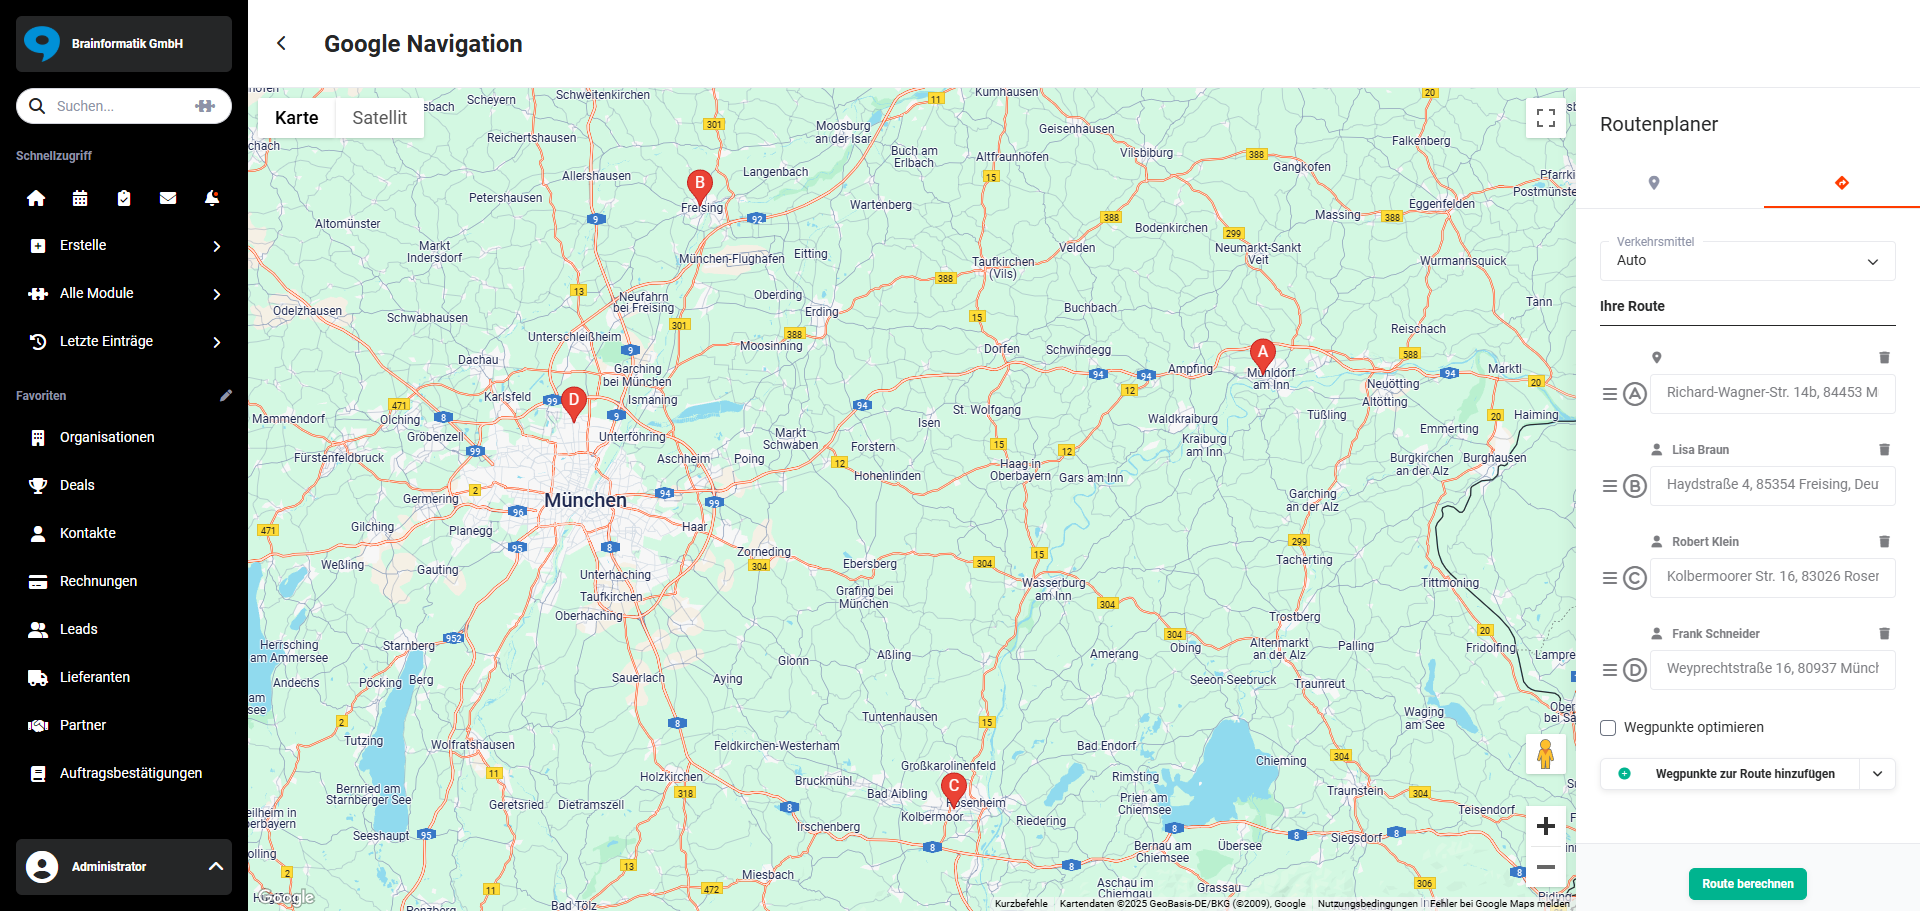 Google Navigation – route planner with waypoints
Addresses in the "Your route" area can be reordered by means of drag & drop.
The "Waypoint optimisation" checkbox is a Google Maps functionality that, when calculating the route, does not take into account the entered order of the addresses, but instead optimises the route with regard to the shortest distance.
By means of the "Map" and "Satellite" buttons located on the map, you can switch between the views of a normal road map and a satellite view.
In the top right corner of the map is the "square" icon, by which the full-screen view of the map can be switched on/off.
In the bottom right corner of the map are the "plus" and "minus" icons, by which the map can be enlarged/reduced.
After clicking the "Calculate route" button, this is calculated and displayed.
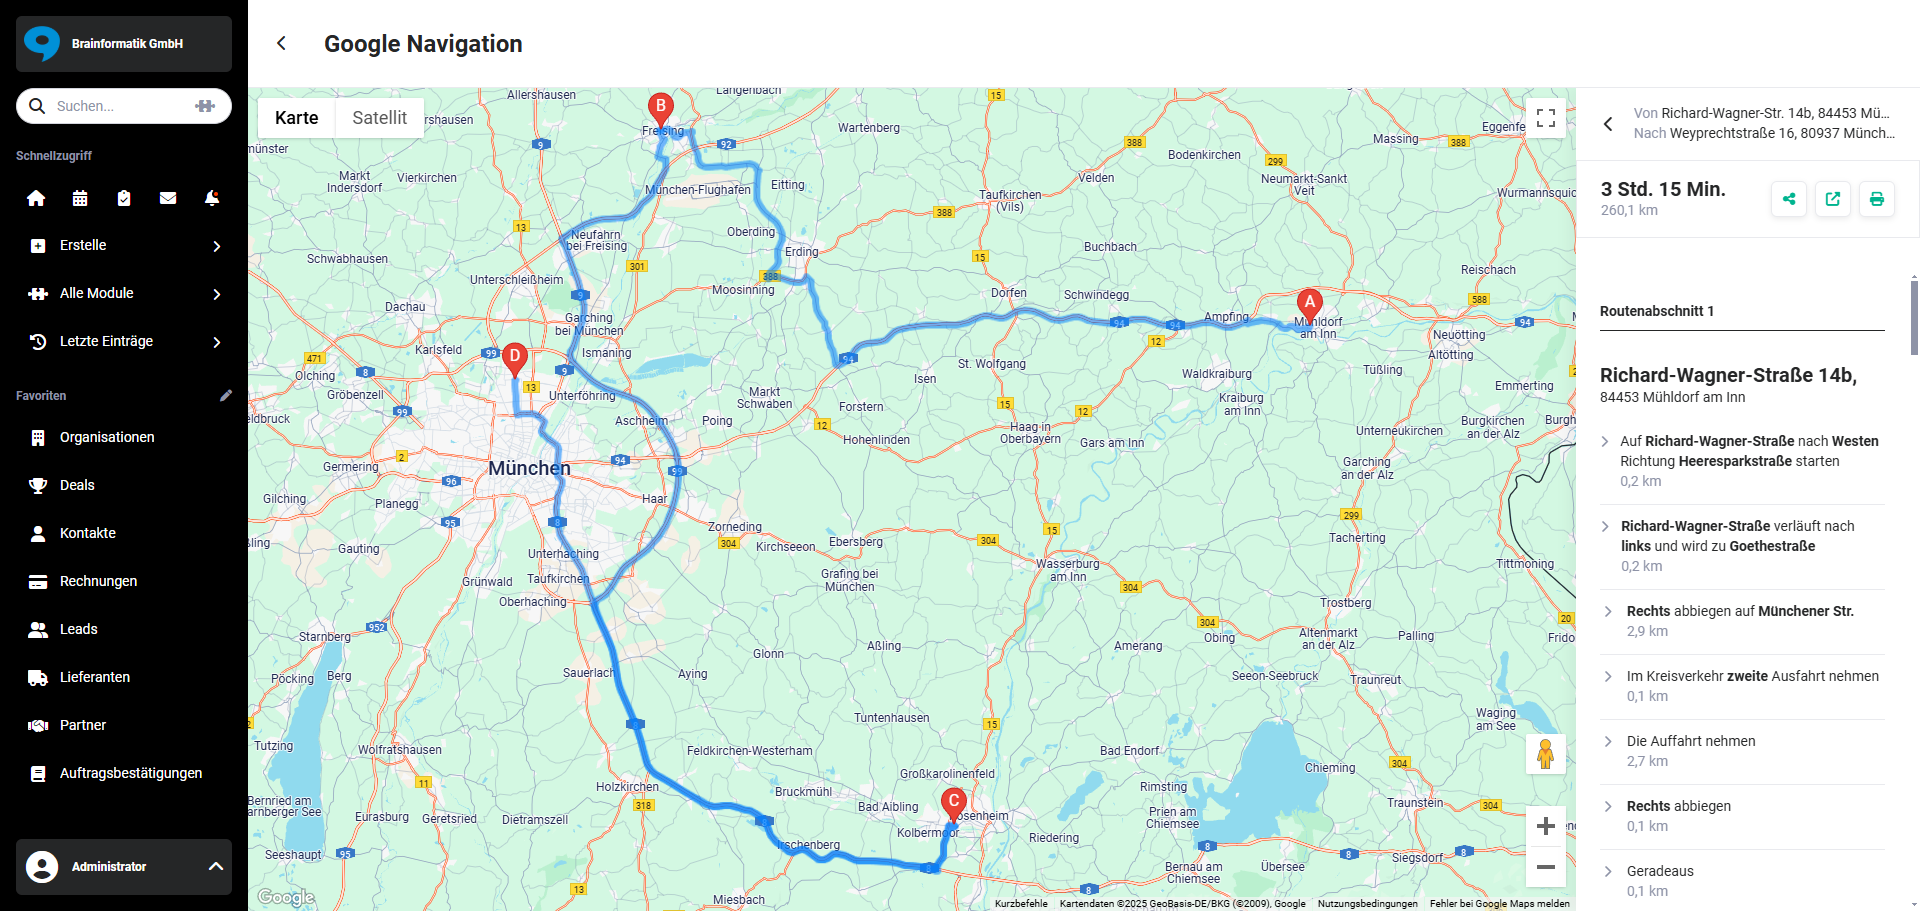 Google Navigation – route planner
In the top right area, in addition to the estimated travel time and the distance in km, the following action buttons are displayed:
- Share → opens a popup in which the route can be shared (e.g. by email, Outlook, MS Teams, WhatsApp, etc.)
- Open record in new tab → opens Google Maps in a new browser tab
- Print → the operating system's print dialogue opens
3.1.2. Determine geodata
To be able to use the "Determine geodata" action, the Google Maps Geocoding API key and the Google Maps JavaScript API Key must be stored in Global Settings - Additional functions - Geodata determination.
For brainX in-house installations, which may only have an intranet connection, it must be ensured that brainX also has access to the internet, so that the "Determine geodata" functionality can be used.
After selecting records via checkbox and clicking the "Determine geodata" action, the geodata for the selected records is determined immediately, without first waiting for the execution of the background task "Geodata determination".
3.1.3. Migrate to Wiki article
All records marked via checkbox can be converted into a record in the Wiki module by means of the "Migrate to Wiki article" action.
After clicking the action, a note popup with the text "If you continue, the document will be irreversibly converted into a Wiki article. Do you want to continue?" is displayed. If the dialogue is confirmed, the selected records are deleted in the Documents module and a new record is created in each case in the Wiki module. Any existing file attachments are adopted.
3.1.4. move document(s)
All records marked via checkbox can be moved into another directory by means of the "move document(s)" action.
After clicking the action, the "Select target directory" popup is displayed, in which the directory into which the document is to be moved can be selected.
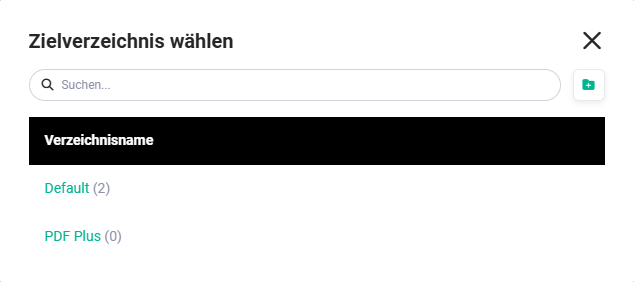 "Select target directory" popup
3.1.5. Manage directories
By means of the "Manage directories" action, new directories (folders) can be created, and existing directories can be renamed or deleted.
After clicking the action, the "Directories" popup is displayed. After clicking the actions icon "three dots", a flyout menu is displayed, in which the actions "Rename directory" and "Delete directory" are displayed.
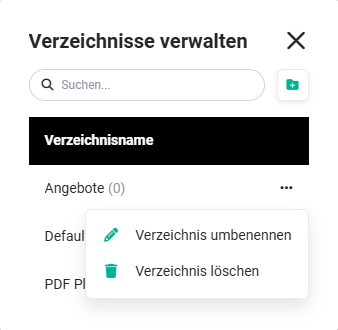 "Manage directories" popup
3.1.6. DATEV export
"DATEV export" is the simplest form of data transfer to DATEV. The export generates a zip file (compressed file), which must be transferred separately to DATEV.
The transfer of the documents must be carried out separately by means of the "DATEV Belegtransfer" program.
The "DATEV Belegtransfer" program can only be installed on a Windows PC!
For further information on the "DATEV Belegtransfer" program, please contact DATEV or your tax advisor directly.
The detailed procedure of the "DATEV export" function as well as further information are available in the section DATEV Rechnungsdatenservice 1.0.
3.1.7. DATEV Rechnungsdatenservice 1.0
By means of the "DATEV Rechnungsdatenservice 1.0" action, general ledger accounts and cost centres can also be transferred to DATEV – in addition to the functionalities of the DATEV export action.
The detailed procedure of the "DATEV Rechnungsdatenservice 1.0" function as well as further information are available in the section DATEV Rechnungsdatenservice 1.0.
3.1.8. DATEV Buchungsdatenservice
The "DATEV Buchungsdatenservice" action transfers data directly into the DATEV data centre. Before the transfer, the data is checked for correctness and, optionally, a preview of the accounting data to be transferred is displayed. With "a single click", the data can thus be transferred to DATEV and you receive a notification about the successful transfer.
The detailed procedure of the "DATEV Buchungsdatenservice" function as well as further information are available in the section DATEV Buchungsdatenservice.
3.1.9. DATEV Buchungsdatenexport
The "DATEV Buchungsdatenexport" action, in contrast to the DATEV Buchungsdatenservice action, generates only a zip file, which can then be used in accounting software or transmitted to the tax advisor.
The detailed procedure of the "DATEV Buchungsdatenexport" function as well as further information are available in the section DATEV Buchungsdatenservice.
3.1.10. Set status "paid"
The status "paid" of records in the modules Incoming Invoices, Credits and Invoices can be changed by means of quick edit in the list view.
3.1.11. Manage fonts
To be able to use any fonts for creating templates and for the PDF export of records, a font management was integrated into the Templates module.
This makes it very easy to store new fonts for the PDF export. The fonts managed here relate only to PDF templates in the Templates module and do not affect the rest of the CRM system.
The detailed procedure of the "Add header template" function as well as further information are available in the section Templates - Manage fonts.
3.1.12. Add header template
By means of this action, a template of the global header can be created or edited.
The action is only available in the Templates module.
The detailed procedure of the "Add header template" function as well as further information are available in the section Templates - Header templates.
3.1.13. Add footer template
By means of this action, a template of the global footer can be created or edited.
The action is only available in the Templates module.
The detailed procedure of the "Add footer template" function as well as further information are available in the section Templates - Footer templates.
3.1.14. Import template
By means of this action, templates can be imported into brainX.
The action is only available in the Templates module.
The detailed procedure of the "Import template" function as well as further information are available in the section Templates - Import template.
3.1.15. Restore
The selected records are restored. The deletion process can thus be undone.
The action is only available in the Recycle Bin module.
The detailed procedure of the "Restore" function as well as further information are available in the section Module Recycle Bin - Actions.
3.1.16. Delete selected records
The selected records are permanently deleted from brainX.
The action is only available in the Recycle Bin module.
The detailed procedure of the "Delete selected records" function as well as further information are available in the section Module Recycle Bin - Actions.
3.1.17. Delete module records
All records of the selected module are permanently deleted from brainX.
The action is only available in the Recycle Bin module.
The detailed procedure of the "Delete module records" function as well as further information are available in the section Module Recycle Bin - Actions.
3.1.18. Empty entire recycle bin
All records in the Recycle Bin module are permanently deleted from brainX.
The action is only available in the Recycle Bin module.
The detailed procedure of the "Empty entire recycle bin" function as well as further information are available in the section Module Recycle Bin - Actions.
3.1.19. Bulk resolve
For the selected records, synchronisation conflicts can be resolved. Missing values in the mandatory fields can be added accordingly and the conflicts resolved.
The action is only available in the Sync Conflicts module.
3.1.20. ICS import
New appointments and tasks can be imported into brainX by means of ICS import (ICS file).
After clicking the "ICS import" action, the "Import appointments" or "Import tasks" popup opens.
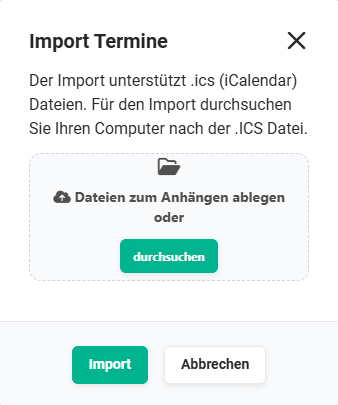 "Import appointments" popup
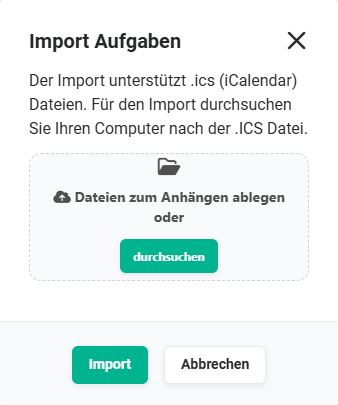 "Import tasks" popup
The action is only available in the modules Appointments and Tasks.
3.1.21. ICS export
Appointments and tasks can be exported from the CRM by means of ICS export (ICS file).
After clicking the "ICS export" action, the "Export appointments" or "Export tasks" popup opens.
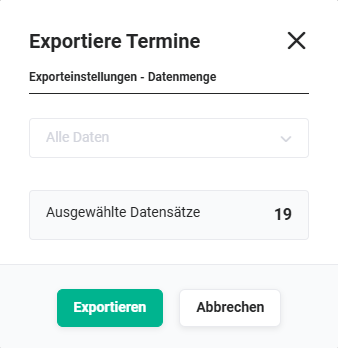 "Export appointments" popup
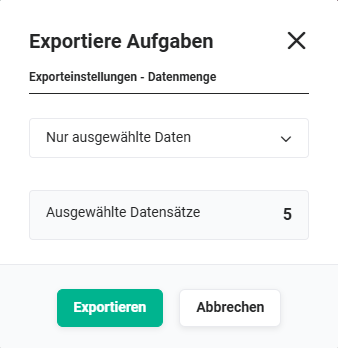 "Export tasks" popup
The action is only available in the modules Appointments and Tasks.
3.1.22. Export ZUGFeRD/X-Rechnung
ZUGFeRD is a cross-industry data format for the electronic exchange of invoice data.
The XRechnung is a data exchange standard for electronic invoices, developed and provided by the "Coordination Office for IT Standards" (KoSIT). The XRechnung is a purely structured data format, i.e. the contents of an invoice are specified and can be automatically processed electronically further.
The export as a ZUGFeRD document requires a corresponding PDF template, which must be present in the Templates module.
In contrast to the ZUGFeRD export, the XRechnung export does not require a special template, since only an XML file is created there.
The records selected via checkbox are exported as a ZUGFeRD document or XRechnung export.
The action is only available in the modules Invoices, Cancellations and Credits.
The detailed procedure of the "Export ZUGFeRD/X-Rechnung" function as well as further information are available in the section Global Settings - Additional functions - ZUGFeRD.
3.1.23. Export to time tracking system
The time tracking functionality was designed in such a way that, in principle, several providers of time tracking software can be implemented.
Currently, however, only the provider "Clockodo" is available in the selection of providers. A prerequisite for using the "Export to time tracking system" action is an active account with Clockodo.
The records selected via checkbox can be exported/synchronised to Clockodo with the "Export to time tracking system" action.
For projects, a referenced record from the "related to" field (e.g. organization) is likewise synchronised!
After a successful export – or a synchronisation – a corresponding note message "Record exported" is displayed at the bottom left in brainX.
Should synchronisation problems occur due to missing values in mandatory fields, these are listed in the Sync Conflicts module.
The action is only available in the modules Services, Organizations (or Contacts), Projects and Timesheets.
The detailed procedure of the "Export to time tracking system" function as well as further information are available in the section Global Settings - Additional functions - Time tracking.
3.1.24. Convert lead
By means of the "Convert lead" action in the Leads module, a record can be "converted". Converting means that the lead's record is deleted and a new record is automatically created in the Contacts module.
Optionally, additional records can also be created in the modules Organizations, Partner, Deals, Appointments and Tasks.
In Global Settings - Edit layout - Fields - Edit properties - Tab Transfer field values, a fundamental configuration of the transfer of field values can be made.
The detailed procedure of the "Convert lead" function as well as further information are available in the section Leads module - Convert lead action.