
Automations - Actions
Package: BASIC
1. Configure Action
Actions determine what should happen when an event occurs and any prerequisites are met.
For each action, the user to be used for execution can be specified.
After clicking an action in the editor, the "Action" sidebar opens.
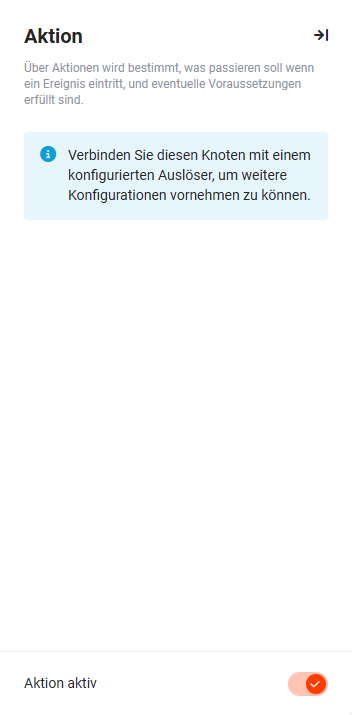 Action sidebar
An action can only be configured if it is connected to an already configured trigger or an already configured condition!
After double-clicking on an action in the editor – alternatively via the action "Edit" in the action's sidebar – the popup "Action" opens.
In the popup "Action", all available actions are displayed as tiles (incl. brief description). To find a desired action more quickly, the popup is divided into three tabs:
- All → Display of all available actions
- Record-related → Display of record-related actions
- Messages → Display of actions that send messages or display information
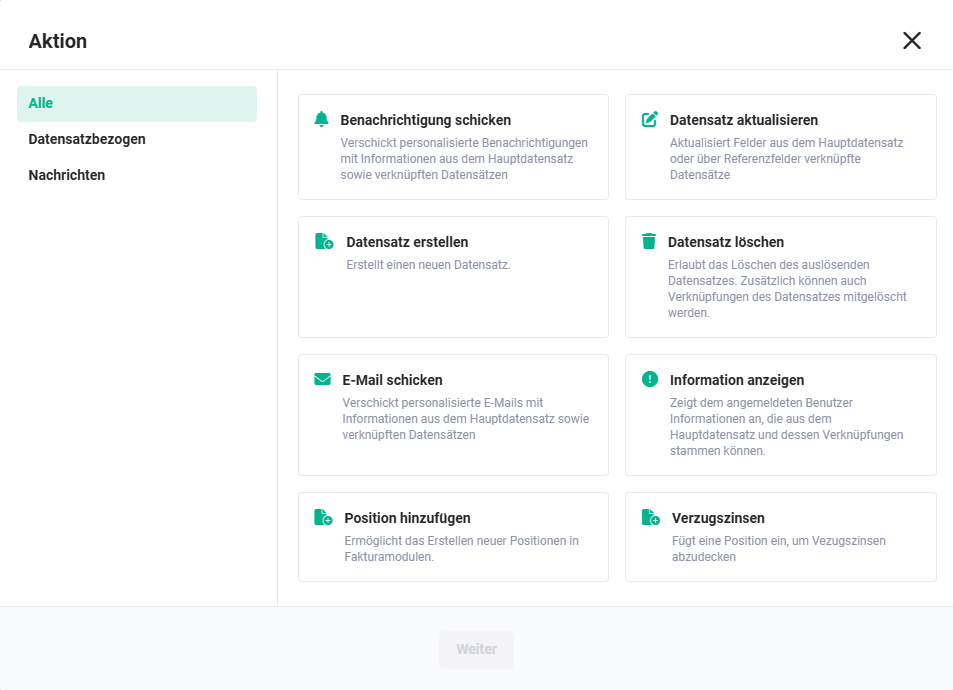 Popup Action - Tab "All"
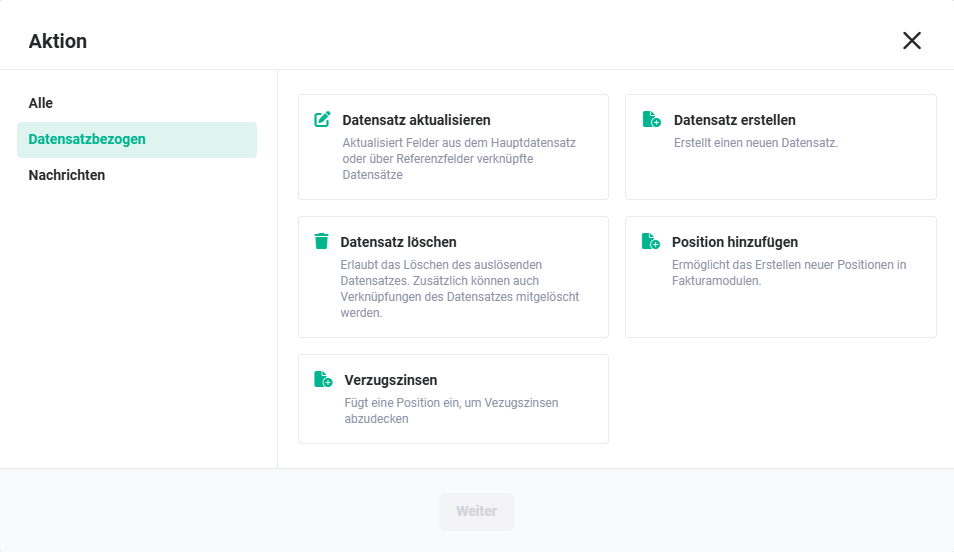 Popup Action - Tab "Record-related"
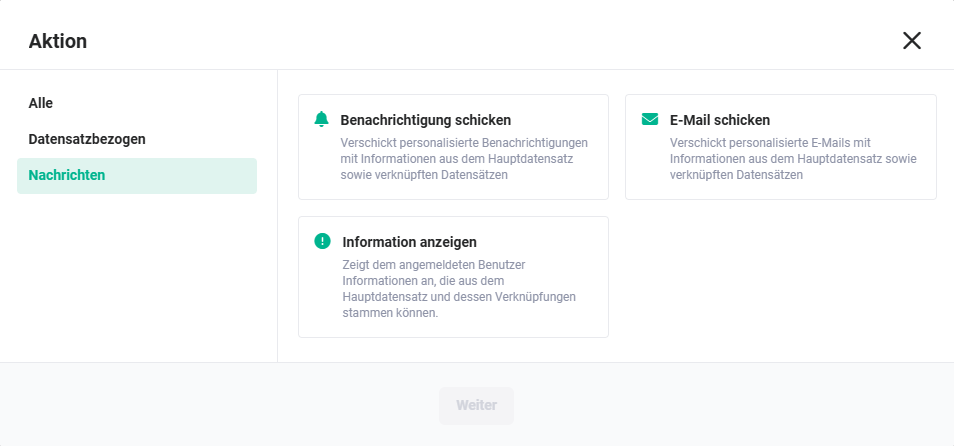 Popup Action - Tab "Messages"
The following actions are available (each depending on the selected trigger):
| Action | Description | Available for trigger |
|---|---|---|
| Attachments as document | Creates attachments of a scanned email as documents, taking conditions into account. |
|
| Send notification | Sends personalized notifications with information from the main record. |
|
| Update record | Updates fields from the main record or records linked via reference fields. |
|
| Create record | Creates a new record. |
|
| Delete record | Allows deletion of the triggering record. Additionally, links of the record can also be deleted. |
|
| Delete record | Deletes records from the selected modules that were created by billing item actions. |
|
| Link records | Searches subject and content for record numbers and links the email. Includes the action "Save email". |
|
| Send email | Sends personalized emails with information from the main record and linked records. |
|
| Save email | Saves a scanned email as a copy in the system and links it if applicable with further records. |
|
| Display information | Displays information to the logged-in user that can originate from the main record and its links. The information can be displayed as a hint or as a popup dialog (configurable in the action). |
|
| Edit item | Enables editing of items in billing modules. |
|
| Add item | Enables creating new items in billing modules. |
|
| Create/update ticket | Updates tickets based on record numbers or creates new ones when not found, with optional creation of the sender. |
|
| Default interest | Inserts an item to cover default interest. |
|
| Contract update | Updates the items of a contract, based on an order. |
|
| Call webhook | Enables the transmission of fields, items or relations of a record to a webhook via POST or GET call. |
|
| Item-based surveys | Calculates values based on items and writes them to a main field of the record. Supports filtering through conditions. |
|
| Update relations | Updates the relations of the triggering record. Relations to be updated can be restricted by conditions. |
|
| Request payment mandate | Requests a mandate via the configured payment provider. Only available if a payment provider is configured and activated for the client. |
|
| Payment collection | Triggers a payment collection via the configured payment provider. Prerequisites: A payment provider is activated for the client, the invoice comes from a contract with a valid mandate. The action requires no further configuration other than naming. |
|
| Send SMS | Sends an SMS via the telephone integration of the logged-in user |
|
1.1. Action Step 1 - Select Action
By marking (clicking) an action in the popup "Action" and clicking the "Continue" button, a popup opens in which the selected action is configured in detail.
1.2. Action Step 2 - Configure Action
1.2.1. Attachments as Document
The action "Attachments as document" creates attachments of a scanned email as documents, taking conditions into account.
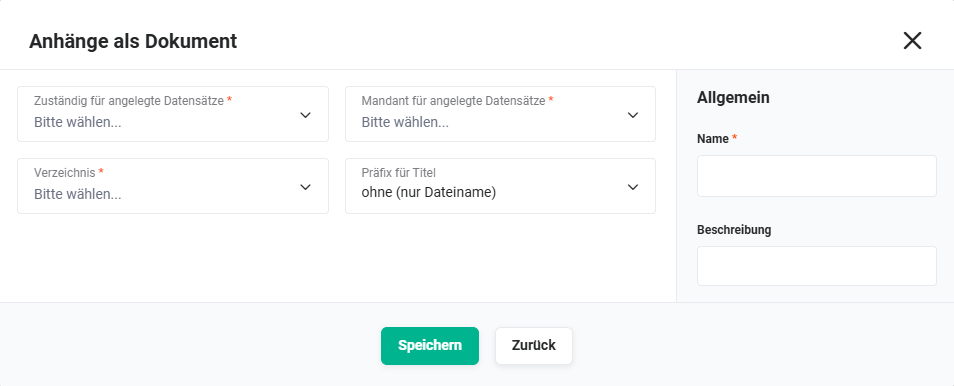 Popup Attachments as document
The following fields/functions are available in the popup "Attachments as document":
- Attachment
- Responsible for created records * → Selection of the responsible user/group
- Client for created records * → Selection of the client for the created records
- Directory * → Selection of the directory in which the record is saved
- Prefix for title → Configuration of the prefix for the title:
- none (filename only)
- Subject
- Sender address
- Free text
- General
- Name * → Enter an individual name for the action
- Description → Brief description of the action (optional)
*Required field
1.2.2. Send Notification
The action "Send notification" sends personalized notifications with information from the main record and linked records.
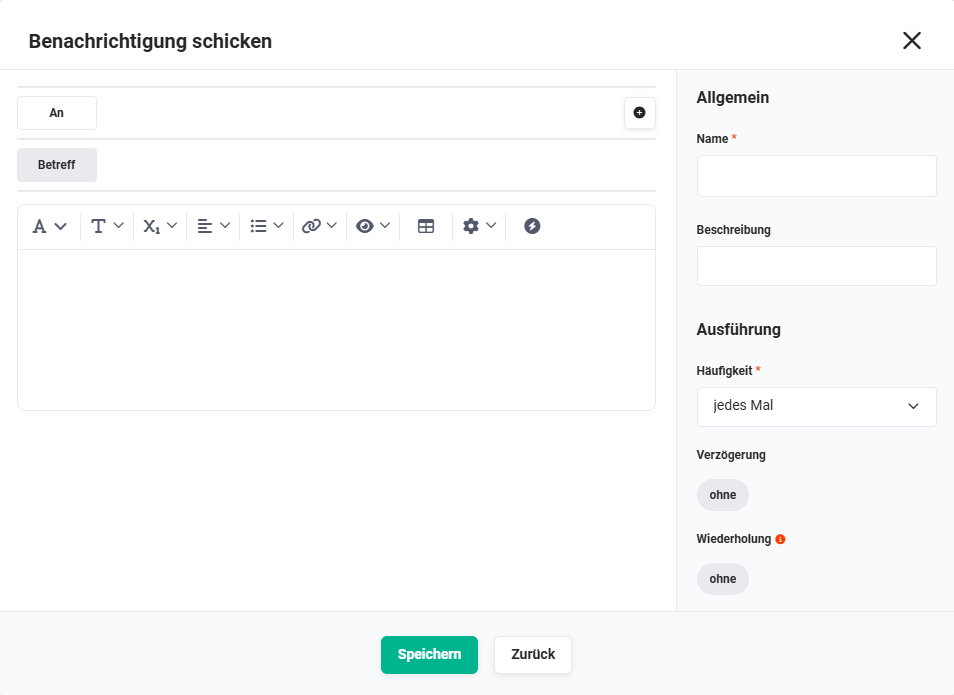 Popup Send notification
The following fields/functions are available in the popup "Send notification":
- Notification
- To → Selection of users, groups, roles and user fields of the triggering record by clicking the action icon "Add recipient" (icon "Plus") who should receive the notification
- Subject → Input field for the subject of the notification
Note: Placeholders can be inserted in the subject of the message. - Editor → In the editor area, a formatable message text can be entered
- General
- Name * → Enter an individual name for the action
- Description → Brief description of the action (optional)
- Execution
- Frequency
* → Selection list of when a notification should be sent:
- every time → the notification is sent every time the trigger and condition apply
- once → the notification is sent only once per record when the trigger and condition apply
- Delay → after clicking the "Configure delay" button, a popup opens with the following fields:
- Input field "Duration" and selection list "Time unit" (optional) → Input field for the duration of the delay of the selected time unit (x minute(s)/hour(s)/day(s)/week(s)/month(s)/year(s) each before/after the trigger date)
- Field "Trigger date"
* → Selection list with date fields as the basis of the delay
If the field is empty in the record, the action is not executed! - Input field "Time" (optional) → Enter an optional time
- Toggle "Check on every run" → If this setting is active, the conditions are checked on every run of this automation, and the task is postponed or deleted according to the delay.
- Repetition (only available if the value "every time" was selected in the field "Frequency") → After clicking the "Configure repetition" button, a popup opens with the following fields:
- Input field "Every" → Input field for the duration of the delay of the selected time unit
- Selection list "Time unit" → Selection list with the time units day(s)/week(s)/month(s)/year(s)
Repeated actions are stopped as soon as the conditions no longer apply at the time of execution of the trigger.
- Frequency
* → Selection list of when a notification should be sent:
*Required field
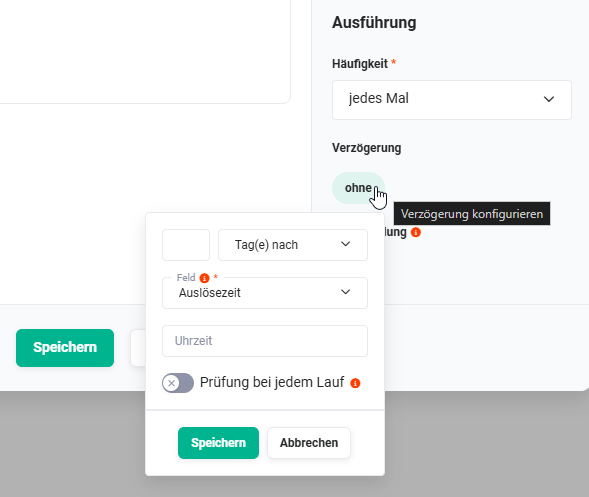 Popup Send notification - Configure delay
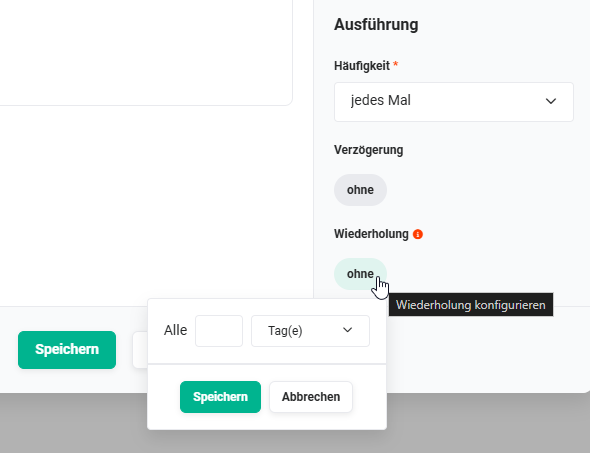 Popup Send notification - Configure repetition
1.2.3. Update Record
The action "Update record" updates fields from the main record or records linked via reference fields.
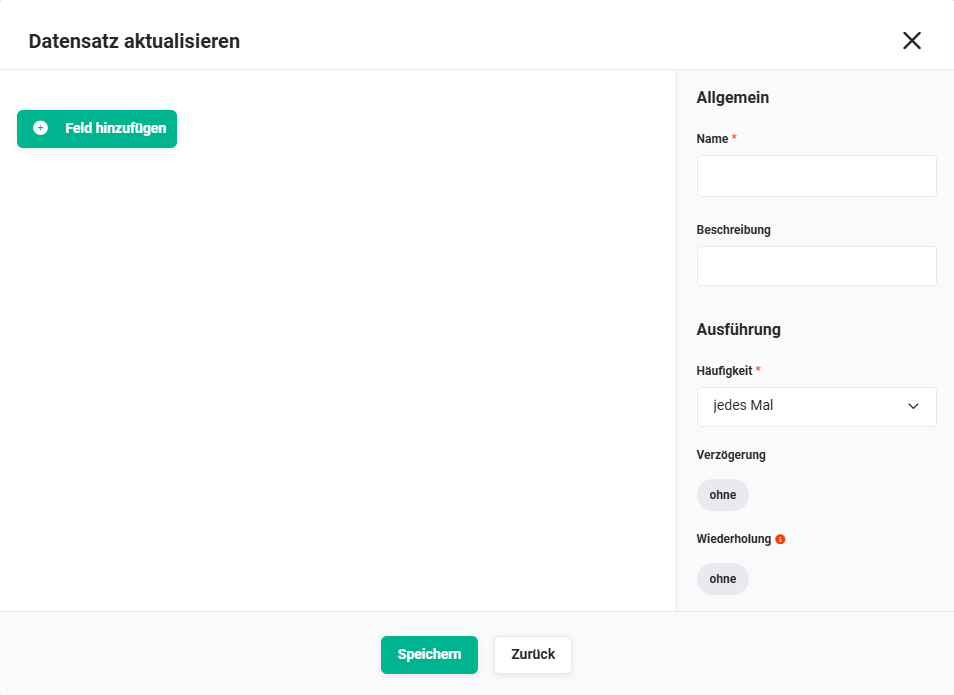 Popup Update record
The following fields/functions are available in the popup "Update record":
- Button "Add field" → A selection list of all available fields for updating is displayed.
- General
- Name * → Enter an individual name for the action
- Description → Brief description of the action (optional)
- Execution
- Frequency
* → Selection list of when a record should be updated:
- every time → the record is updated every time the trigger and condition apply
- once → the record is updated once when the trigger and condition apply
- Delay → after clicking the "Configure delay" button, a popup opens (see Send notification for field descriptions)
- Repetition → After clicking the "Configure repetition" button, a popup opens (see Send notification for field descriptions)
- Frequency
* → Selection list of when a record should be updated:
*Required field
1.2.3.1. Step 1 - Update Record - Add Field
After clicking the "Add field" button, a selection list of all available fields for updating is displayed.
After selecting the field, it is displayed as a new row.
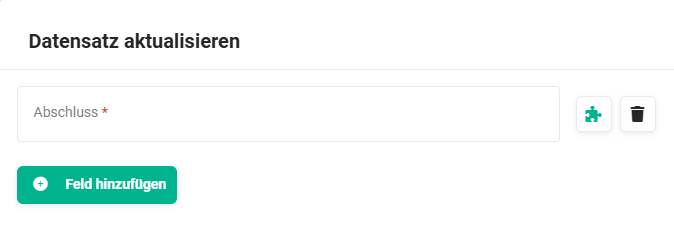 Popup Update record - Add field
The new value of the field can now be entered in the input field.
Two action icons are frequently also displayed in the row of an input field:
- Action icon "Configure workspace" (icon "Puzzle") → displays the popup Set value to create more complex field values
- Action icon "Remove field" (icon "Recycle Bin") → delete the field
1.2.3.2. Step 1a - Update Record - Configure Workspace (optional)
Optionally, the "Configure workspace" function can also be used to configure more complex comparisons.
After clicking the action icon "Configure workspace" (icon "Puzzle"), the popup "Set value" opens.
The functionalities in the popup "Set value" are described in detail in the section Configure workspace - Set value.
1.2.4. Create Record
The action "Create record" creates new records in other modules.
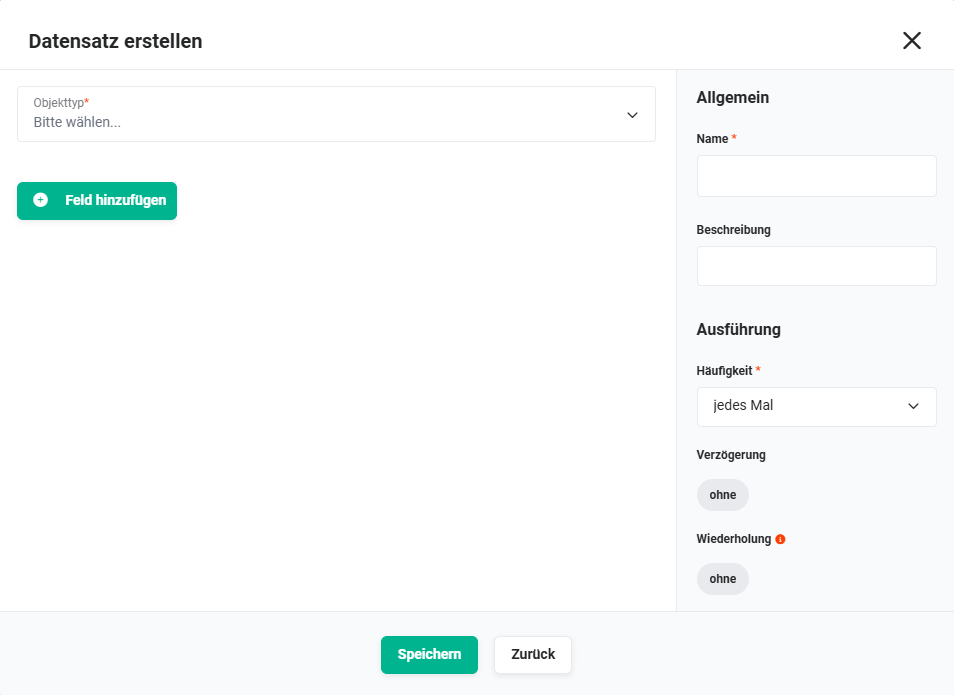 Popup Create record
The following fields/functions are available in the popup "Create record":
- Selection list "Object type" * → Selection list of object types (modules) for which a new record should be created.
- Button "Add field" → A selection list of all available fields of the selected object type (module) is displayed.
- General
- Name * → Enter an individual name for the action
- Description → Brief description of the action (optional)
- Execution: Frequency, Delay, Repetition (see Update record for field descriptions)
*Required field
1.2.4.1. Step 1 - Create Record - Select Object Type
- Selection list "Object type" → A selection list of all available modules in which a new record can be created is displayed.
- Selection list "Reference field" → A selection list of the modules via which a link to the source record is established is displayed.
- Selection list "Action" → Selection of the action used as the basis for data transfer.
Depending on the selected object type (module), additional fields for configuration are displayed.
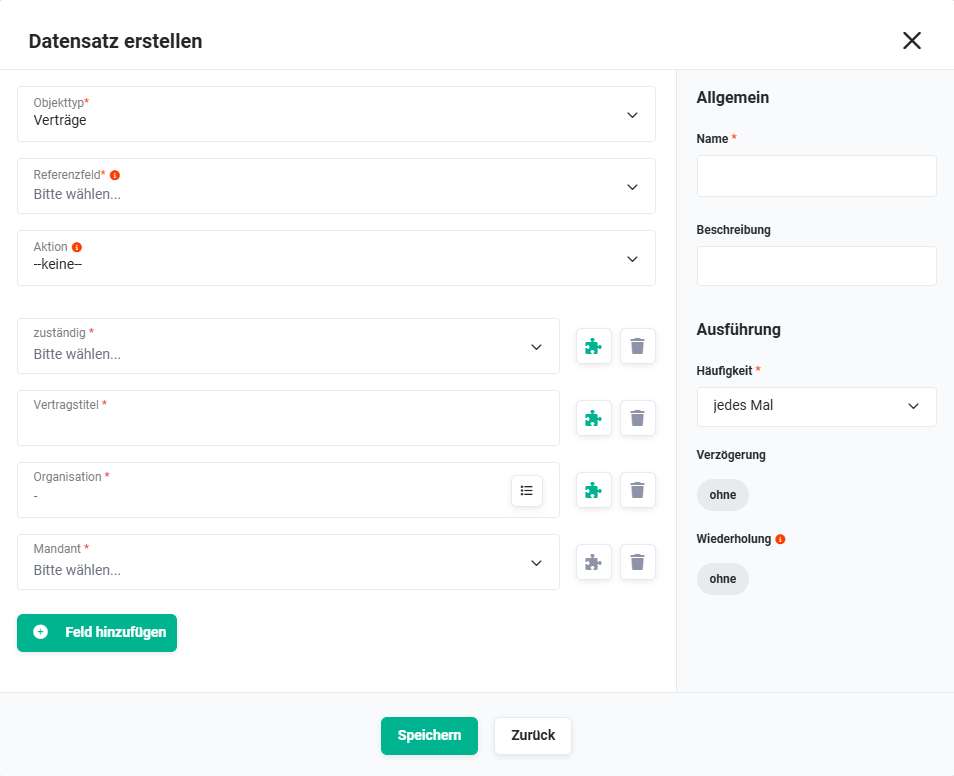 Popup Create record - Object type Contracts
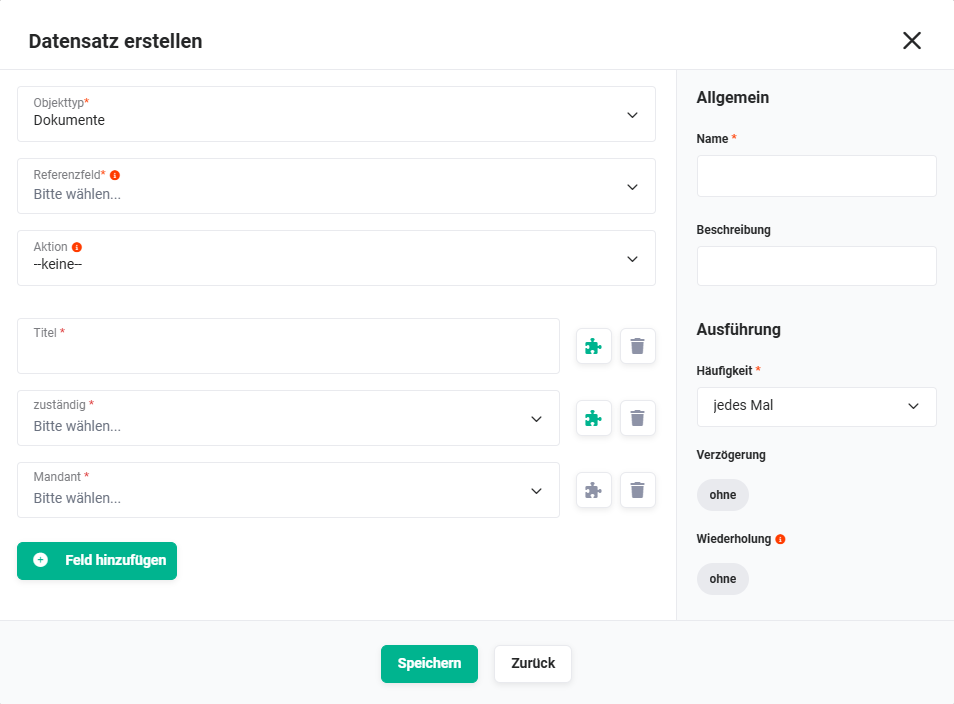 Popup Create record - Object type Documents
For many fields, the icon "i" is available which, on mouseover, displays additional info on the respective field.
Required fields are marked with a red asterisk *.
Two action icons are frequently displayed in the row of an input field:
- Action icon "Configure workspace" (icon "Puzzle") → displays the popup Set value to create more complex field values
- Action icon "Remove field" (icon "Recycle Bin") → delete the field
1.2.4.2. Step 1a - Create Record - Configure Workspace (optional)
After clicking the action icon "Configure workspace" (icon "Puzzle"), the popup "Set value" opens. The functionalities are described in detail in Configure workspace - Set value.
1.2.5. Delete Record
The action "Delete record" allows deletion of the triggering record. Additionally, links of the record can also be deleted. Deleted records are moved to the Trash module.
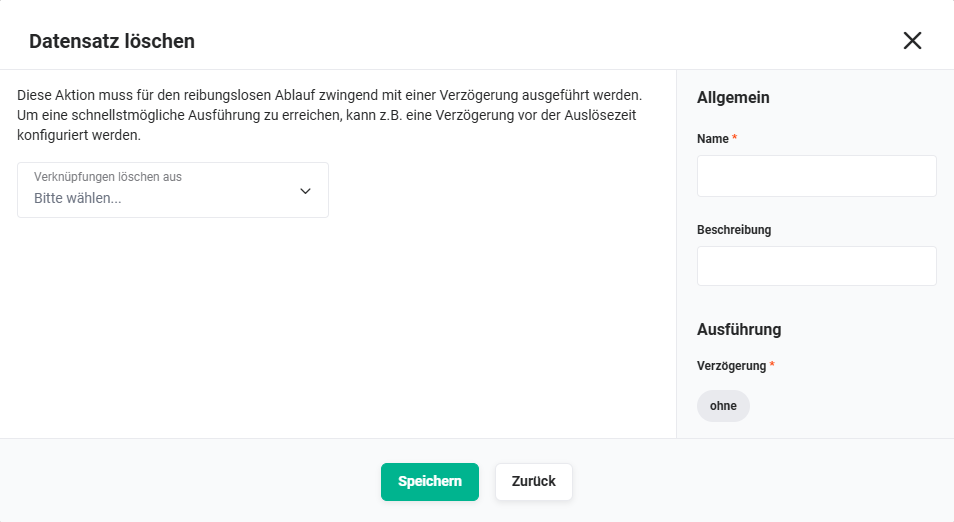 Popup Delete record
The following fields/functions are available in the popup "Delete record":
- Delete link from (optional) → Selection list of modules that can have a reference to the record to be deleted. The reference is also deleted when the triggering record is deleted. One or more modules can be selected.
- General
- Name * → Enter an individual name for the action
- Description → Brief description of the action (optional)
- Execution
- Delay * → after clicking the "Configure delay" button, a popup opens (see Send notification for field descriptions)
*Required field
1.2.5.1. Step 1 - Delete Record - Configure Delay
For smooth execution, this action must be executed with a delay. To achieve the fastest possible execution, a delay before the trigger time can be configured.
1.2.5.2. Step 1a - Delete Record - Delete Links (optional)
In the field "Delete link from" (selection list), modules can be selected that can have a reference to the record to be deleted. The reference is also deleted when the triggering record is deleted.
1.2.6. Delete Record
The action "Delete record" deletes records from the selected modules that were created by billing item actions.
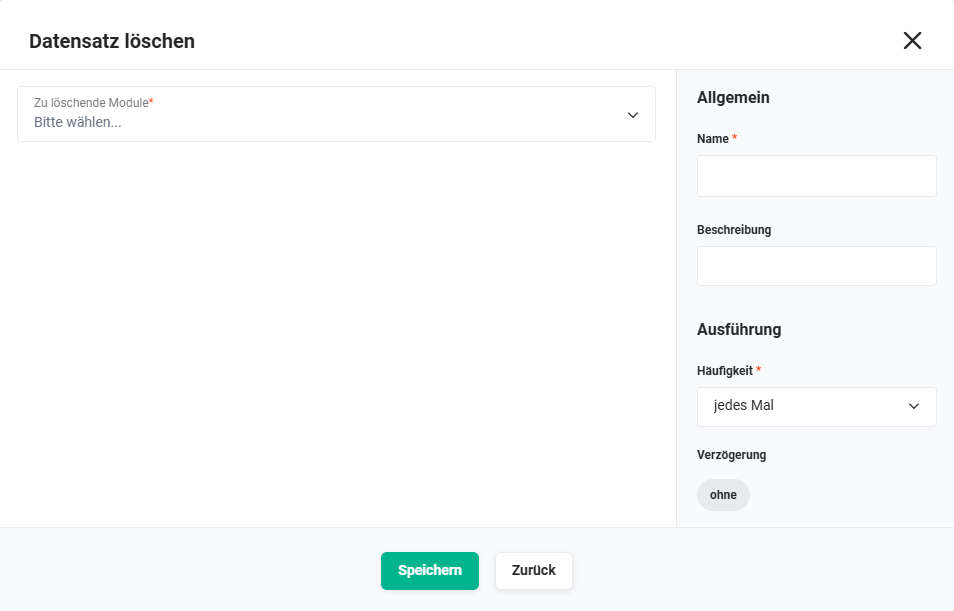 Popup Delete record
The following fields/functions are available in the popup "Delete record":
- Modules to be deleted * → Selection list of modules in which records created by billing item actions should be deleted. One or more modules can be selected.
- General → Name, Description
- Execution → Delay (see Send notification for field descriptions)
*Required field
1.2.7. Link Records
The action "Link records" searches subject and content for record numbers and links the email. Includes the action Save email.
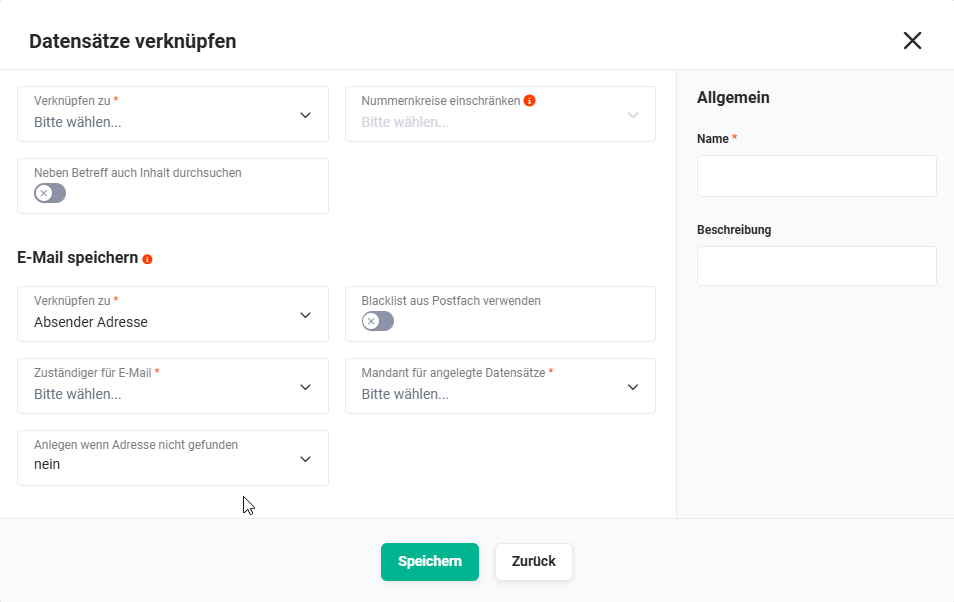 Popup Link records
The following fields/functions are available in the popup "Link records":
- Link to * → Selection list of modules to which the email should be linked. One or more modules can be selected.
- Restrict number ranges → Restriction of number ranges to be searched per module. If no restriction is selected for a module, all number ranges are searched. X = currently inactive number range.
- Also search content in addition to subject → Toggle to configure whether the content should also be searched in addition to the subject.
- Save email → If records for linking are identified but the email is not yet in the system, it is created once with this configuration.
- Link to
* → Selection list to configure which address the email should be linked to (both addresses can be selected):
- Sender address
- Recipient addresses
- Use blacklist from mailbox → Toggle to configure whether the blacklist from the mailbox should be used.
- Responsible for email → Selection of the responsible user/group
- Client for created records * → Selection of the client for the created records
- Create if address not found → Selection list to configure whether a new record should be created if the address is not found. The following values are available for selection:
- no
- as contact
- as lead
- Link to
* → Selection list to configure which address the email should be linked to (both addresses can be selected):
- General
- Name * → Enter an individual name for the action
- Description → Brief description of the action (optional)
*Required field
1.2.8. Send Email
The action "Send email" sends personalized emails with information from the main record and linked records.
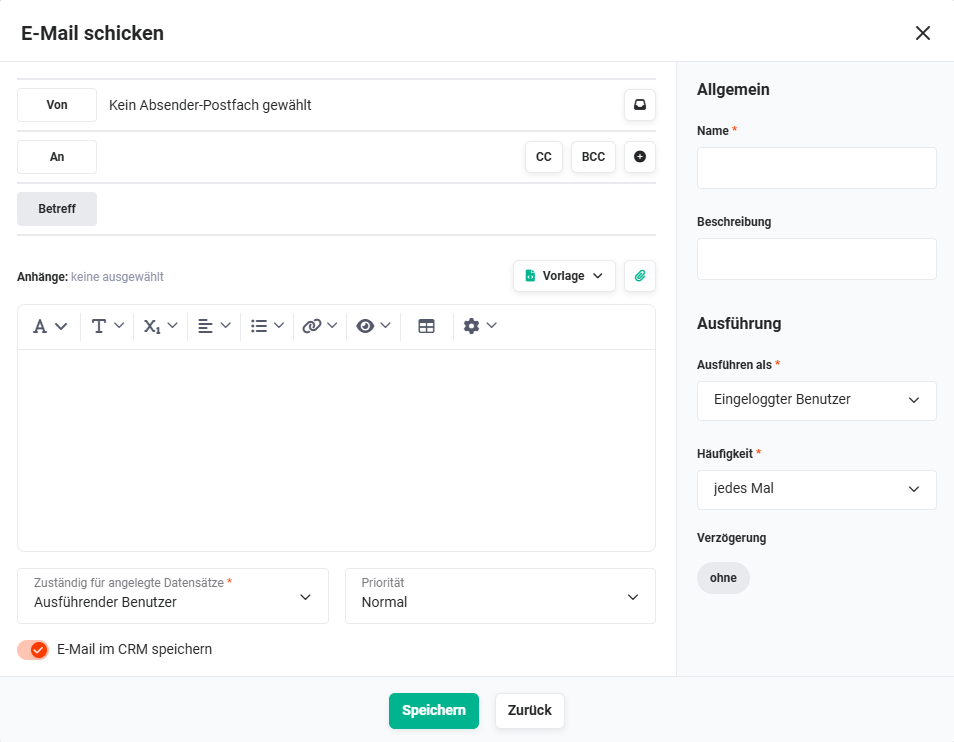 Popup Send email
For the action "Send email", the responsibility of the sent email can be defined. The default value for responsibility is the executing user.
The following fields/functions are available in the popup "Send email":
- Field "From" → Selection of the sender mailbox
- Action icon "Change sender mailbox" → After clicking the action icon, a selection list of all email mailboxes opens in which the setting "Automation allowed" is set to "active".
- Field "To" → Selection of email recipients
- Action icon "CC" → Display of the input line for CC recipients
- Action icon "BCC" → Display of the input line for BCC recipients
- Action icon "Add recipient" (icon "Plus") → Opens a selection list of email fields from the modules. One or more fields can be selected, direct input of an email address is also possible.
- Editor → In the editor area, the text of the email is composed. Optionally, an email template can be selected and an attachment added.
- Action button "Template" → After clicking the action button, a flyout menu opens for selecting an email template. Two additional actions are also available:
- Create template → The creation view of an email template is opened in a new browser tab.
- Update templates → The list of available email templates is updated.
- Action icon "Add attachment" (icon "Paperclip") → After clicking the action icon, a flyout menu opens with the actions:
- PDF template → Opens the popup window "Load template" for selecting a PDF template.
- File field → Opens the popup window "Select field", in which a file field from a module can be selected via a selection list.
- Select file → The file explorer of the operating system opens to select files.
- Editor area/Email body → In the email body, the text can be formatted using the toolbar. The toolbar offers all functionalities for text formatting (e.g. font and size, lists, insert images and links, tables, etc.)
- Action button "Template" → After clicking the action button, a flyout menu opens for selecting an email template. Two additional actions are also available:
- Field "Responsible for created records" * → Selection list of users/groups for the "responsible" field in created records
- Field "Priority" → Selection list of the priority of the email (values Low, Normal and High)
- Toggle "Save email in CRM" → Setting whether the email should be saved in the CRM (module Emails)
- General: Name, Description
- Execution
- Execute as * → Selection list of which user (logged-in user or username) the action is executed as
- Frequency, Delay, Repetition (see Send notification for field descriptions)
*Required field
1.2.8.1. Step 1 - Send Email - Sender Mailbox
After clicking the action icon "Change sender mailbox" (icon "Inbox"), a selection list of all email mailboxes opens in which the setting "Automation allowed" is set to "active".
1.2.8.2. Step 2 - Send Email - Select Recipients
After clicking the action icon "Add recipient" (icon "Plus"), a selection list of email fields from the modules opens. One or more fields can be selected; direct input of an email address is also possible (by pressing the Enter key, the entered email address is transferred to the recipient field).
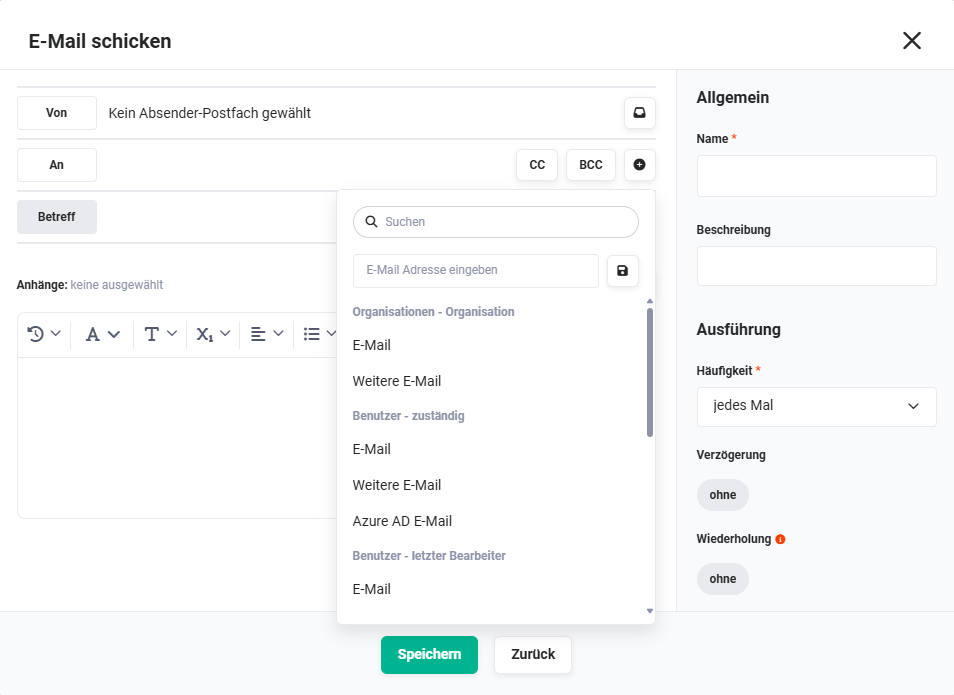 Popup Send email - Selection list field "To"
1.2.8.3. Step 3 - Send Email - Subject
The subject of the email is entered in the input line.
1.2.8.4. Step 4 - Send Email - Select Template (optional)
After clicking the action button, a flyout menu opens for selecting an email template. Two additional actions are also available:
- Create template → The creation view of an email template is opened in a new browser tab.
- Update templates → The list of available email templates is updated.
1.2.8.5. Step 5 - Send Email - Add Attachment (optional)
After clicking the action icon "Add attachment" (icon "Paperclip"), a flyout menu opens with the actions:
- PDF template → Opens the popup window "Load template" for selecting a PDF template.
- File field → Opens the popup window "Select field", in which a file field from a module can be selected via a selection list.
- Select file → The file explorer of the operating system opens to select files.
1.2.8.6. Step 6 - Send Email - Email Body (optional)
In the editor area, the email text (email body) can be entered. The text can be formatted using the toolbar.
1.2.9. Save Email
The action "Save email" saves a scanned email as a copy in the system and links it if applicable with further records.
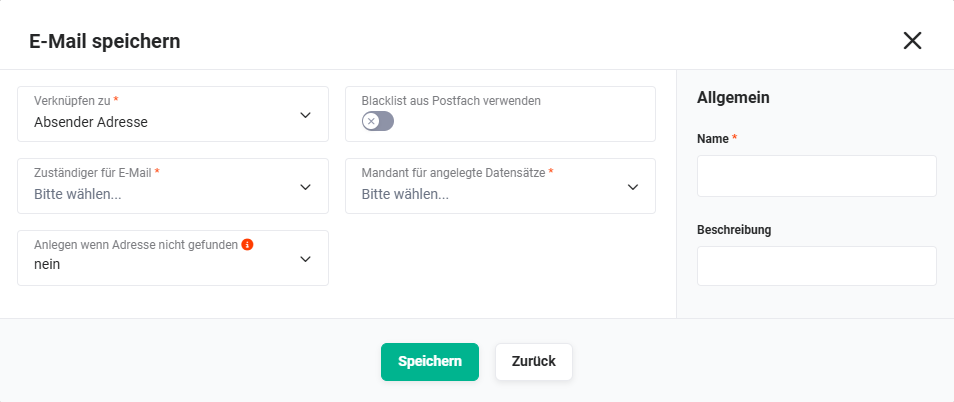 Popup Save email
- Link to
* → Selection list to configure which address the email should be linked to:
- Sender address
- Recipient addresses
- Use blacklist from mailbox → Toggle
- Responsible for email → Selection of responsible user/group
- Client for created records * → Selection of the client
- Create if address not found → Selection list: no, as contact, as lead
- General: Name, Description
*Required field
1.2.10. Display Information
The action "Display information" displays information to the logged-in user that can originate from the main record and its links.
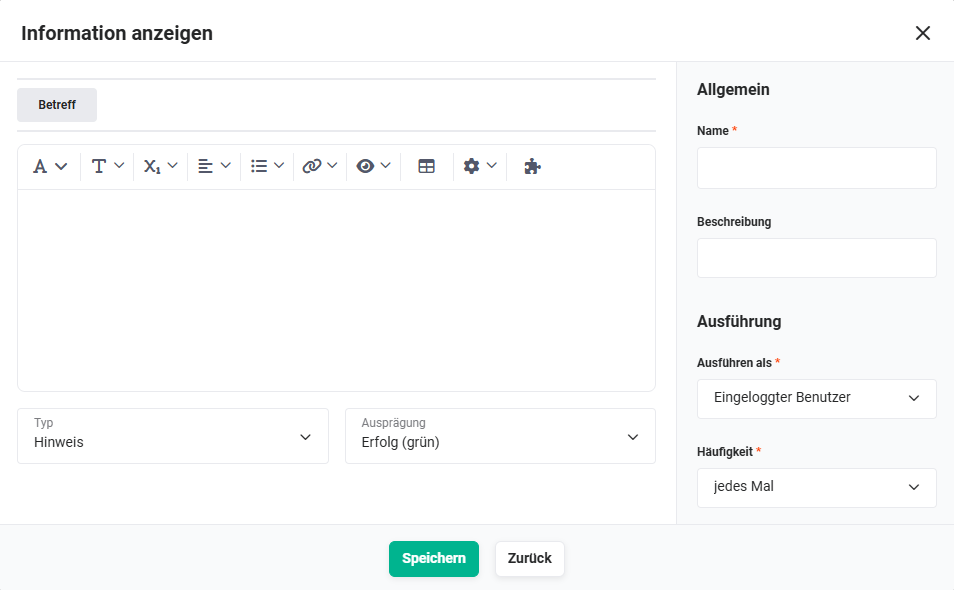 Popup Display information
The following fields/functions are available:
- Display information
- Subject → Input field for the subject of the information
- Editor → In the editor area, a formatable message text can be entered
- Selection list "Type" → Selection list with the values "Popup dialog" and "Hint" to configure the type of information
- Popup dialog → A popup dialog with the information is displayed
- Hint → A hint with the information is displayed. The hint can have the following variants (selection list "Variant" is displayed when type "Hint" is selected):
- Information (blue)
- Success (green)
- Warning (yellow)
- Error (red)
- General: Name, Description
- Execution
- Frequency: every time / once
*Required field
1.2.11. Edit Item
The action "Edit item" enables editing of items in billing modules.
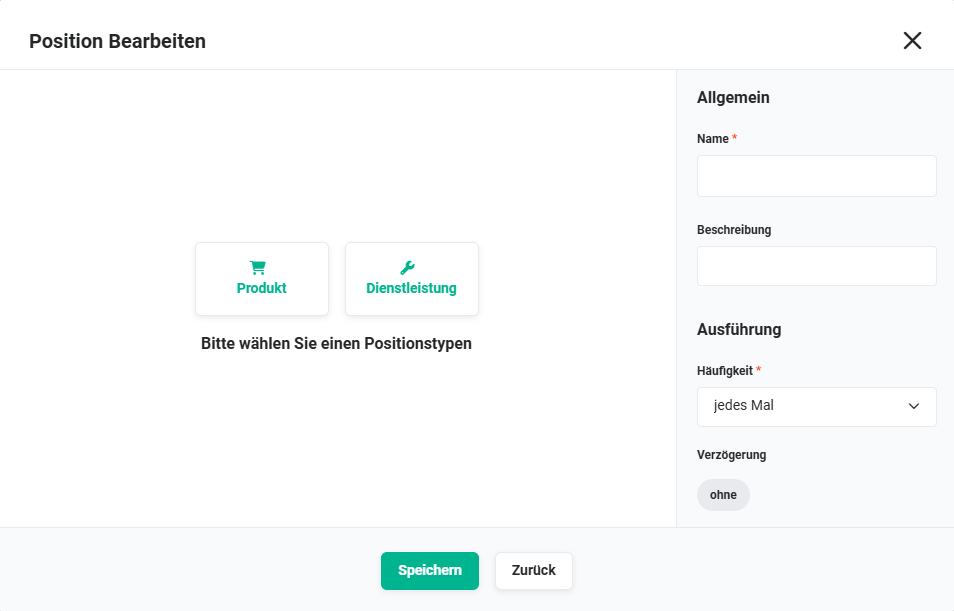 Popup Edit item
The following fields/functions are available:
- Select item type
- Button "Product" → the input form for editing a product is displayed
- Button "Service" → the input form for editing a service is displayed
- General: Name, Description
- Execution: Frequency, Delay, Repetition
*Required field
1.2.11.1. Step 1 - Edit Item - Product or Service
After clicking the button "Product" or "Service", the input form for configuring the item is displayed.
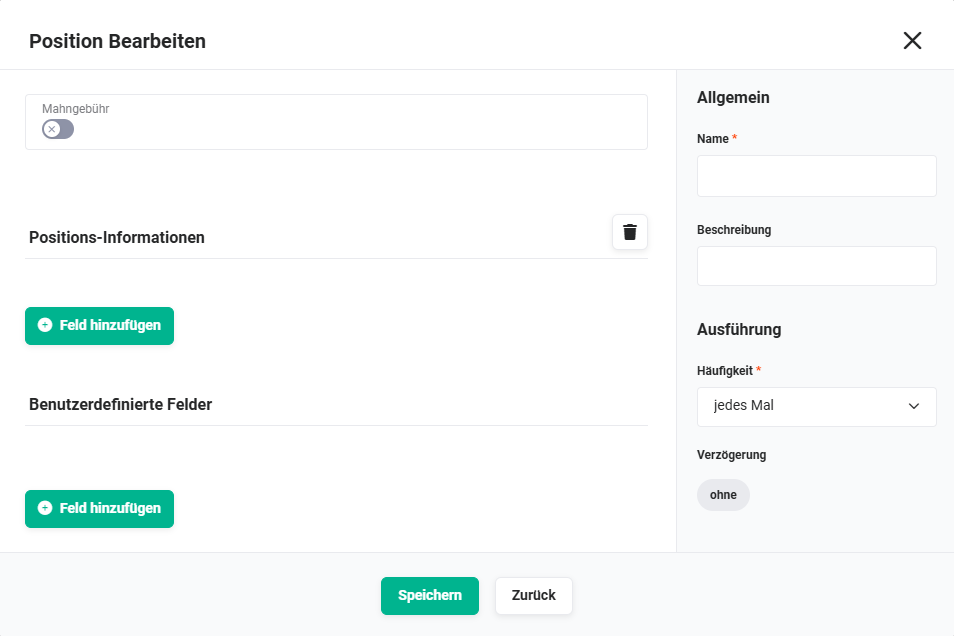 Popup Edit item - Product selected
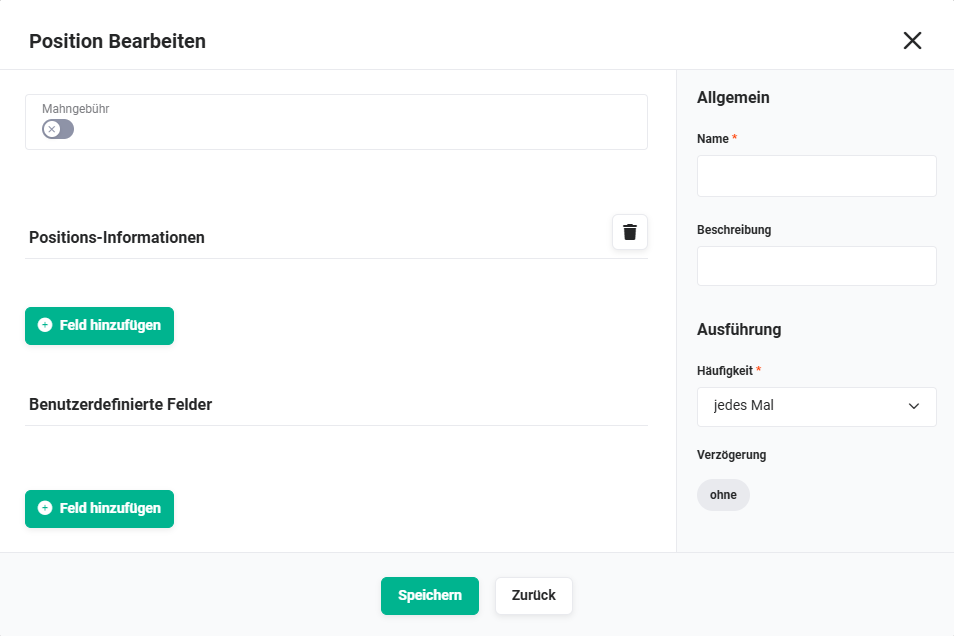 Popup Edit item - Service selected
The following fields/functions are available after selecting a product/service:
- Toggle "Late payment fee" → Setting for late payment fee (active/inactive)
- Item information
- Button "Add field" → A selection list of all available fields for updating is displayed.
- Custom fields
- Button "Add field" → A selection list of all available fields for updating is displayed.
Custom field values when updating items allow the use of fields from references.
- Button "Add field" → A selection list of all available fields for updating is displayed.
In the row of an added field, two action icons are displayed:
- Action icon "Remove field" (icon "Recycle Bin") → delete the field
- Action icon "Configure workspace" (icon "Puzzle") → displays the popup Set value
1.2.12. Add Item
The action "Add item" enables creating new items in billing modules.
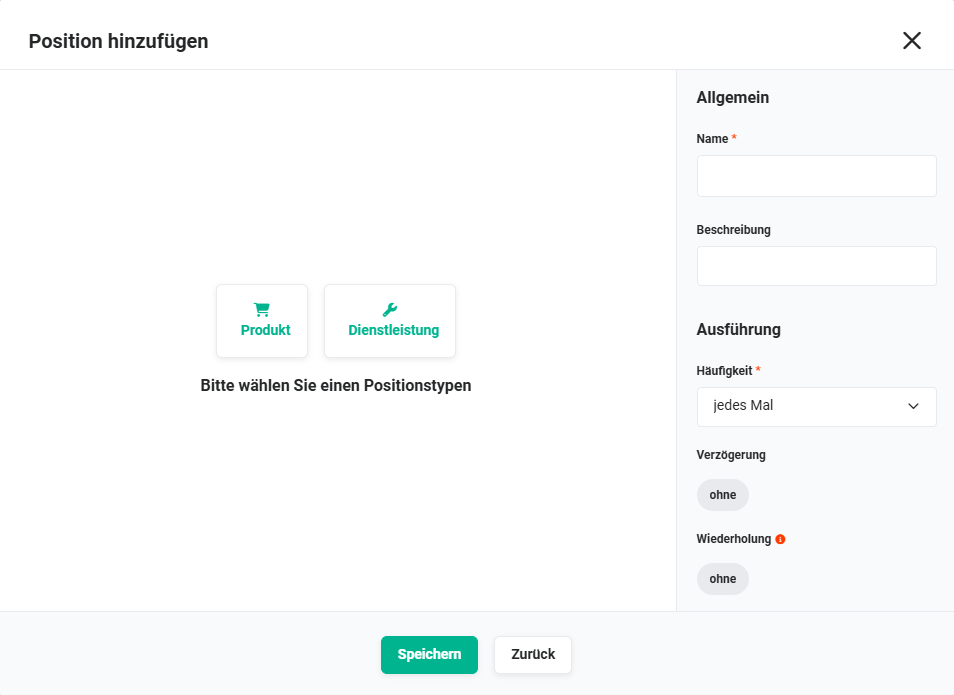 Popup Add item
The following fields/functions are available:
- Select item type
- Button "Product" → the input form for configuring a product is displayed
- Button "Service" → the input form for configuring a service is displayed
- General: Name, Description
- Execution: Frequency, Delay, Repetition
*Required field
1.2.12.1. Step 1 - Add Item - Product or Service
After clicking the button "Product" or "Service", the input form for configuring the item is displayed.
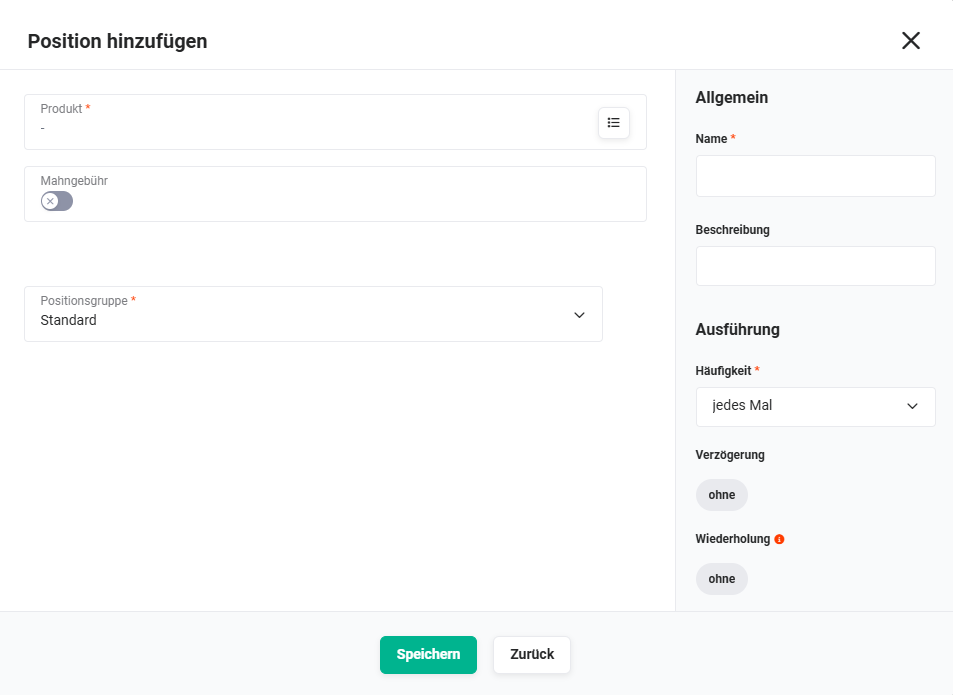 Popup Add item - Product selected
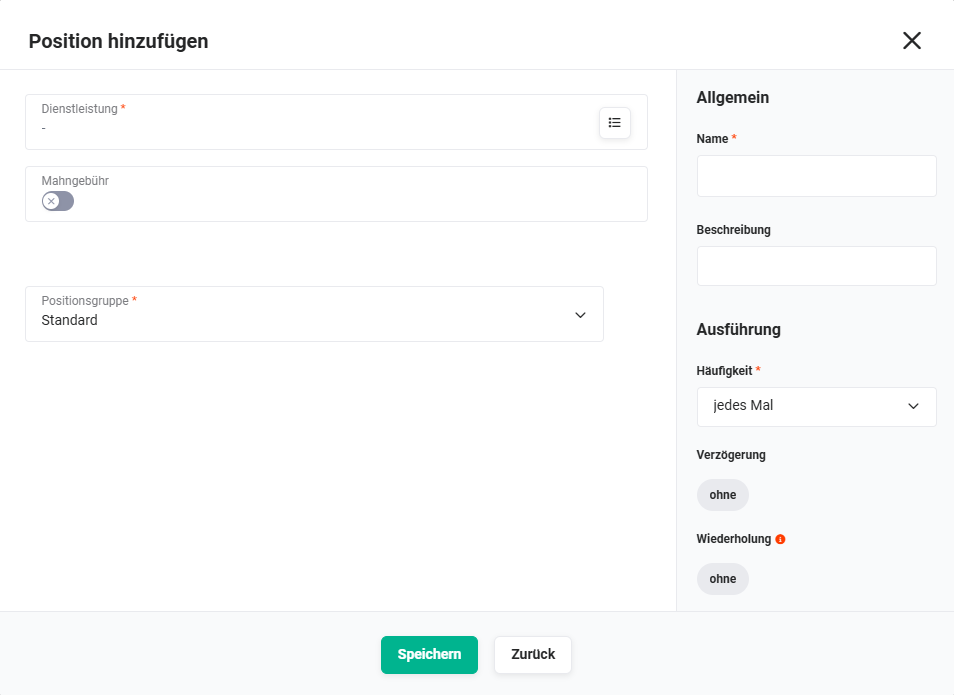 Popup Add item - Service selected
The following fields/functions are available after selecting a product/service:
- Field Product or Service → After clicking the action icon "Select record" (icon "three dots with lines"), a popup opens for selecting a product or service.
- Toggle "Late payment fee" → Setting for late payment fee (active/inactive)
1.2.12.2. Step 2 - Add Item - Item Information
After selecting a product/service, additional fields for configuration are displayed:
- Product/service name
* → The product/service name is taken from the selected record and can be manually changed if required.
Action icon "Configure workspace" (icon "Puzzle") → displays the popup Set value. - Description → The description of the product/service is taken (formatted) from the selected record and can be manually changed if required.
- List price → The list price (net) is taken from the selected record and can be manually changed if required.
- Quantity * → The quantity is taken from the selected record and can be manually changed if required.
1.2.13. Create/Update Ticket
The action "Create/update ticket" searches emails for ticket record numbers, creates or updates tickets accordingly, with optional creation of the sender as a contact.
The following fields/functions are available:
- Responsible → Selection of the responsible user/group
- Client → Selection of the client
- Also search content in addition to subject → Toggle
- Create missing senders as contact → Toggle
- Use blacklist from mailbox → Toggle
- Attachments as documents → Toggle
- Directory → Selection of the directory
- Name * → Enter an individual name for the action
- Description → Brief description of the action (optional)
*Required field
1.2.14. Default Interest
The action "Default interest" inserts an item to cover default interest.
The following fields/functions are available:
- Button "Reference product" → Selection of the reference product
- Base interest rate → Selection of the base interest rate
- Tax type → Selection list: Target / Actual
- Type of business → Selection list: Consumer transaction 5% / Commercial transaction 9% / Custom
- Name * → Enter an individual name for the action
- Description → Brief description of the action (optional)
- Delay → Configure delay (duration + time unit, trigger date, time, check on every run)
*Required field
1.2.15. Contract Update
The action "Contract update" updates the items of a contract, based on an order.
The following fields/functions are available:
- Contract reference → Selection of the contract reference field
- Restrict item groups → Optional restriction to specific item groups
- Name * → Enter an individual name for the action
- Description → Brief description of the action (optional)
- Delay → Configure delay
*Required field
1.2.16. Call Webhook
The action "Call webhook" enables the transmission of fields, items or relations of a record to a webhook via POST or GET call.
The following fields/functions are available:
- Webhook URL * → Input field for the webhook URL
- Method → Selection list: POST / GET
- Button "Add text" → Add a text parameter (name + value)
- Button "Add field" → Add a field parameter
- Name * → Enter an individual name for the action
- Description → Brief description of the action (optional)
- Execute as * → Selection list of which user the action is executed as
- Frequency * → every time / once
- Delay → Configure delay
- Repetition → Configure repetition
*Required field
1.2.17. Item-Based Surveys
The action "Item-based surveys" calculates values based on items and writes them to a main field of the record.
The following fields/functions are available:
- Button "Add calculation" → Adds a calculation with the fields:
- Source field → Field to read values from (items)
- Calculation type → Sum / Average / Min / Max
- Target field → Field in the main record where the result is written
- Name * → Enter an individual name for the action
- Description → Brief description of the action (optional)
- Execute as * → Selection list
- Frequency * → every time / once
- Delay → Configure delay
Each calculation requires its own trigger/condition/action combination.
*Required field
1.2.18. Update Relations
The action "Update relations" updates the relations of the triggering record.
The following fields/functions are available:
- Object type * → Selection list of the object type (module) whose relations should be updated
- Button "Add field" → Add a field to be updated (with workspace icon)
- Name * → Enter an individual name for the action
- Description → Brief description of the action (optional)
- Execute as * → Selection list
- Frequency * → every time / once
- Delay → Configure delay
*Required field
1.2.19. Request Payment Mandate
The action "Request payment mandate" requests a mandate via the configured payment provider.
Only available when the trigger "Record created" is selected, the module is "Contracts" and a payment provider is configured and activated.
The following fields/functions are available:
- Name * → Enter an individual name for the action
- Description → Brief description of the action (optional)
*Required field
1.2.20. Payment Collection
The action "Payment collection" triggers a payment collection via the configured payment provider.
Only available when the trigger "Record created" is selected, the module is "Invoices" and the invoice comes from a contract with a valid mandate.
The following fields/functions are available:
- Name * → Enter an individual name for the action
- Description → Brief description of the action (optional)
*Required field
1.2.21. Send SMS
The action "Send SMS" sends an SMS via the telephone integration (Connect) of the executing user.
The following fields/functions are available:
- Source field for phone number * → Selection of the field that contains the phone number
- Message * → Input field for the SMS text (with placeholder icon for inserting field values)
- Name * → Enter an individual name for the action
- Description → Brief description of the action (optional)
- Execute as * → Must have Connect configured
- Frequency * → every time / once
*Required field
1.3. Delete Action
By selecting an action (by clicking, the border is displayed thick) and pressing the "Delete key", an action can be deleted again in the automation editor.
If the action is connected to other nodes, it is deleted without a warning popup.
2. Practical Examples
1 – Update Record: Automatically set status after PDF export
After a quote is exported as a PDF, the status of the deal should automatically be set to Sent. The trigger Record Exported is selected for the Deals module. The action Update Record is configured: the field Status is added and the value Sent is entered as a static value.
2 – Send Email: Automatically send an order confirmation
As soon as an order is created, the customer should automatically receive an order confirmation by email. The action Send Email is selected. The To field is filled with the email field of the linked organization. The prepared email template Order Confirmation is selected. A PDF template for the order is attached in the Attachment field. The frequency is set to Once so that only one email is sent per order.
3 – Create Record: Automatically generate an invoice after order creation
When a new order is saved and the field Project Installments has the value No, an invoice should be created automatically. The action Create Record is configured with the object type Invoices. The reference field links the new invoice to the triggering order. The Due Date field is populated via the workspace (Set Value) with the value "current date + 14 days".
4 – Send Notification with Delay: Reminder before contract expiry
30 days before a contract expires, the responsible user should receive a notification. The action Send Notification is configured with a delay of 30 days before the Contract End field. The frequency is set to Once. The toggle Check on every run is activated so that the notification is skipped if the contract has been renewed in the meantime.
5 – Show Information: Warning when opening an overdue record
When a record in the Invoices module is opened and the due date is in the past, a yellow warning notice should be shown to the user. The trigger is Record Opened. The action Show Information is configured with type Note and appearance Warning (yellow). The subject contains a placeholder with the invoice number.
3. Frequently Asked Questions
Why can't I configure an action?
An action can only be configured if it is connected to an already configured trigger or a configured condition. Without this connection, the configuration panel remains locked.
What is the difference between frequency "Every Time" and "Once"?
With Every Time, the action is executed each time the trigger and condition fire. With Once, the action is only executed once per record — even if the trigger fires again afterwards. Use Once for one-time notifications or emails.
What happens if the configured trigger date for a delay is empty?
If the date field configured for the delay is empty in the record, the action is not executed. No error appears — the action is silently skipped.
Can I set multiple fields in a single "Update Record" action?
Yes. Any number of fields can be configured in a single action using the Add Field button. All configured fields are updated simultaneously when the action is triggered.
When should I use "Update Record" instead of "Create Record"?
Update Record modifies existing fields in the triggering or linked record. Create Record creates a completely new record in another module. If a new order should be created after a quote is accepted, Create Record is the right choice; if only the status of an existing deal needs to change, Update Record is sufficient.
How do I prevent an email from being sent multiple times?
Set the frequency of the Send Email action to Once. This ensures the email is only sent once per record, even if the trigger fires again — for example, because the record is saved again.