
Users and Groups
Package: BASIC
1. Users
The "Users" area includes all functions for managing brainX user accounts.
The following options are available here:
- create new users
- edit user settings
- delete users
- copy users
- import users
- view the login history of users
1.1. User List View
The user list view has the following columns:
- Username → display of the username
- Available roles → display of all roles that are permitted to the user via "Allowed roles from tenants" for switching tenants (see section User Settings - Account)
- Last name → last name of the user
- First name → first name of the user
- Status → status (active/inactive) of the user
- Email → (primary) email address of the user
- Rights Management → display of the rights management setting (Admin, CustomerAdmin, Superuser or no special rights)
- Actions → further actions (Edit, Delete, Copy and Login History) for users
Below the list view there is additionally the display of the booked and still available licenses (= number of maximum permitted active users).
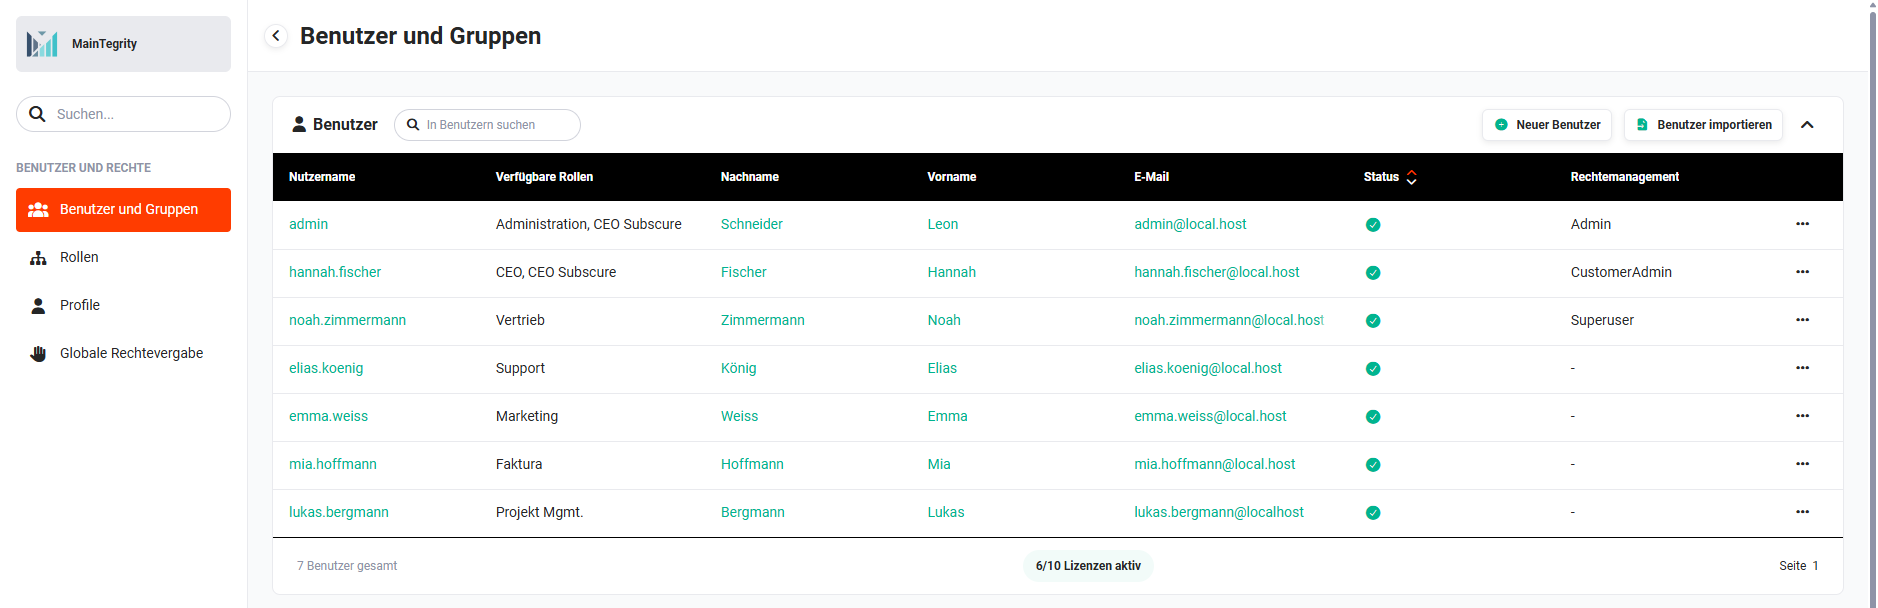 List View Users and Groups
The columns of the user list view are static and cannot be customized. If an overview of users with more information is needed, a report can be created that includes the "Users" module. For systems with very many users, a report containing fields such as language, time zone and currency can be helpful for the administrator. This report can also be displayed in a widget on the administrator's homepage.
1.1.1. List View Actions
Four general actions are available in the Users block:
Right-clicking on a user opens a context menu with the following actions:
Right-clicking on a user opens the same context menu as clicking the actions icon "three dots" in the "Actions" column of the respective user in the user list view.
1.1.1.1. Search in Users
In the "Search for users" input field, the searched names/terms can be entered. After pressing the Enter key, the search is started. The user list view is reloaded and – if there are matches – restricted to the matching users.
Only the following fields from the list view are searched:
- Username
- Role
- Last name
- First name
Case sensitivity is ignored in the search. It is also irrelevant whether the search term is at the beginning, middle or end of the found value.
The roles "Sales Manager" and "Sales Employee" exist. A search is performed with the term "sales".
All users who have the role "Sales Manager" or "Sales Employee" are listed.
One user with the first name "John" and one with the last name "Johnson" exist. A search is performed with the term "john".
The users with the first name "John" and the last name "Johnson" are listed.
To clear the search – so that all users are displayed again – the "Search for users" input field must be emptied and the Enter key pressed. All existing users are now listed again.
1.1.1.2. Collapse/Expand Block
Both the block of the user list view and the block of the group list view can be collapsed separately.
To the top right of the list views – next to the "Import users" button – is the "Collapse/Expand" actions icon (icon "pointed bracket up/down").
After clicking the actions icon, the user list view is collapsed. Clicking again expands the list view.
1.1.1.3. Edit User
In the "Actions" column, either the actions icon (icon "three dots") can be clicked for the desired user or the user can be right-clicked. A flyout menu opens with the actions Edit, Delete, Copy and Login History.
After clicking the "Edit" action, the user edit view opens. To save changes made, the "Save" button at the top right must be clicked at the end.
Alternatively, the username, last name or first name can be clicked to open the user detail view. In the detail view, the user can also be edited using the "Edit" button.
The corresponding explanations for the fields, functions and options are described in detail in the My Settings section.
1.1.1.4. Delete User
In the "Actions" column, either the actions icon (icon "three dots") can be clicked for the desired user or the user can be right-clicked. A flyout menu opens with the actions Edit, Delete, Copy and Login History.
After clicking the "Delete" action, the "Delete user" popup opens:
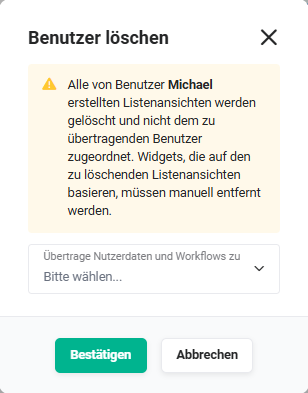 Popup "Delete User"
In the next step, an active user must be selected to transfer the user data to this user.
To complete the deletion of the user, the "Confirm" button in the popup must be clicked.
- Responsibility in records: In all affected records, the user to be transferred is entered in the "responsible" field.
- Field "last editor": If the user to be deleted is entered in the "last editor" field, the user to be transferred is entered instead.
- Comments: The username of the deleted user continues to be displayed in the comment.
- List views: The list views created by the user to be deleted are deleted and not assigned to the user to be transferred! Widgets based on the list views to be deleted must be removed manually!
- Email mailboxes: The email mailboxes of the user to be deleted are deleted. If the mailbox is used in an automation, it must be replaced by another one, as errors may otherwise occur.
- Integrations: All existing authentications in integrations of the user to be deleted are deleted. Depending on the integration, this may affect its functionality. Therefore, existing authentications should be checked before deletion and reconfigured if necessary. An exception is the Exchange Connector integration: when a user is deleted, an existing authentication is automatically removed.
- Automations: If the user to be deleted is used in an automation, the username of the user to be transferred is entered.
- Reports module: In all affected records, the user to be transferred is entered in the "responsible" field. If the user to be deleted is entered as a recipient of an automatically sent report, the user to be transferred is entered as the recipient.
- CSV Import/CSV Update: During CSV import or CSV update, if the user to be deleted has saved field mappings, these are transferred to the user to be transferred.
- Charts: If charts were created by the user to be deleted, they are assigned to the user to be transferred.
A deleted user cannot be restored!
The user "admin" cannot be deleted!
1.1.1.5. Copy User
To create users with similar attributes more quickly, it is possible to copy an existing user.
In the "Actions" column, either the actions icon (icon "three dots") can be clicked for the desired user or the user can be right-clicked. A flyout menu opens with the actions Edit, Delete, Copy and Login History.
After clicking the "Copy" action, the user creation view opens. All information from the underlying user has been carried over. The exceptions are the "Password" and "Confirm password" fields, which are not carried over and must be re-entered.
The username must also be reassigned, as identical usernames are not permitted.
To save changes made, the "Save" button at the top right must be clicked at the end.
If new users are frequently needed, a user can be created that is only used for cloning new users. All settings that are the same for all users, such as time zone, currency, etc., can already be entered here. This means the configuration does not have to be repeated for each new user and new users can be created much more quickly.
If this user is set to the status "inactive", it also does not count toward the booked user licenses.
1.1.1.6. Login History
The login history logs all successful logins and logouts of a user.
To view the login history, in the "Actions" column either the actions icon (icon "three dots") can be clicked for the desired user or the user can be right-clicked.
The "Login history of …" popup opens:
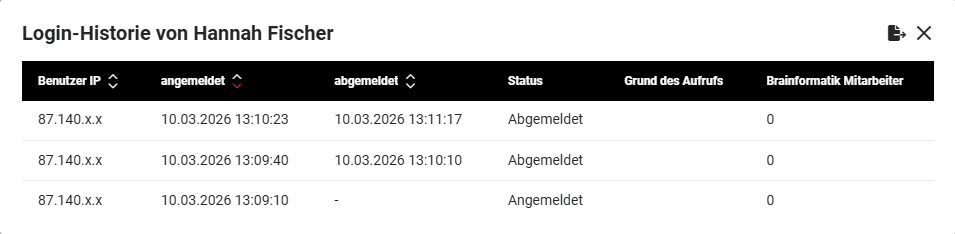 Popup Login History
The following information can be found in the tabular listing:
- User IP: Display of the IP address from which the user logged in.
For data protection reasons, however, only the first two blocks are shown here. - logged in: date and time of login
- logged out: date and time of logout
A value is only displayed when the user has correctly logged out. If the browser was simply closed, or if a forced logout was performed due to a session timeout, no value is entered here. - Status: The status shows whether a user has logged in or out.
The following fields are filled exclusively for the Brainformatik user serviceuser and serve to track when and for what reason a Brainformatik employee logged in:
- Reason for access: Display of the reason why the Brainformatik user serviceuser logged in (e.g. Project management).
- Brainformatik employee: Display of a number by which the logged-in Brainformatik employee can be identified.
1.2. User Detail View
The detail view of a user can be opened from the list view as follows:
- Click on the username
- Click on the last name
- Click on the first name
The setting options for users are described in detail in the My Settings section.
1.3. New User
New users are created using the "New User" button. After clicking the button, the user creation view opens.
The fields are described in detail in the subsections User Settings, Basic Settings, Further Settings and Tag Settings of the My Settings section.
When creating a new user, at minimum all required fields must be filled in:
All other fields are optional and can also be edited by the user themselves afterwards. The corresponding explanations for the fields, functions and options are described in detail in the My Settings section.
The username cannot be changed after creation/saving!
The settings for password strength (password length, numbers, uppercase letters, special characters, etc.) can be configured in Company Information - General Settings - Security.
If brainX uses multiple clients, note when creating a new user that access to individual clients is controlled via role assignment. A user only receives access to the clients to which their role is assigned. Further information on client management and rights management can be found in the section Company Information – Clients Rights Management.
1.4. Import Users
As a rule, new brainX users are created manually by the administrator in the "Global Settings - Users and Groups" area. New brainX users can also be created via a CSV import.
The CSV file must contain all required fields:
The first row of the CSV file contains the field names, where it should be noted that these correspond to the field names in brainX. When importing field values that are in selection lists (e.g. the "Language" field), the exact spelling of the selection list value must be used here.
Values for fields of type toggle/checkbox are entered in the CSV file as "yes" (alternatively "1") or "no" (alternatively "0"). The values are to be used without the double quotation marks (see example CSV file).
The downloadable "Example_file_Import_Users.csv" is intended to illustrate the structure of the CSV file:
1.5. License Display
Below the list view is the display of the booked and still available licenses.
The display "6/10 licenses active" means that ten user licenses have been booked and six users are active. Thus four more users with the user status "Active" can be created.
The user "admin" is always present and does not generally count toward the booked user licenses!
Users with the status "Inactive" also do not count toward the booked user licenses!
1.6. Change User Status
To temporarily deactivate users, the user's status can be set to "inactive". Users with the status "inactive" can no longer log in to brainX.
Inactive users do not count toward the quota of booked user licenses.
If a user who is set to "inactive" uses the Exchange Connector integration, the option "Clean up synchronized data" is displayed when deactivating. If this option is activated, all created folders and synchronized records are deleted from the Exchange account.
2. Groups
Groups are seen in brainX as organizational units. This means every member of the group can view, edit and delete an assigned record.
Which actions are possible for each user is defined via the corresponding specification of the profile from the respective module.
Custom access rules in the Global Rights Assignment can also be created for groups.
2.1. Group List View
The group list view has the following columns:
- No. → internal number of the group
- Group → name of the group
- Description → brief description of the group
- Actions → further actions (Edit, Delete and Calendar sharing) for groups
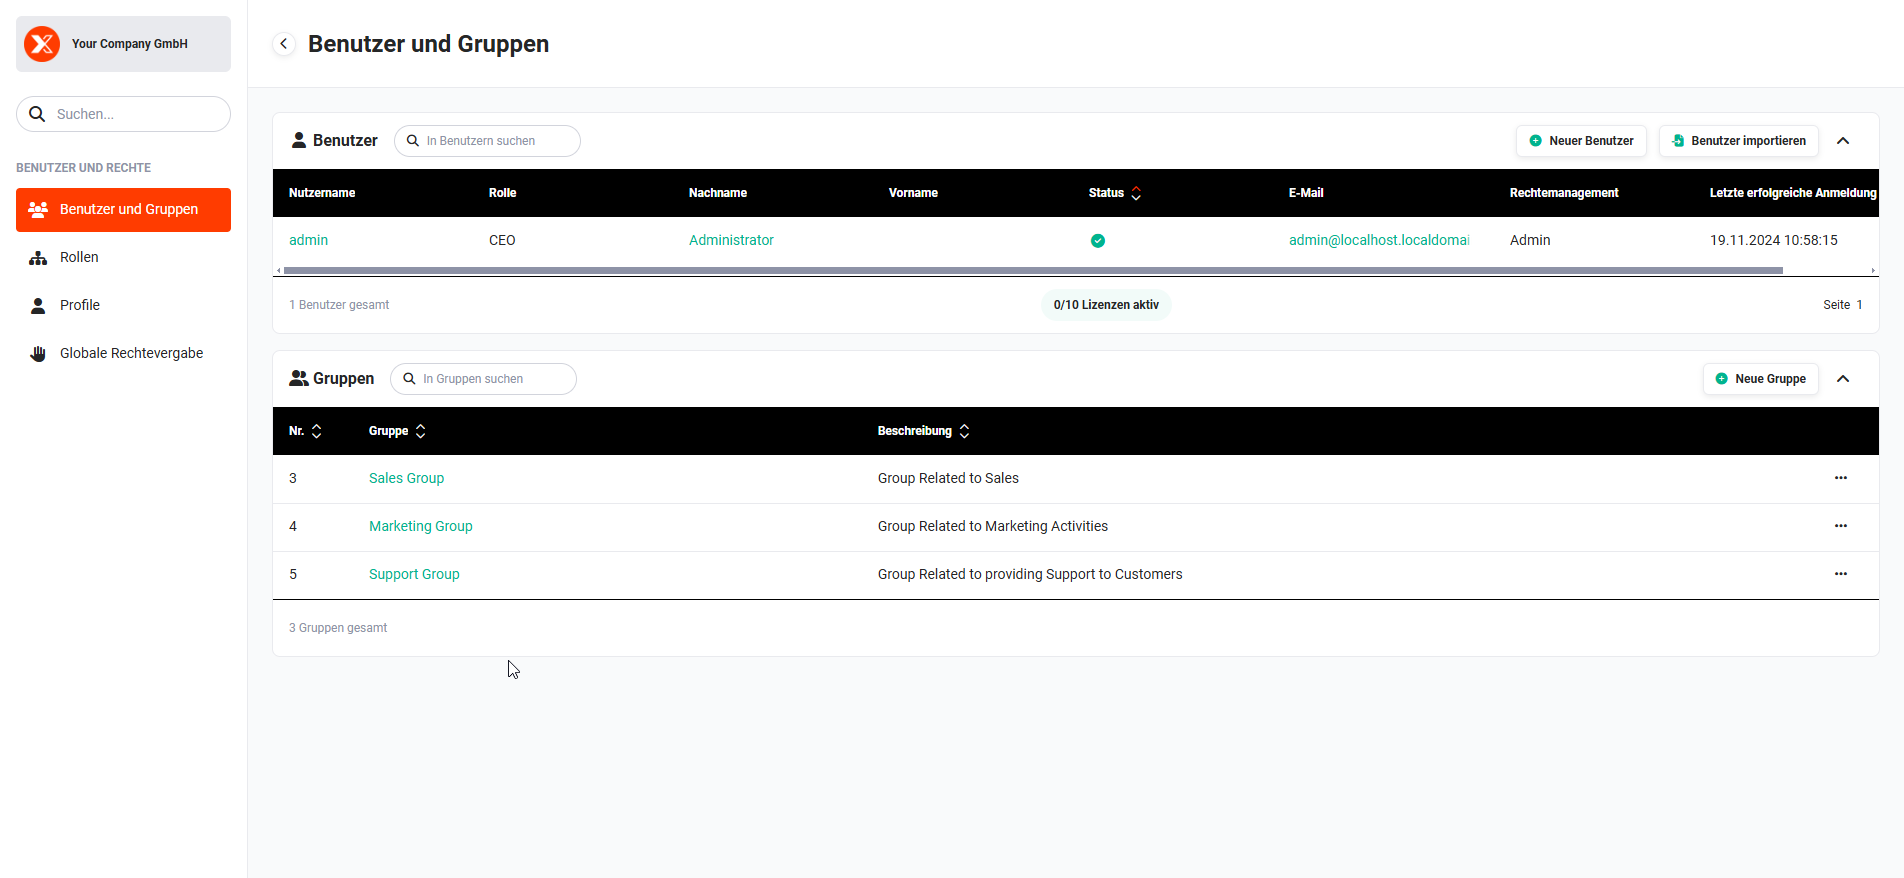 List View Users and Groups
2.1.1. List View Actions
Three general actions are available in the Groups block:
2.1.1.1. Search in Groups
In the "Search for groups" input field, the searched names/terms can be entered. After pressing the Enter key, the search is started. The group list view is reloaded and – if there are matches – restricted to the matching groups.
Only the following fields from the list view are searched:
- Group
- Description
Case sensitivity is ignored in the search. It is also irrelevant whether the search term is at the beginning, middle or end of the found value.
The groups "Sales Group", "Marketing Group" and "Support Group" exist. A search is performed with the term "sales".
Only the group "Sales Group" is listed.
To clear the search – so that all groups are displayed again – the "Search for groups" input field must be emptied and the Enter key pressed. All existing groups are now listed again.
2.1.1.2. Collapse/Expand Block
Both the block of the user list view and the block of the group list view can be collapsed separately.
To the top right of the list views – next to the "New Group" button – is the "Collapse/Expand" actions icon (icon "pointed bracket up/down").
After clicking the actions icon, the group list view is collapsed. Clicking again expands the list view.
2.1.1.3. Edit Group
In the "Actions" column, click the actions icon (icon "three dots") on the group to be edited. A flyout menu opens with the actions Edit, Delete and Calendar sharing.
After clicking the "Edit" action, the group edit view opens. To save changes made, the "Save" button at the top right must be clicked at the end.
The corresponding explanations for the fields, functions and options are described in detail in the Group Detail View section.
As soon as changes have been made to a group, the rights must be recalculated. A corresponding notice is displayed after saving:
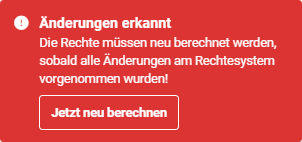 Notice: Changes Detected
The changes in the rights system are only recalculated and take effect after clicking the "Recalculate now" button!
2.1.1.4. Delete Group
In the "Actions" column, click the actions icon (icon "three dots") on the group to be deleted. A flyout menu opens with the actions Edit, Delete and Calendar sharing.
After clicking the "Delete" action, the "Delete group" popup opens:
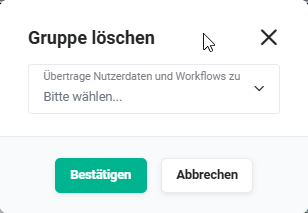 Popup Delete Group
In the next step, an active user or a group must be selected to transfer the user data and workflows to this user or group.
To complete the deletion of the group, the "Confirm" button in the popup must be clicked.
A deleted group cannot be restored!
2.1.1.5. Calendar Sharing
Calendar sharing allows users to share their calendar with other users and/or groups.
Calendar sharing can be granted individually for the calendar modules Appointments (block "Appointment sharing") and Tasks (block "Task sharing").
By clicking the "Add sharing" button in the "Appointment sharing" or "Task sharing" block in the popup, an additional row is displayed in which the sharing is defined.
In each row of a calendar sharing, the left selection list can be used to set who (user or group) has access to the records of the Appointments and Tasks modules.
The right selection list defines what permissions other users/groups have on your own records in the Appointments and Tasks modules.
The following permissions are available:
- Sees when I am busy → Other users/groups only see date and time, but no further details.
- Can see title and location → Other users/groups see date, time, title and location, but no further details.
- Sees all details → Other users/groups see all details, but cannot edit the records.
- Can edit everything → Other users/groups see all details and can edit the records.
- Delegate (read & write) → Other users/groups can access the records for reading and writing.
- Delegate (full access) → Other users/groups have full access to the records.
To create tasks for other users, at least the "Delegate (read & write)" permission is required.
Additional Setting for Appointment Sharing
The "Can see all details of private appointments" toggle in the "Appointment sharing" block determines whether the selected users/groups can see all details of a private appointment. The checkbox is only available for the "Delegate (full access)" permission.
Calendar sharing for private appointments: The "and edit" toggle is displayed as an additional sharing option when the "Delegate (full access)" sharing is selected and the "can see all private appointments" toggle is active.
Private appointments can, regardless of other rights settings, only be edited/deleted by the responsible user or the responsible group.
2.2. Group Detail View
In the detail view, the settings of a group can be viewed and edited.
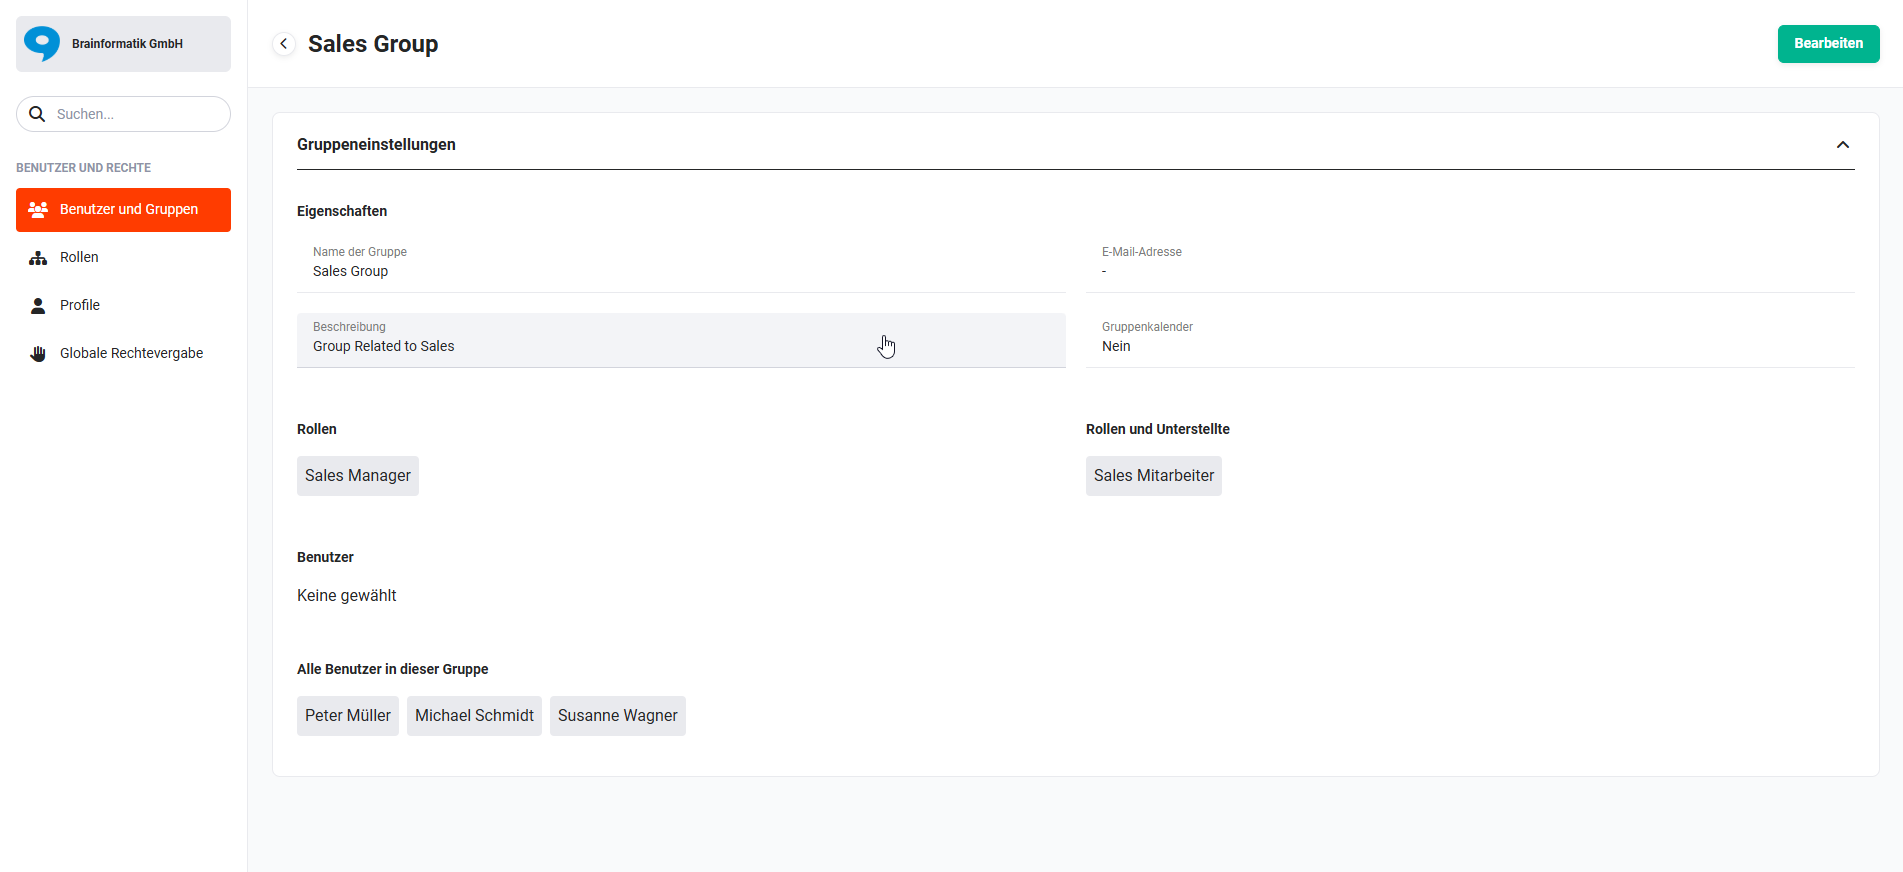 Group Detail View
The detail view is divided into several sections, which contain all relevant information about a group.
- Properties
- Group name → display of the group name
- Email address → The email address of a group is used when comments are written and the user has activated the email notification for comment notifications in My Settings.
- Description → description of the group (optional)
- Group calendar → display of whether the group calendar has been activated. If the group calendar is active, the additional Calendar Permissions section is displayed in the group view for editing group calendar rights and group calendar sharing.
- Roles
- Display of all roles belonging to the group
- Roles and Subordinates
- Display of all roles belonging to the group and subordinate roles
- Users
- Display of users who have been individually added to the group
- All users in this group
2.2.1. Calendar Permissions
If the group calendar of a group has been activated, the Calendar Permissions section is additionally displayed in the group detail view.
It shows here which group member has which permissions (create and edit, delete).
The corresponding configuration options for calendar permissions are described in detail in the New Group - Calendar Permissions section.
2.3. New Group
New groups are created using the "New Group" button. After clicking the button, the group creation view opens.
2.3.1. Group Settings
The following fields are available in the "Properties" and "Select members" areas:
Properties
- Group name → display of the group name
- Email address → The email address of a group is used when comments are written and the user has activated the email notification for comment notifications in My Settings.
- Description → description of the group (optional)
- Group calendar → display of whether the group calendar has been activated. If the group calendar is active, the additional Calendar Permissions section is displayed in the group view for editing group calendar rights and group calendar sharing.
Select members
The "Select members" area is divided into two parts. On the left side, members can be selected. On the right side, the selected members are displayed and can – if needed – be removed again.
When removing, members can be removed individually (icon "Remove" displayed on mouseover) or completely (button "Clear list").
When selecting members, the "Unit" selection list can be used to choose between the following units:
-
Users → selection of individual users
-
Roles → When a role is selected, all users assigned to this role become members of the group.
If a new user is created with this role or an existing user is transferred to this role, they are automatically part of the group.
-
Roles and Subordinates → Here not only a role and its members (users), but also all roles subordinate to the selected role with all users become part of the group.
This form of assignment is the most difficult to manage, as new users at all role levels become part of the group.
New sub-roles of the selected main role including their users also become part of the group.
It is recommended to structure groups simply rather than complex. This greatly simplifies administration.
An integrated search field rounds out the "Select members" area for quickly finding and selecting users, roles, etc.
Only the required field "Group name" needs to be filled in to save the new group. Other settings can be made afterwards.
As soon as the new group has been saved, the rights must be recalculated. A corresponding notice is displayed after saving:
Notice: Changes Detected
The changes in the rights system are only recalculated and take effect after clicking the "Recalculate now" button!
2.3.2. Calendar Permissions
If the group calendar was activated in "Group Settings - Properties", the additional Calendar Permissions section is displayed in the group view.
To configure the calendar permissions, the group must be edited. For each member of the group, it can be defined separately what permissions they have.
The toggle defines whether the member has the permission to create and edit entries in the calendar. Additionally, it can be defined whether the member also has the permission to delete entries in the calendar.
The permissions "create and edit" and "delete" can be granted independently of each other per member. This means a member can be authorized to delete calendar entries but not have permission to create and edit them.
3. Practical Examples
1 – Quickly create a new employee: Copy a user instead of reconfiguring
A new sales employee joins the company. Since an existing colleague already has the same role assignment, timezone, language, and currency settings, their user account is copied via the Copy action. In the creation view, the username, last name, first name, email, and password are updated. After saving, the new user is active with all inherited settings.
2 – Map holiday cover using calendar sharing
An assistant covers for her manager during vacation and needs to manage the manager's appointments. Via the Calendar Sharing action on the manager's user account, the assistant is granted the permission Deputy (read & write) for the Appointments module. The assistant can now create and edit appointments in the manager's calendar for the duration of the absence.
3 – Create a sales group with role-based membership
The company wants to ensure that all current and future sales employees automatically have access to shared deals and contacts. Instead of adding individual users to the group, the Sales group is configured with the unit Roles and the role Sales Employee. New users assigned to this role automatically become group members — without any manual maintenance of the group.
4 – Deactivate a user when an employee leaves instead of deleting them
An employee leaves the company. Since their records, comments, and history entries should be preserved, the user is not deleted but set to Inactive status. The user can no longer log in, does not count toward the license, and all records remain correctly assigned. Reassigning records to a successor can be done separately via CSV export or manual record transfer.
5 – Create many users at once via CSV import
At go-live of a new client, 25 users need to be created simultaneously. A CSV file is built following the structure of the sample file and contains all required fields: last name, email, username, role, password, status, and language. After importing via the Import Users button, all users appear in the list view and can log in with their credentials.
4. Frequently Asked Questions
What happens to the records of a deleted user?
When deleting a user, a target user must be specified to whom all responsibilities are transferred. Comments retain the original username. List views created by the deleted user are deleted and not transferred to the target user — widgets based on those list views must be removed manually.
Why are permission changes for a group not effective immediately after saving?
After every change to a group, the notice Changes detected appears. The changes only take effect after clicking the Recalculate now button. Without this step, the permission system remains in its previous state.
What is the difference between adding an individual user and adding a role to a group?
Adding an individual user requires manual maintenance whenever the team changes. Adding a role instead automatically makes all current and future users of that role members of the group — less maintenance overhead, but slightly harder to see at a glance who exactly is a member.
Can a user belong to multiple groups?
Yes. A user can be a member of any number of groups — either through direct assignment as a user or indirectly via their role. The effective permissions result from the combination of all groups and the assigned role.
What is the difference between deleting a user and deactivating a user?
Deactivating (setting status to Inactive) prevents login but preserves all data and does not count toward the license. Deleting permanently removes the user and cannot be undone — responsibilities are transferred, but list views are deleted. When an employee leaves, deactivation is recommended as the first step.
Does the "admin" user count toward the booked licenses?
No. The system user admin is always present and is not counted toward the booked user licenses. Users with Inactive status also do not count toward the license.