
Email Marketing
Package: MARKETING
1. General
Unlike standalone email marketing solutions, the Email Marketing module focuses on the core areas of brainX: adding and synchronizing contacts to lists, displaying statistics for individual recipients in brainX, and linking fields from brainX with recipient fields of the provider to maintain all relevant information directly in brainX.
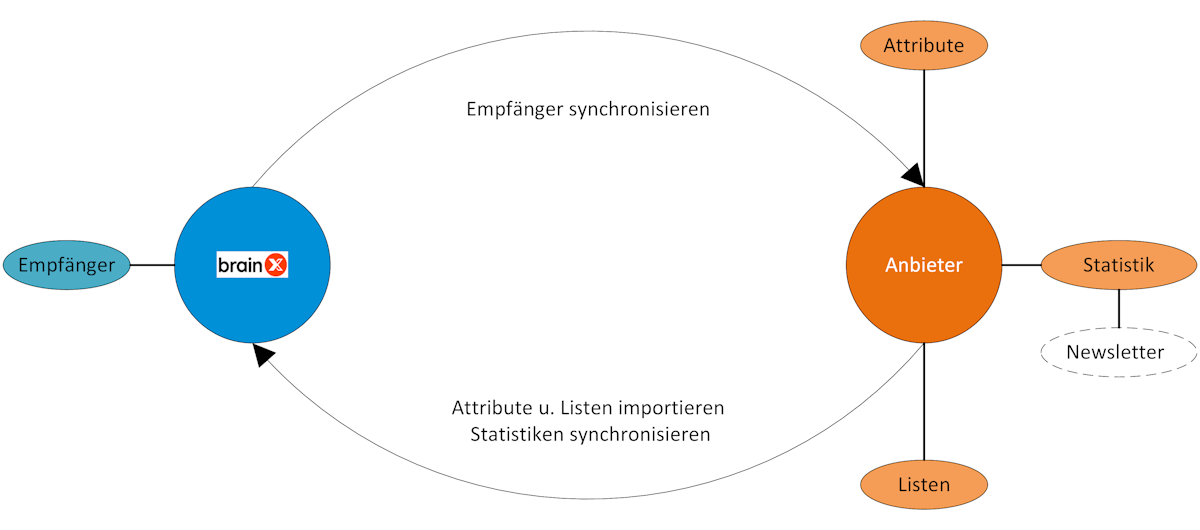
Creating and sending newsletters as well as comprehensive campaign evaluations, on the other hand, are performed directly at the respective provider. This division of tasks has the following reasons:
- Scope of features: Providers continuously develop their solutions. Many of the resulting features – especially in the areas of newsletter design and campaign evaluation – are not made available via an interface and are therefore not available in brainX.
- Legal compliance: Today's standard procedures for Double Opt-in and Opt-out can only be implemented in a legally compliant manner on the provider's side.
- Flexibility: Features such as the design of sign-up and unsubscribe forms, responsive newsletter design, or comprehensive campaign evaluations are only available in full directly at the provider.
The Email Marketing module allows the management of multiple providers and multiple accounts per provider. For example, marketing and sales departments can use different accounts in brainX.
The following providers are currently available:
A account with the respective email marketing provider is required for use. Costs depend on the respective provider.
The "Email Marketing" module supports multi-client operation.
The marketing team wants to send a monthly newsletter to all active contacts. In brainX, the contacts are synchronized with the corresponding Brevo list via the Synchronize Recipients tab. Fields such as First Name, Last Name and Company are linked with the recipient fields in Brevo via Manage Attributes. The newsletter itself is designed and sent directly in Brevo. Open rates and click rates can then be viewed in the Dashboard tab in brainX.
An interested party signs up for the newsletter via a sign-up form on the company website. The provider notifies brainX of the sign-up. Thanks to the configured setting New Lead, a lead record is automatically created in brainX and the responsible sales employee is notified.
2. Provider Overview
2.1. Brevo
Brevo offers, in addition to mature email marketing functionalities, excellent evaluation and statistics options for the most important key figures such as delivery rate, open rate, click rate and conversion rate as well as unsubscribes and bounces. Brevo has an ISO certification and is GDPR-compliant. All data centers used are located in the EU.
Information on current prices: Brevo – Pricing Overview
2.2. CleverReach
CleverReach is a provider headquartered in Germany. All data is stored in secure data centers exclusively in the European region. In addition to paid plans, CleverReach also offers a free Lite version with which a limited number of emails per month can be sent free of charge.
Information on current prices and quotas: CleverReach – Prices & Plans
2.3. Inxmail
Inxmail is a multiple-certified, German-made email marketing software. The focus of the modular platform is on data security and a user-friendly interface.
Information on current prices: Inxmail – Prices & Services
2.4. MailChimp
MailChimp is one of the world's leading email marketing tools headquartered in the USA. In addition to paid plans, a free plan is available that includes a limited number of contacts and sends per month.
Information on current prices and quotas: MailChimp – Plans
3. Integration with Email Marketing Providers
The following illustration shows the process for sending a newsletter from brainX in conjunction with a supported provider:
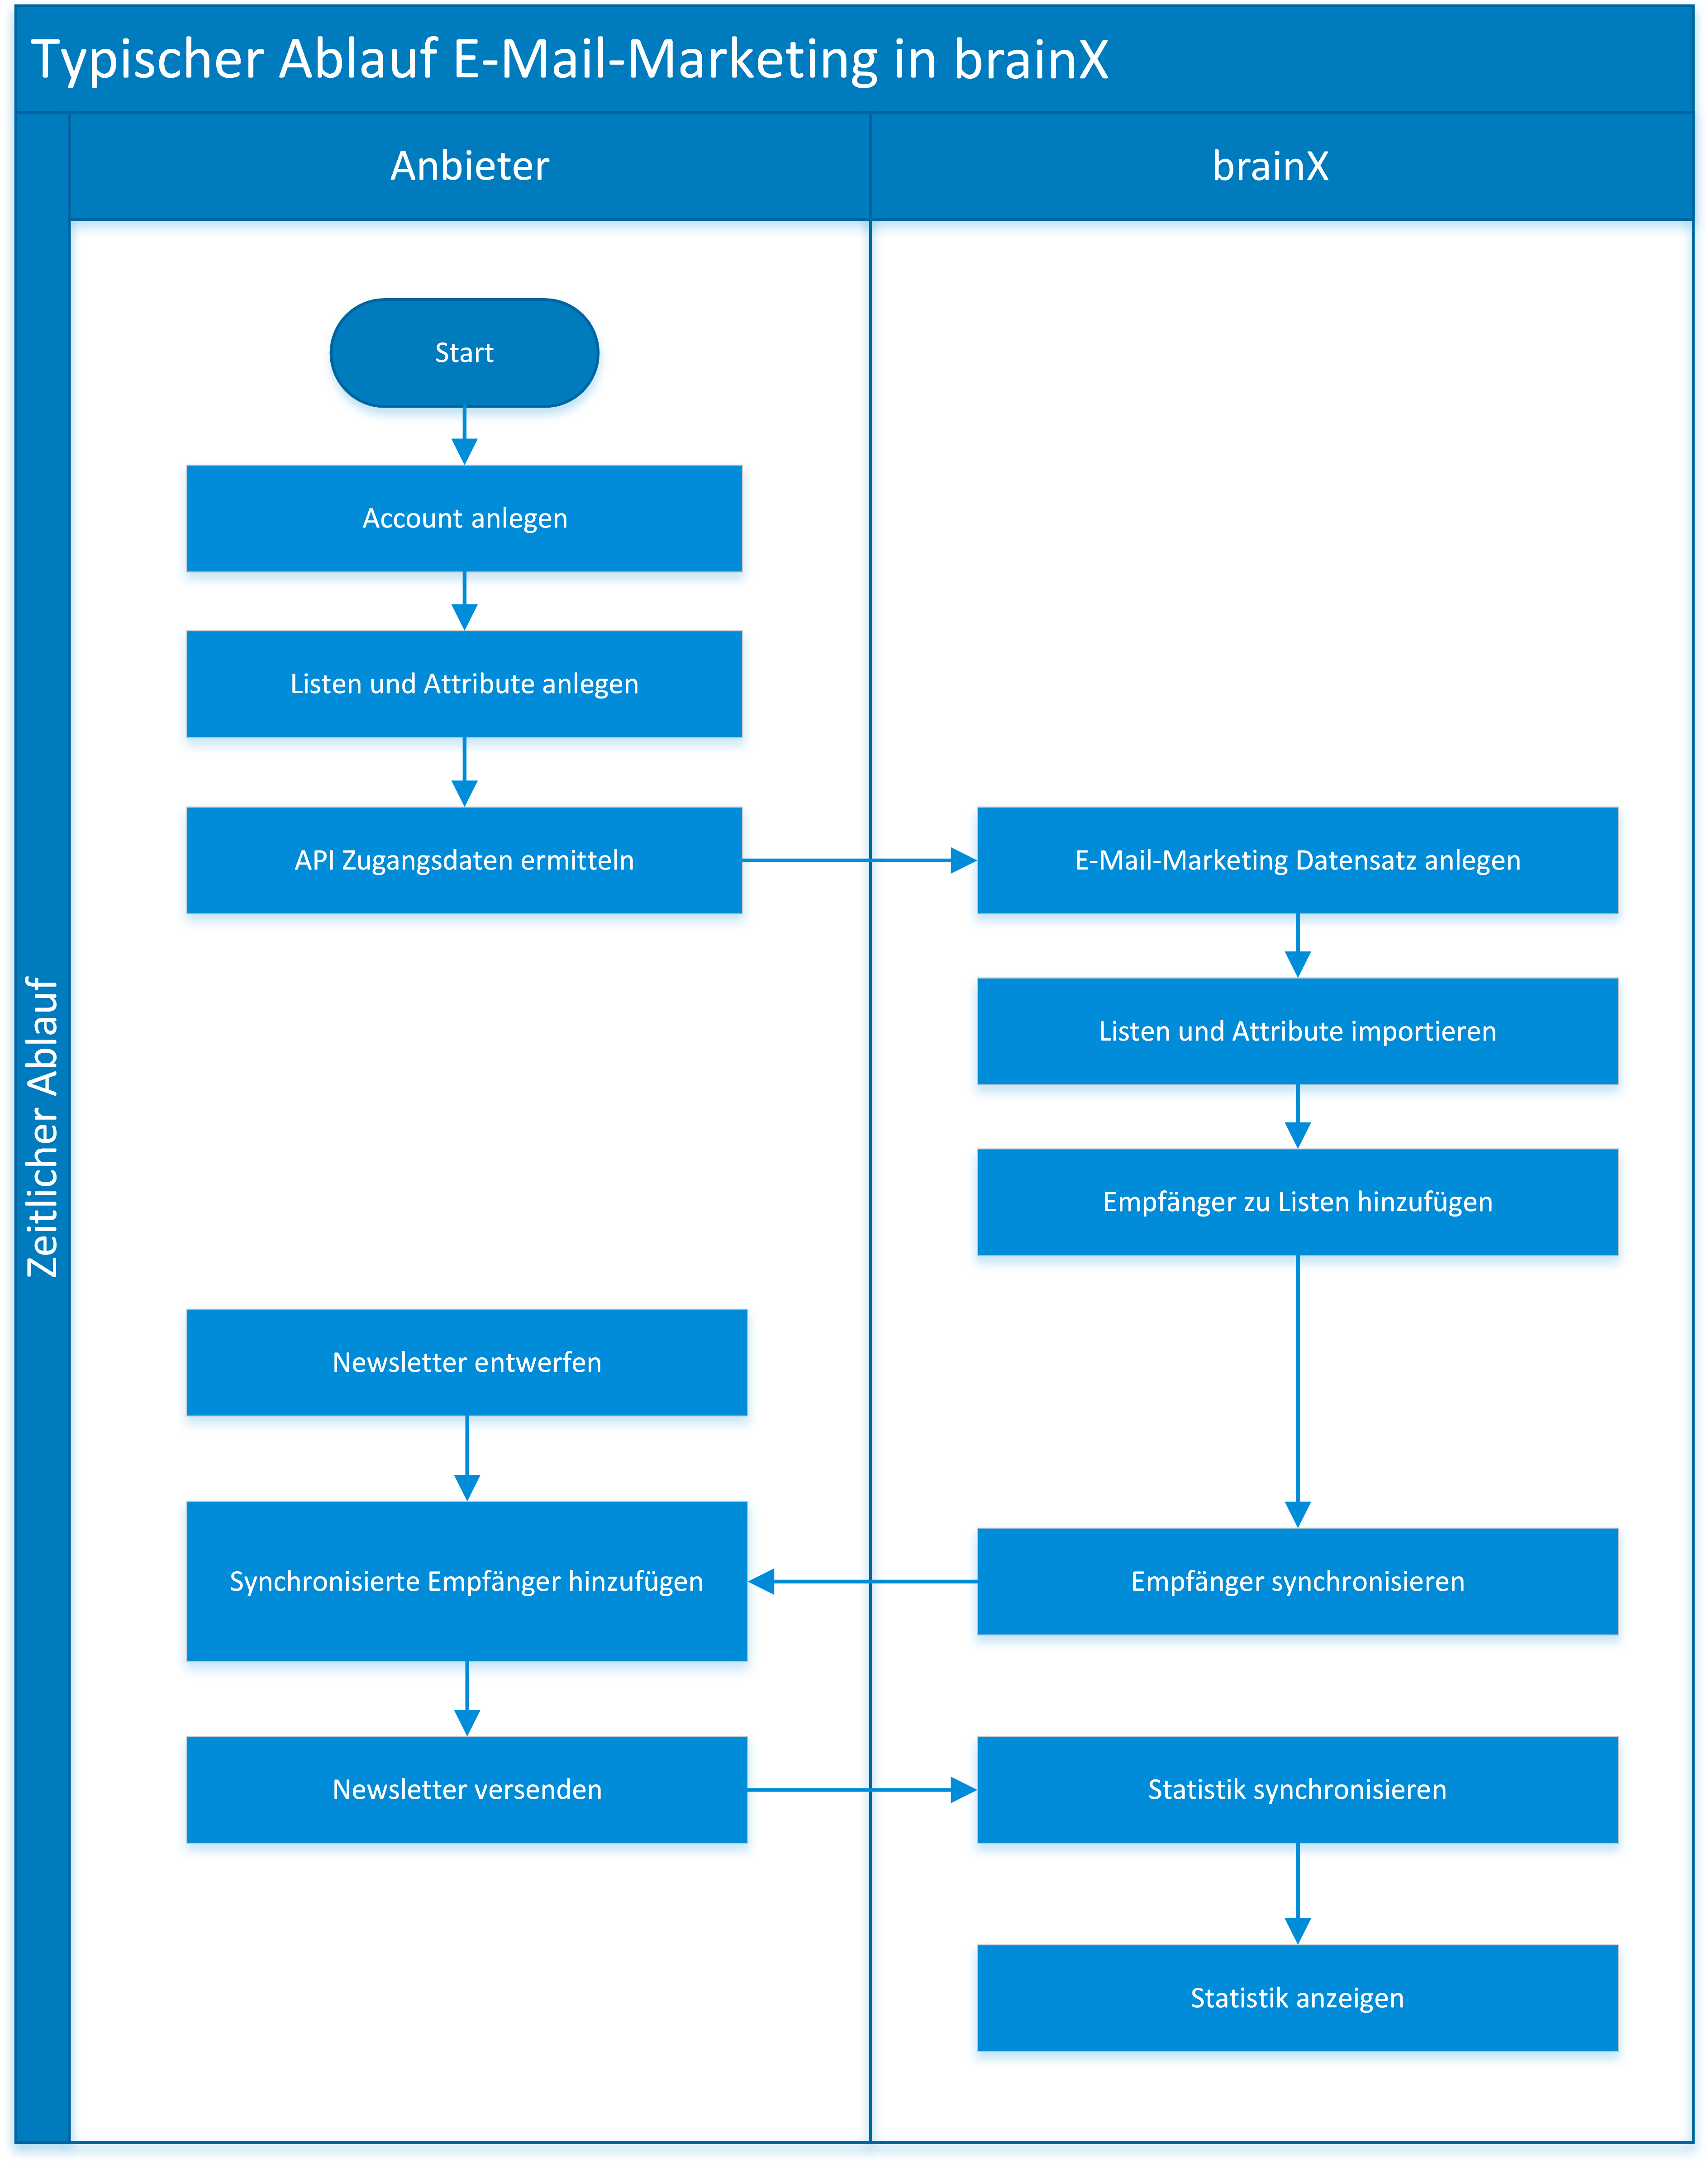 Schematic process of Email Marketing in brainX
4. Global Settings
For the full functionality of the Email Marketing module, the following background tasks (cron jobs) must be enabled in Global Settings – Background Tasks:
- Email Marketing Events → Synchronizes events (sign-ups, unsubscribes, hard bounces) of all existing email marketing accounts.
- Email Marketing Statistics → Synchronizes the statistics of all email campaigns of all existing email marketing accounts.
5. Linking an Account with brainX
Multiple providers and multiple separate accounts per provider can be configured in the Email Marketing module.
To link an account of a supported provider with brainX, a new record is created via the "Add Account" button in the Email Marketing module. Alternatively, a new record can be created via the Navigation Bar and the action "Create → Email Marketing".
The record requires at least an internal name and – after selecting a provider – its credentials. The credentials can be viewed at the respective provider in the account settings. When saving the record, the credentials are checked directly.
Depending on the provider, creating a new record differs. Detailed information can be found on the respective provider sub-pages:
5.1. List View
A list view in the Email Marketing module is only available when at least 2 records (providers) have been created.
Records are displayed not as a list but as tiles.
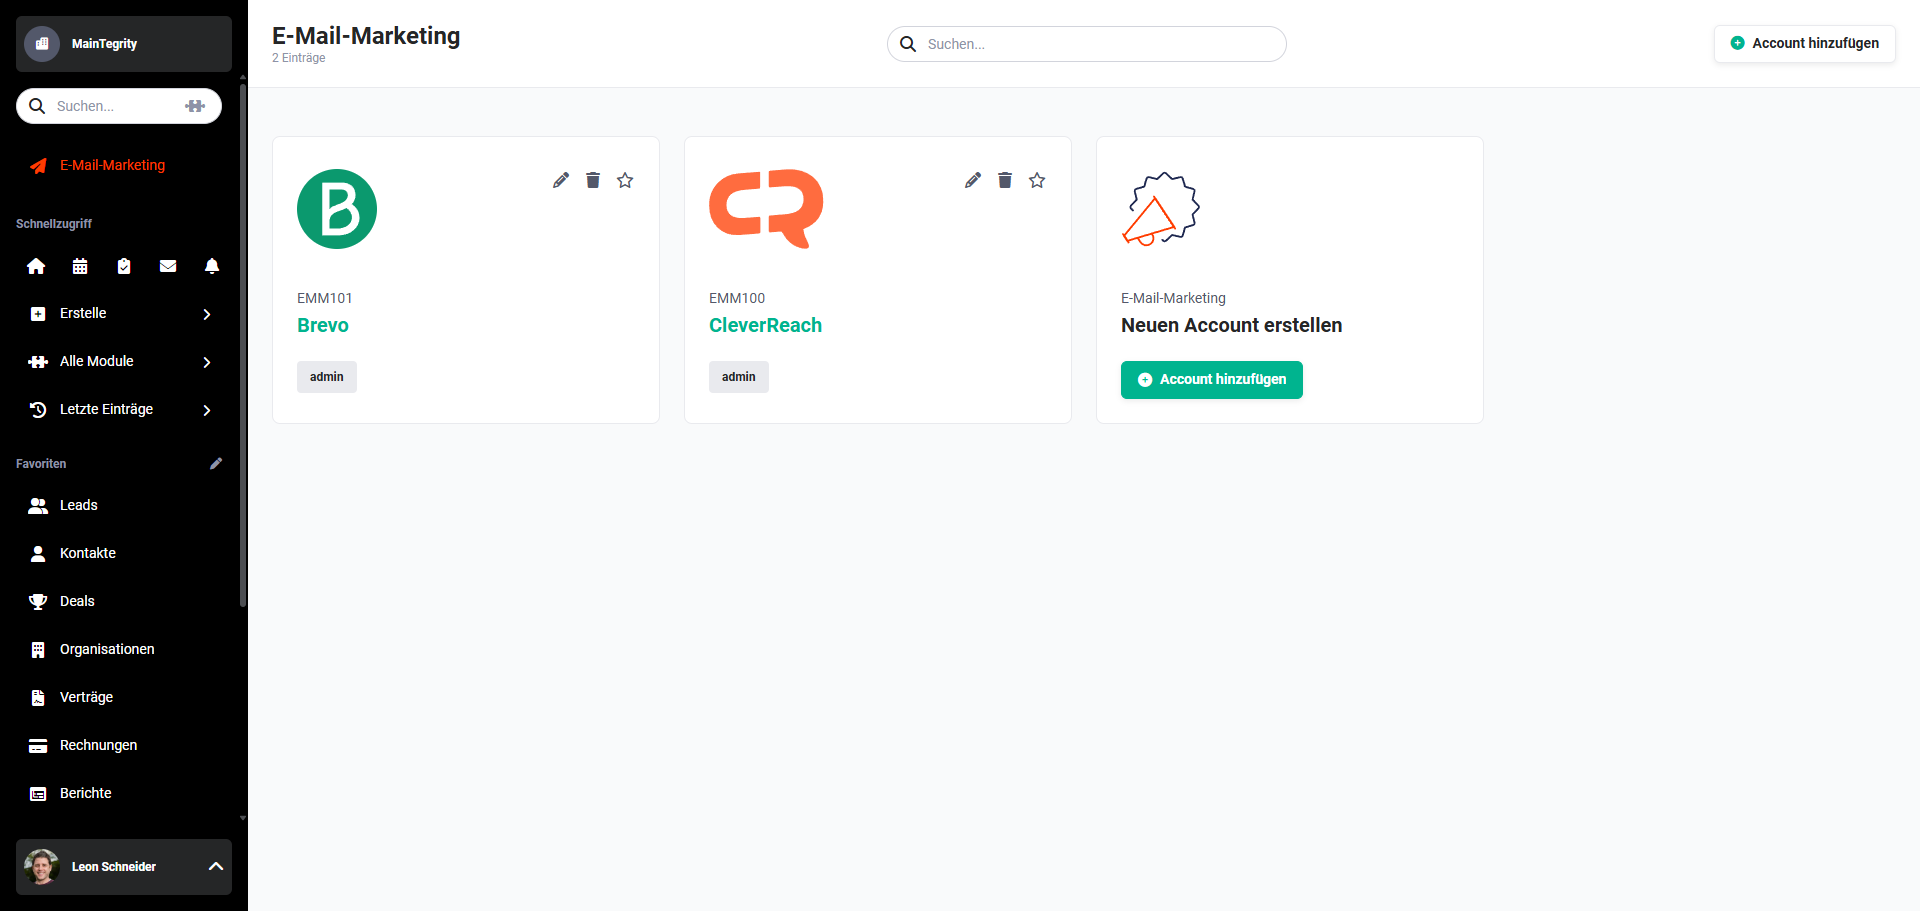 Email Marketing module
6. Tabs in the Detail View
The detail view of an account includes five tabs:
- Email Marketing Information – Standard information and credentials of the account; comments and tags
- Manage Attributes – Import attributes from lists and link with brainX fields
- Synchronize Recipients – Import lists and select and synchronize recipients
- Bounce Reactions – Configure reactions to soft bounce, hard bounce and unsubscribe
- Dashboard – Basic statistics of all sent newsletters
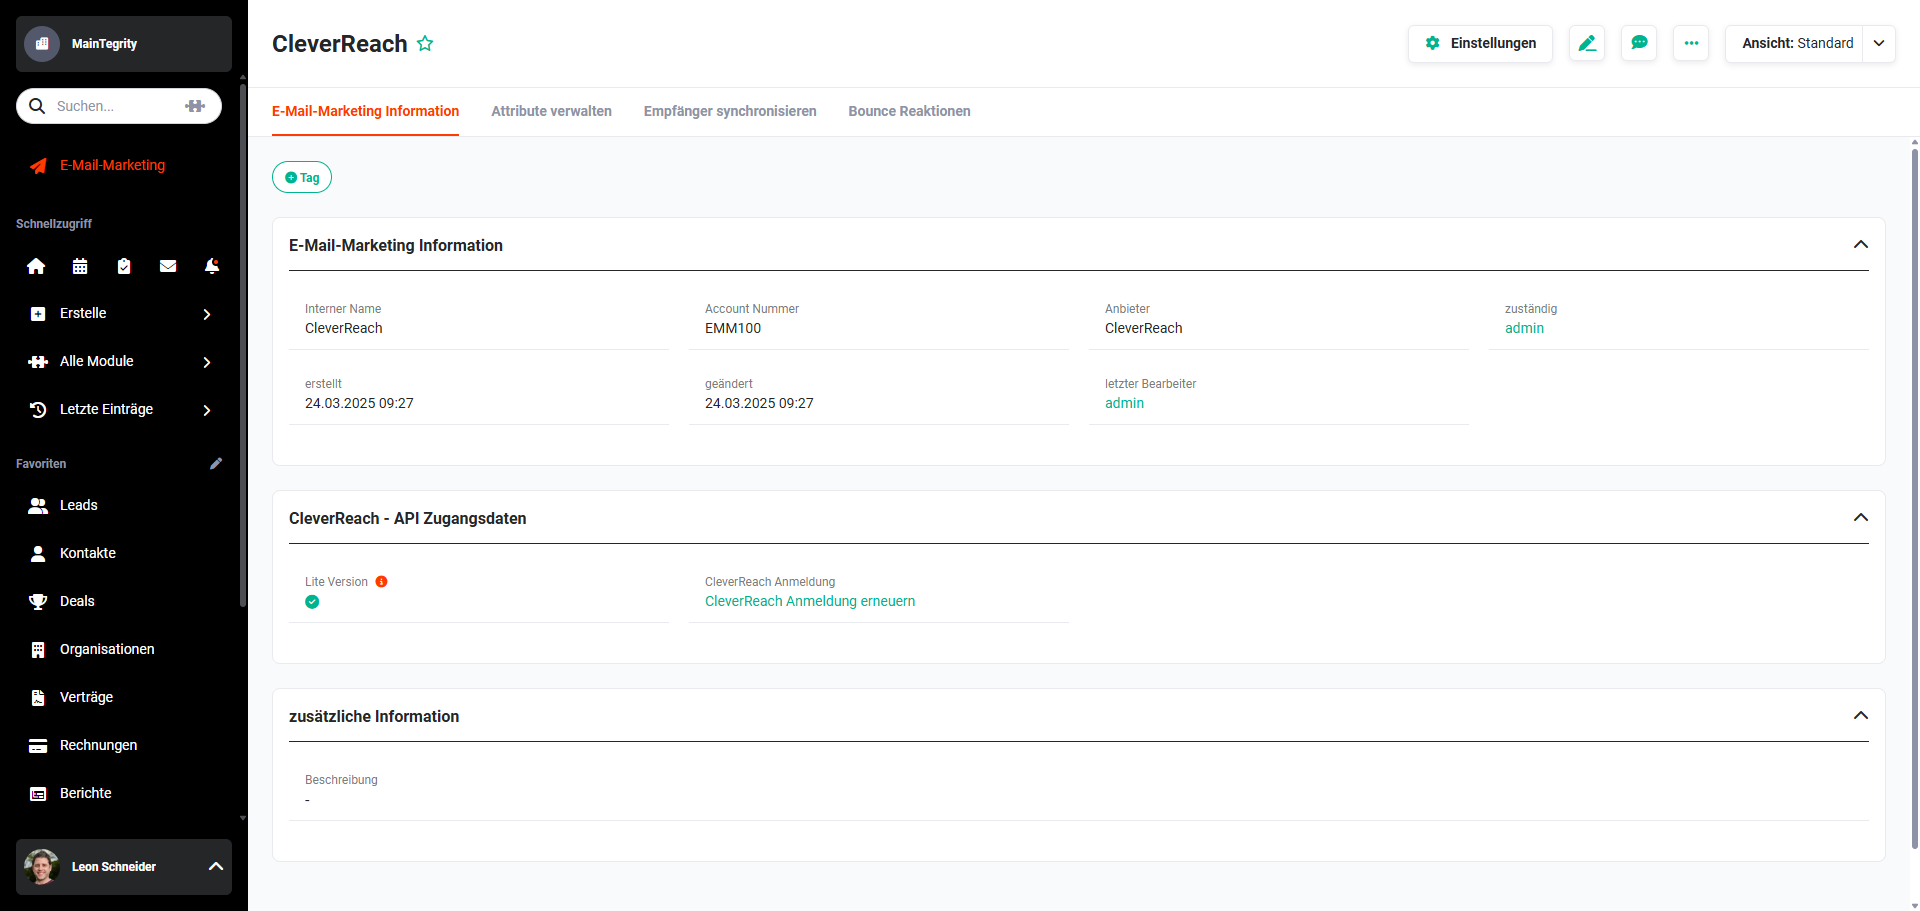 Example detail view – Provider CleverReach
6.1. Tab "Email Marketing Information"
The "Email Marketing Information" tab contains the standard information and credentials of an account.
Depending on the provider, information such as API key, login URL or username/password is displayed here.
Additionally, a description can be entered, comments can be written and tags can be assigned.
6.1.1. Actions
In addition to the standard actions (Edit, Recommend, Delete and Change Tracking), the following additional actions are available here:
| Action | Requirement | Functionality |
|---|---|---|
| Settings | – | Opens the sidebar for configuring the CRM address, email address fields, sign-ups and notifications – see Section 7.1 |
| Show Errors | – | Opens a popup with all errors that occurred during interface communication |
6.2. Tab "Manage Attributes"
The "Manage Attributes" tab enables the import and management of attributes from lists and linking with fields from the brainX system.
After clicking the "Import Attribute" button, the "Import New Attribute" popup opens:
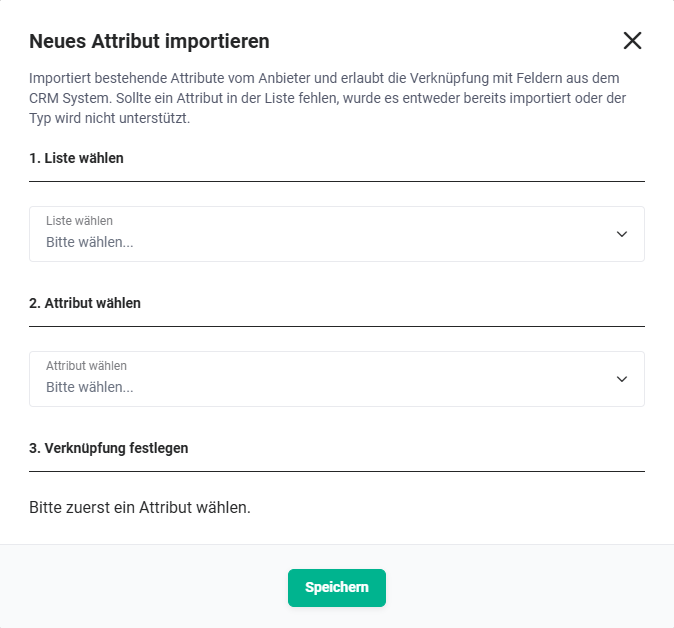 Import New Attribute popup
In the popup, existing attributes are imported from the provider and linked with fields from the brainX system. If an attribute is missing from the list, it has either already been imported or the type is not supported.
Importing and managing attributes is described in detail in the following section Import New Attribute.
Once attributes have been imported and fields linked, this is displayed accordingly in the "Manage Attributes" tab in a list view.
The overview contains the following information:
- Lists → All lists for which attributes are linked are displayed below each other.
- Attributes → All linked attributes are displayed per list.
- Type – The type of each attribute is listed.
- Linked CRM Fields → For each module, the field linked with the attribute is displayed.
- More Options → For selection lists, the information about which values from the CRM are linked with which values of the provider can be displayed.
- Actions → Links of imported attributes can be edited and an imported attribute can be deleted.
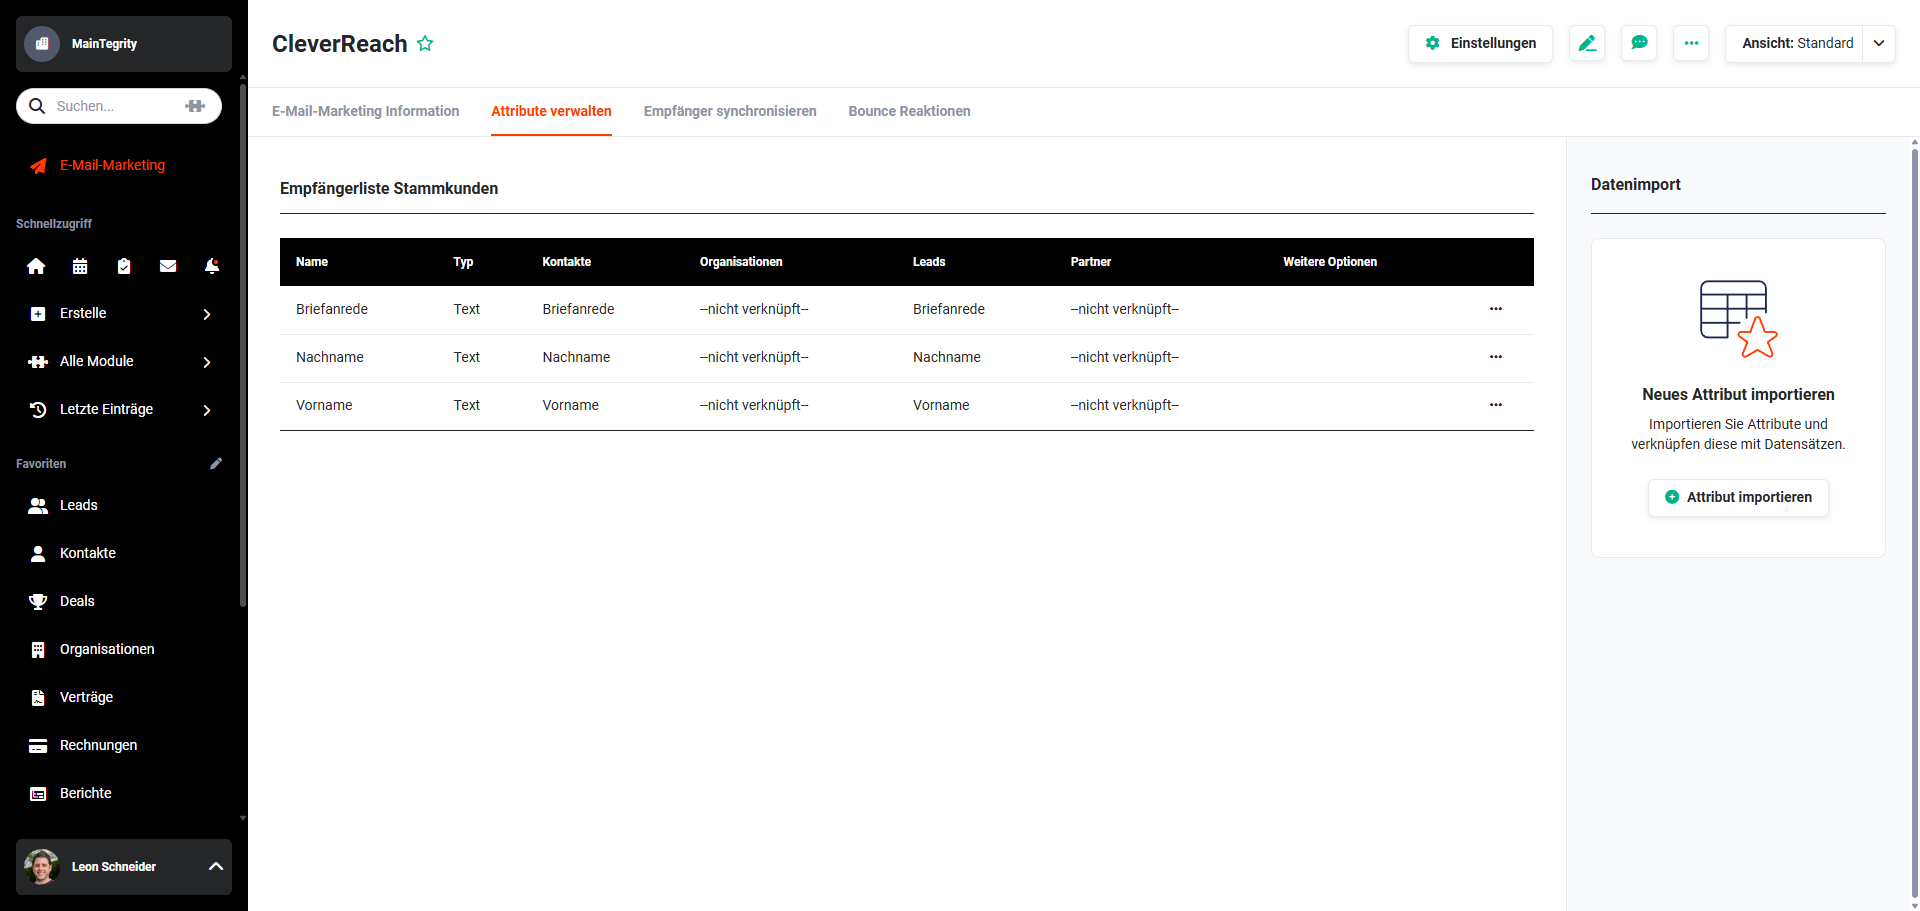 Example view of the "Manage Attributes" tab of a CleverReach account with already imported attributes
6.3. Tab "Synchronize Recipients"
In the "Synchronize Recipients" tab, recipient lists can be imported and recipients can be selected and synchronized. Recipients can be chosen from the modules Organizations, Contacts, Leads and Partner.
The procedure for synchronizing recipients is described in detail in the section Synchronize Recipients.
6.4. Tab "Bounce Reactions"
In the "Bounce Reactions" tab, reactions to a Soft Bounce, a Hard Bounce and an unsubscribe from the mailing list can be configured.
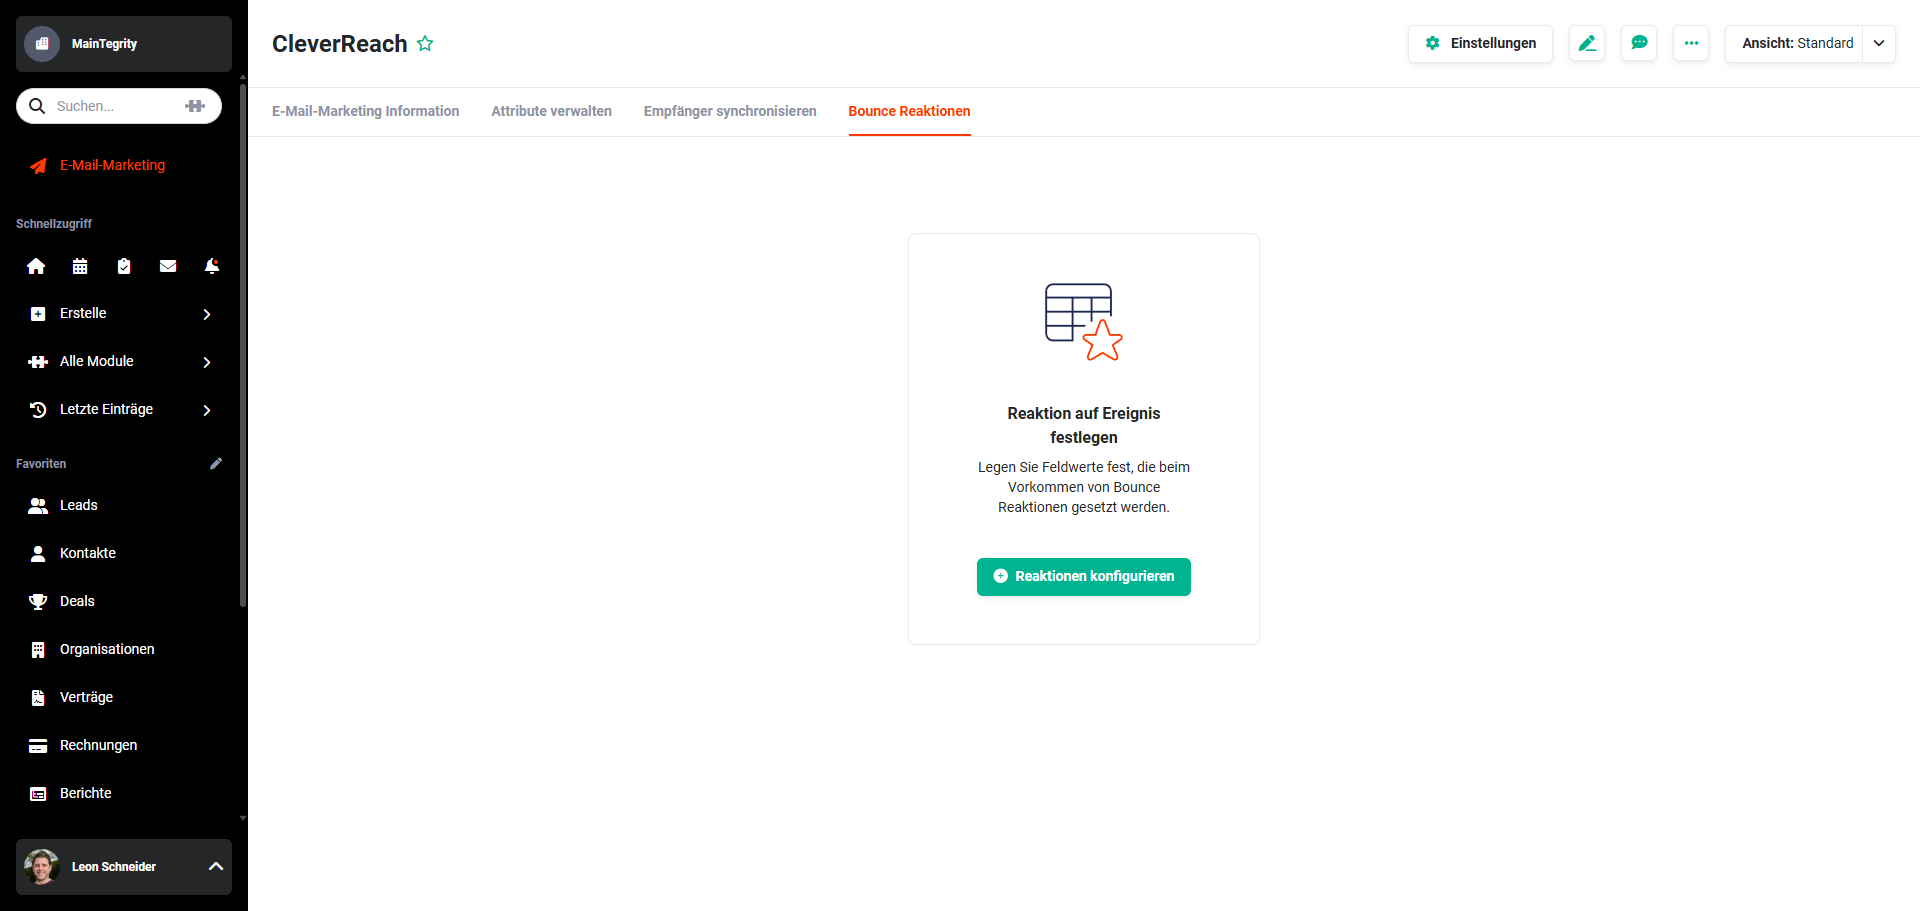 "Bounce Reactions" tab without configured reactions
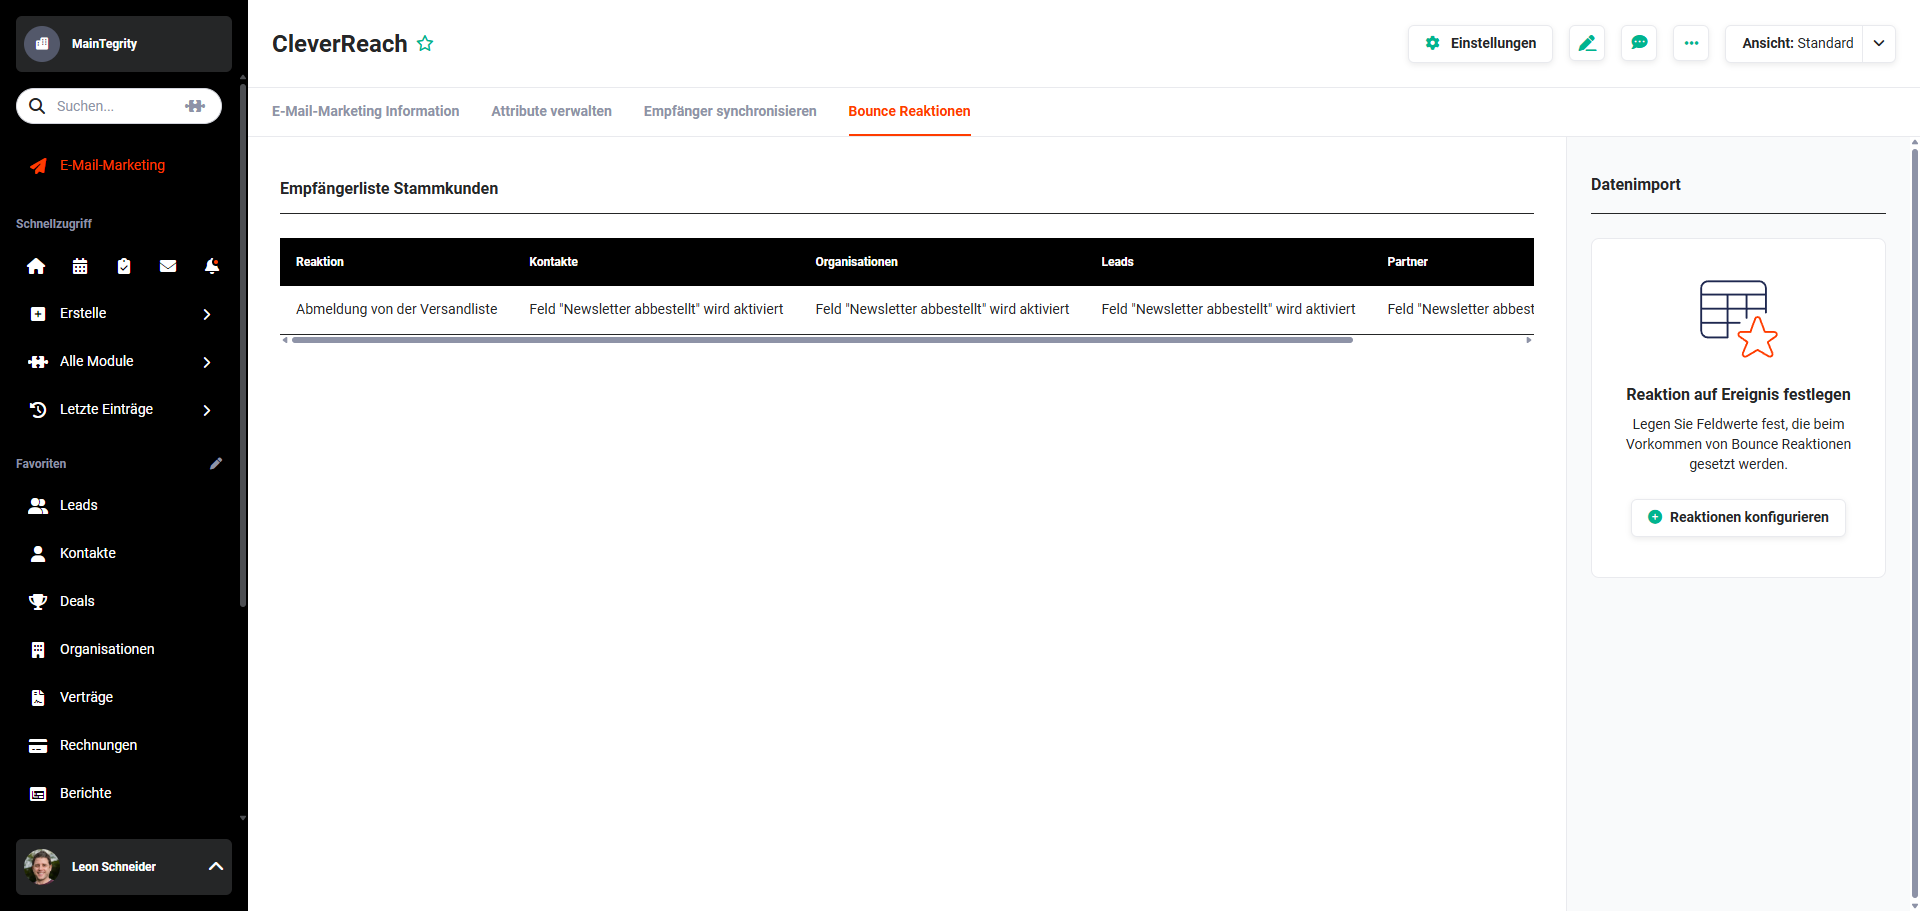 "Bounce Reactions" tab with configured reactions
After clicking the "Configure Reactions" button, the "Set Reaction to Event" popup opens.
The configuration is described in detail in the section Configure Reactions.
6.5. Tab "Dashboard"
The "Dashboard" tab shows basic statistics of all newsletters sent via the provider.
All newsletters whose statistics have been synchronized with brainX are listed here.
The "Dashboard" tab is only shown if the statistics synchronization has been executed at least once initially.
When using the provider Inxmail, this functionality is not available, as this provider's API does not provide statistics.
The synchronization of statistics is done by default once daily overnight via the background task (cron job) "Email Marketing Statistics".
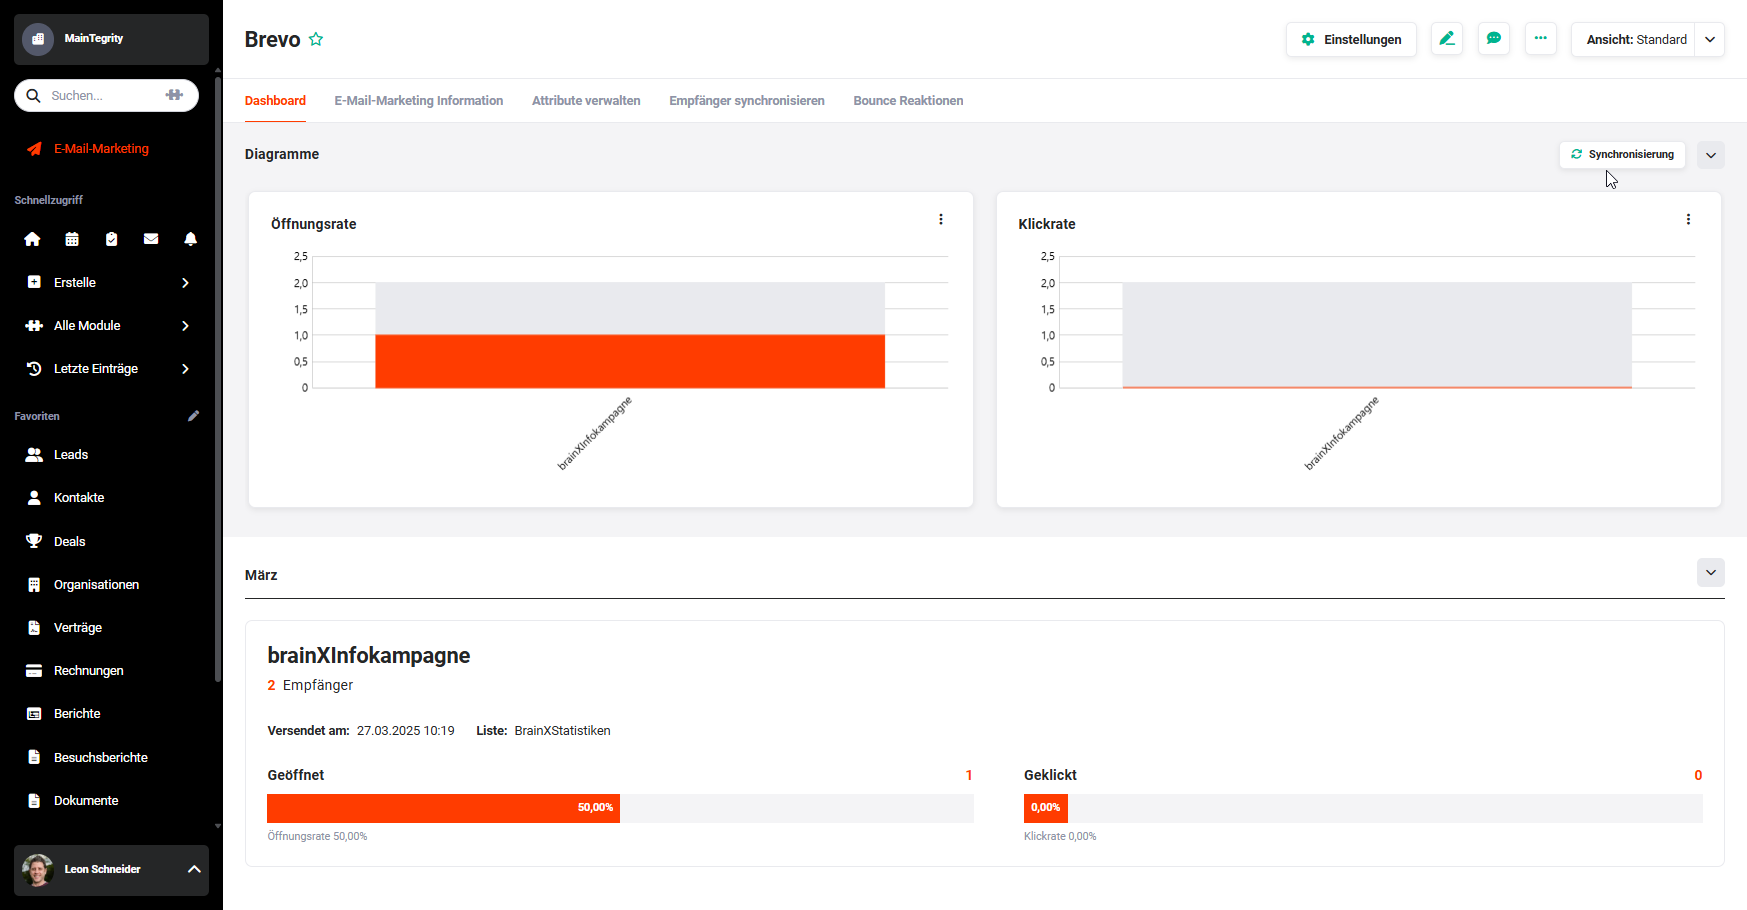 Dashboard tab with statistics
The Dashboard tab is divided into the following sections:
- Charts → Open Rate and Click Rate as charts
- Campaigns → Time-based grouping of campaigns with number of recipients, send date, list name and charts for open and click rates
7. Actions
In addition to the standard actions, the following email marketing-specific actions are available. Which actions are displayed depends on the active tab:
| Tab | Available Actions |
|---|---|
| Email Marketing Information | Settings |
| Manage Attributes | Import New AttributeSettingsConfigure Reactions |
| Synchronize Recipients | Import ListSettingsShow Errors |
| Bounce Reactions | Configure Reactions |
| Dashboard | Synchronize Statistics |
7.1. Settings
The settings of an account can be opened in all tabs via the "Settings" button. After clicking, the "Settings" sidebar opens.
All changes made in the settings are automatically saved.
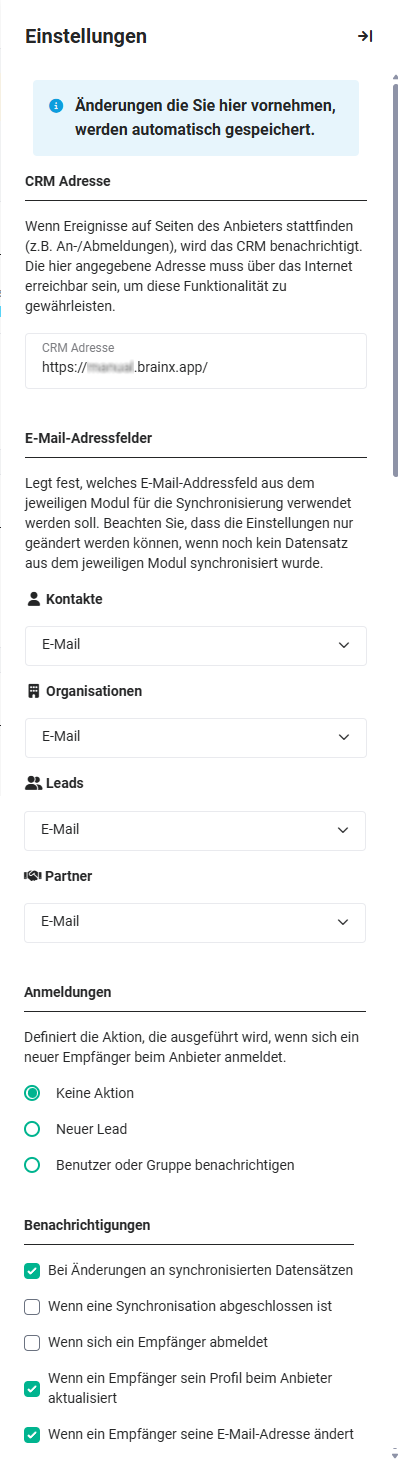 Settings sidebar
The settings sidebar is divided into several sections, which may differ slightly depending on the provider:
7.1.1. CRM Address
The "CRM Address" field is already pre-filled with the correct address.
When events occur on the provider's side (e.g., sign-ups/unsubscribes), brainX is notified. The address specified here must be accessible via the internet to ensure this functionality.
7.1.2. Email Address Fields
The settings made here determine which email address field from the respective module should be used for synchronization. If a lead is created due to a new newsletter sign-up, the email address is also entered into this field.
The settings of the email address fields can only be changed if no record from the respective module has been synchronized yet.
7.1.3. Sign-ups
When a new sign-up is reported by the provider to brainX, one of the following actions can be executed:
- No Action → The sign-up is ignored.
- New Lead → Responsible user and lead source can be set. The responsible user can be notified of new sign-ups. If the lead is later converted, the created contact is used as the recipient.
- Notify User or Group → Sends a message to the selected user or group. The following actions are then available:
- Create Lead → A lead is created in brainX.
- Delete at Provider → Deletes the recipient at the provider.
- Ignore → The recipient remains in the provider's list but is not created in brainX.
If a group is notified, the message is deleted from the inbox of all users as soon as one of them has executed one of the mentioned actions.
7.1.4. Notifications
For certain actions of the Email Marketing module, messages are sent to the responsible user of the account. Not all of them can be deactivated, as they are necessary for the function of the module. The following notifications can be configured:
-
On changes to synchronized records
When a synchronized record in brainX is changed, a message is sent. The email address field and the CRM fields linked with the provider are checked.
-
When a synchronization is completed
Since synchronization takes place in the background, the initiator is informed about the completion of the process.
-
When a recipient unsubscribes
Sent as soon as a recipient unsubscribes via the provider or has been automatically unsubscribed due to a hard bounce.
-
When a recipient updates their profile at the provider
Some providers allow recipients to edit certain information. When enabled, a notification is sent to update the data in brainX if necessary.
-
When a recipient changes their email address
The email address is automatically updated in the configured field to maintain synchronization. If required, the responsible user of the account record is informed.
7.2. Import New Attribute
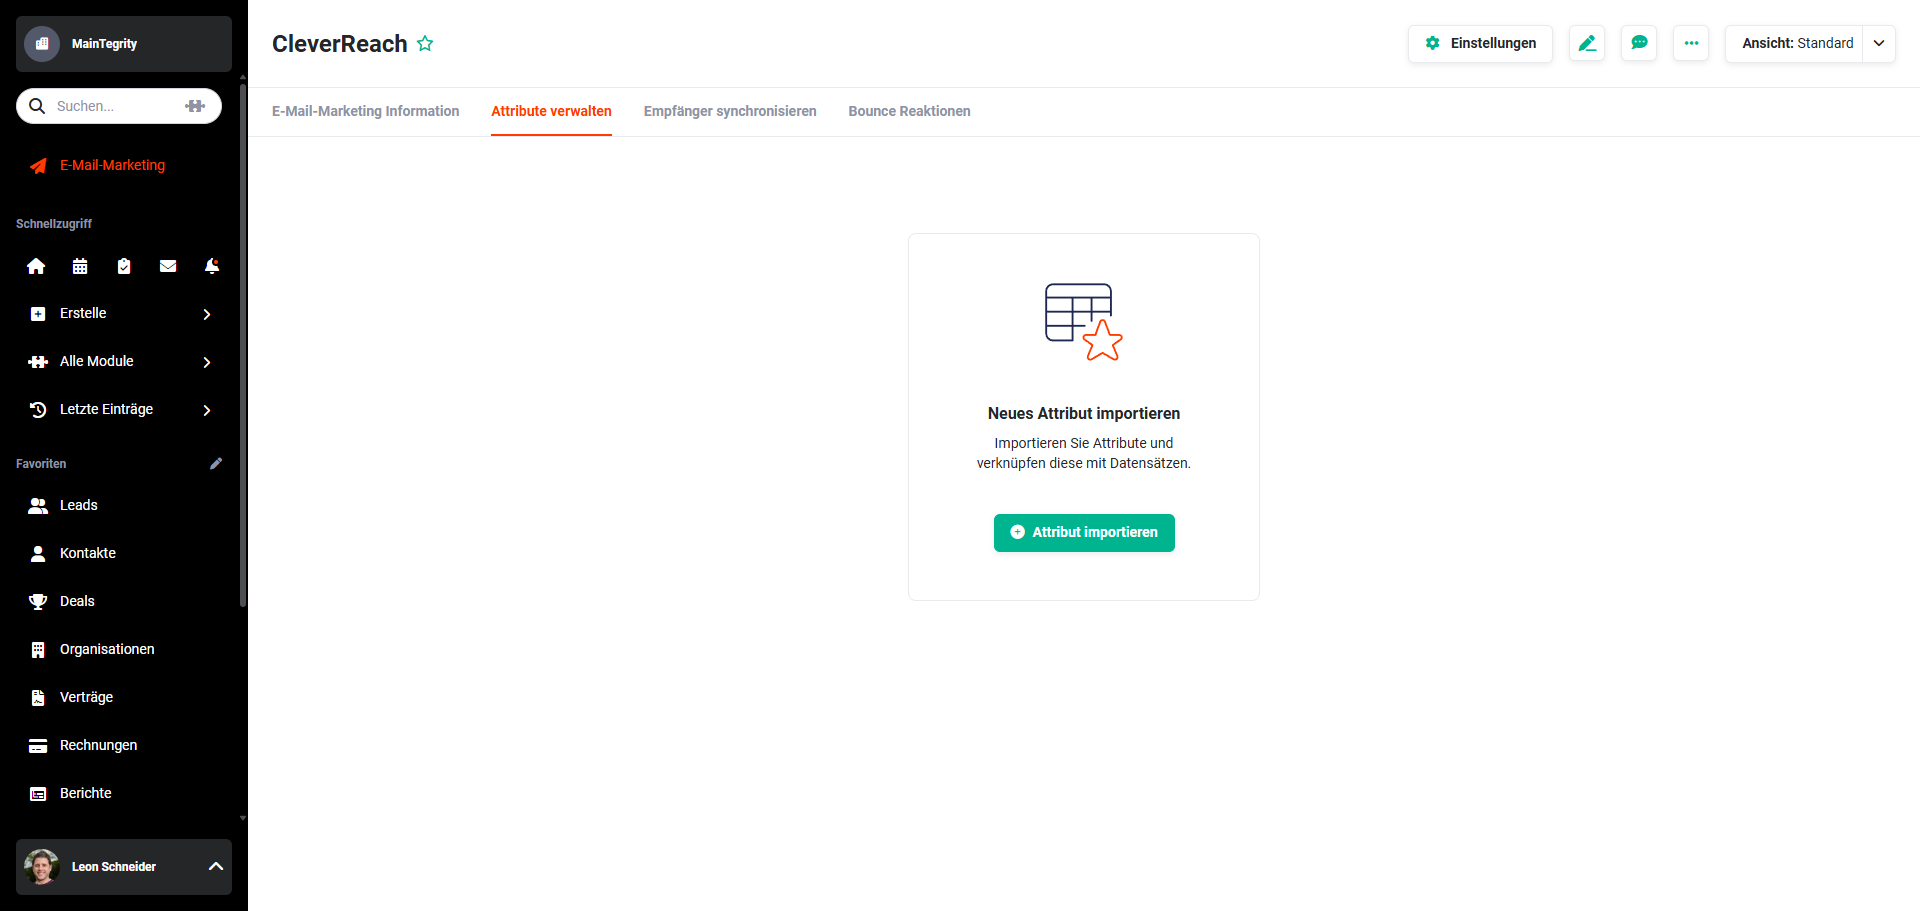 "Manage Attributes" tab before first import of attributes
After clicking the "Import Attribute" button, a popup opens in which first the corresponding list, followed by the desired attribute, is selected. Then the field from brainX to be used for synchronization is defined.
Import New Attribute popup
Supported attribute types: Text, Phone (universal format), Website, Date, Number, Selection list
Since all attributes in Brevo are global, only one list is available for selection, in which all attribute links are displayed.
Depending on the type of the field on the provider's side, the selection of available brainX fields is restricted – a date attribute can only be linked with date fields from brainX.
Additional Options
For the field type "Selection list", a default value must be set and optionally individual values from brainX must be linked with the provider's values for error-free synchronization.
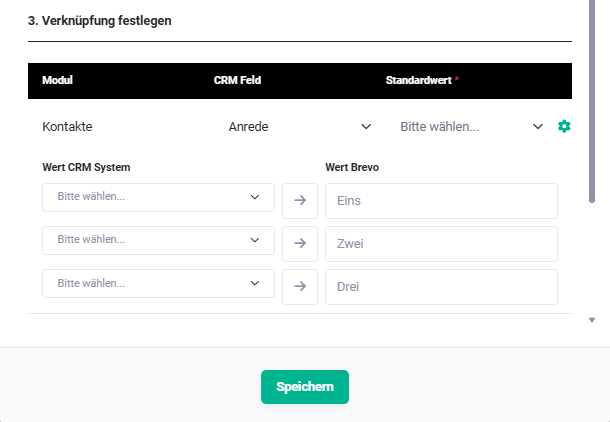 Field type Selection list
Unlinked selection list values from brainX are transferred with the default value.
7.3. Configure Reactions
The "Configure Reactions" functionality is only available for the providers Brevo, CleverReach and MailChimp, not for Inxmail.
In the "Set Reaction to Event" popup, the fields and values to be changed for selected events are configured.
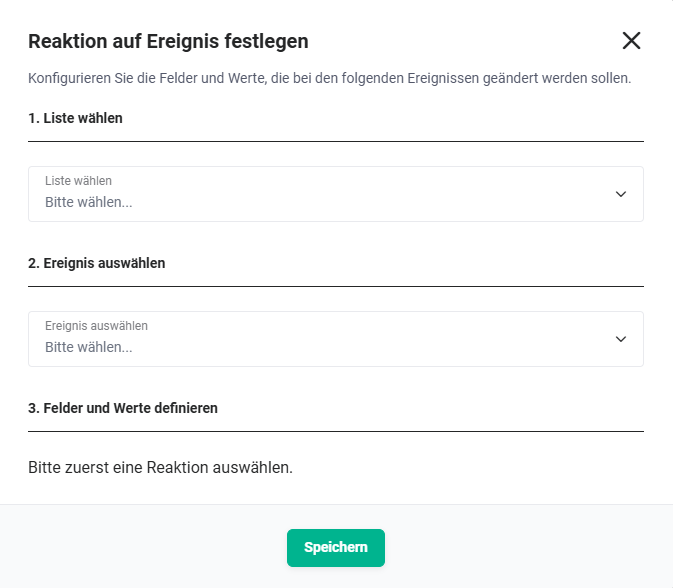 Set Reaction to Event popup
After selecting the list, the corresponding event is selected. In the last step, the fields and values to be changed are defined module by module.
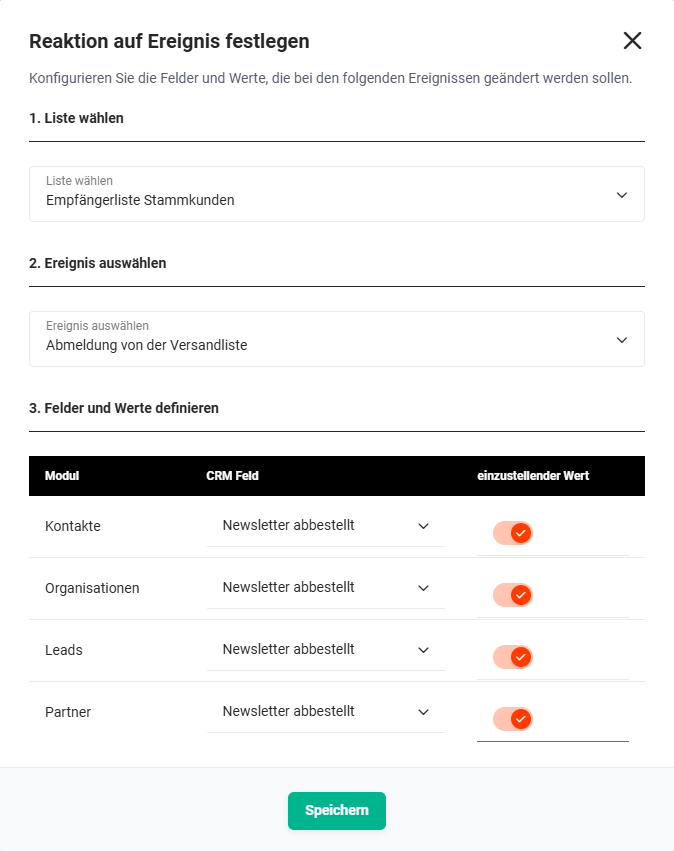 Example: Define reaction to event "Unsubscribe from mailing list"
7.4. Import List
Recipient lists can be imported in the "Synchronize Recipients" tab.
On the right side is the "Data Import" area. An existing list from the provider can be selected via the "Please select" dropdown and then imported into brainX via the "Import List" button.
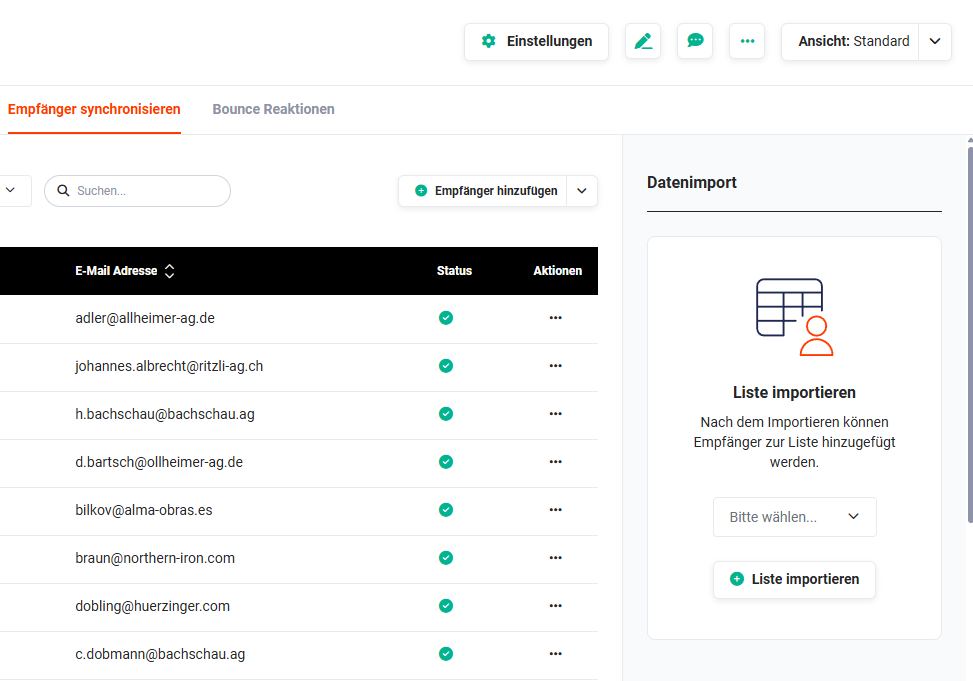 Synchronize Recipients – Data Import
7.5. Synchronize Statistics
The synchronization of statistics is done by default once daily overnight via the background task (cron job) "Email Marketing Statistics".
If needed, the synchronization can also be executed manually via the "Synchronize" button in the "Dashboard" tab. A notification is sent upon completion.
7.6. Synchronize Recipients
After adding a new list or adding recipients to a list, they can be synchronized.
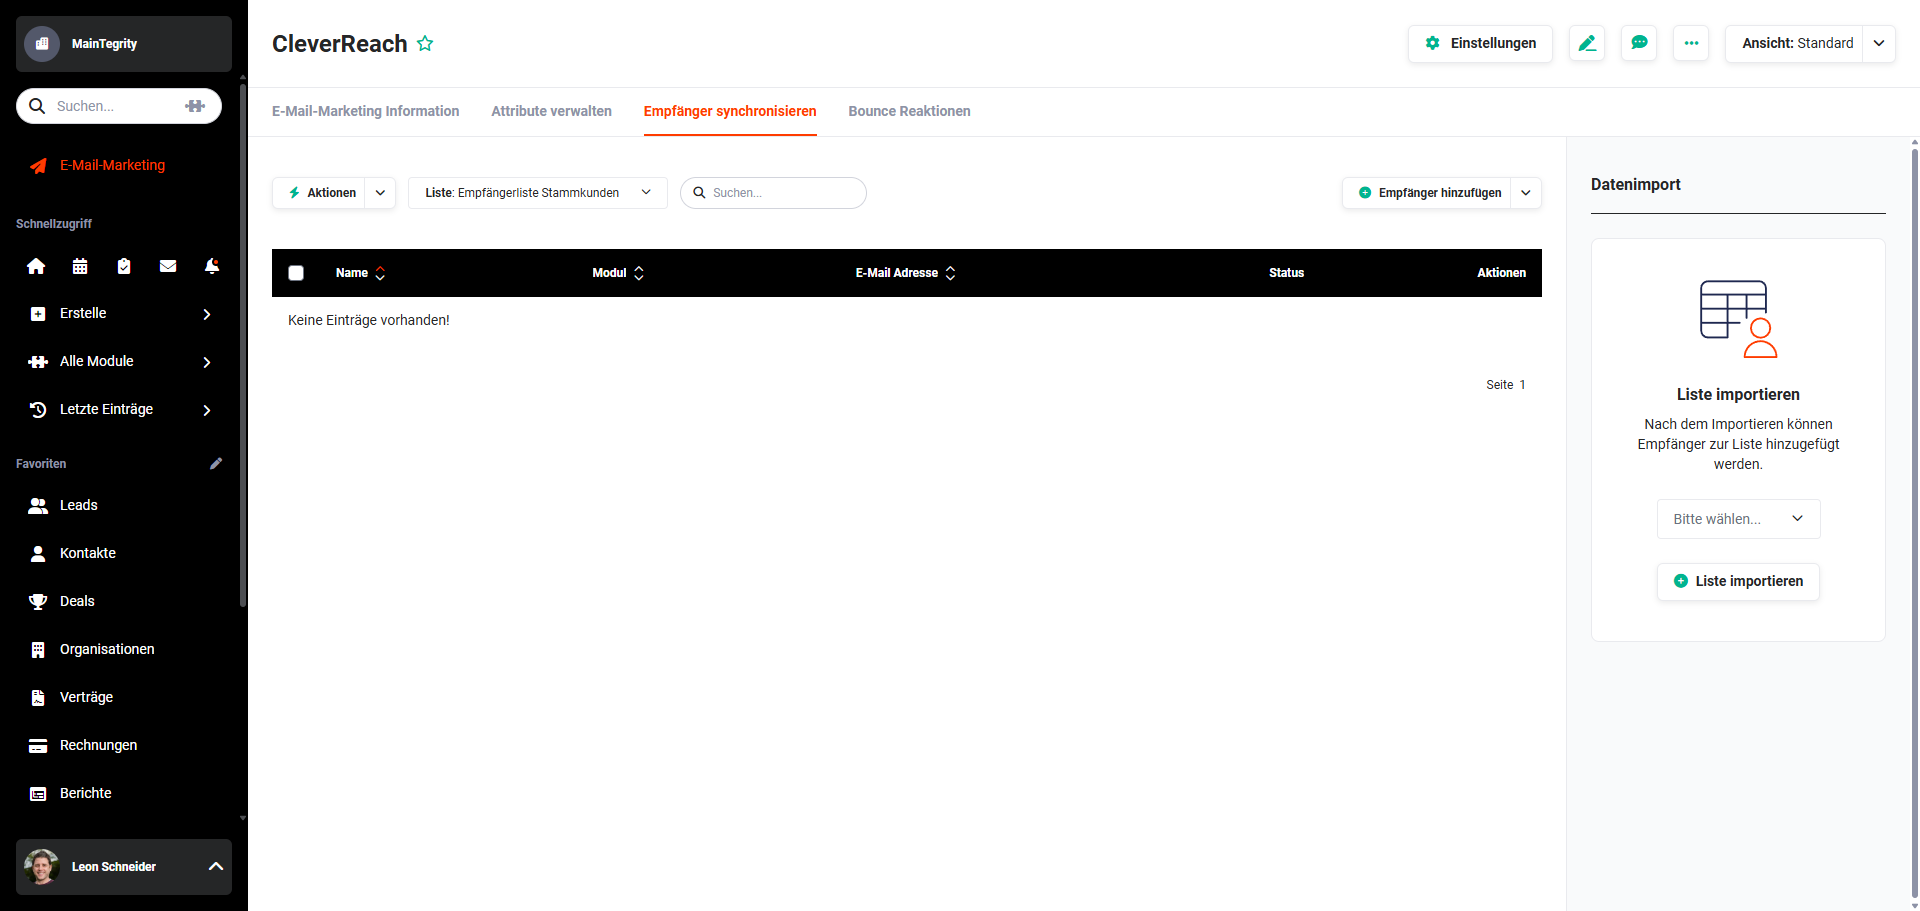 Imported recipient list without recipients
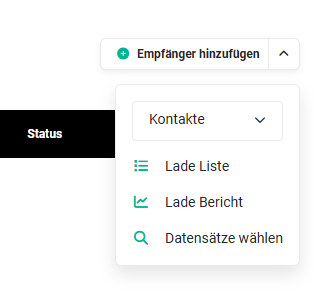
After clicking the "Add Recipients" button, a flyout menu opens with the selection of the module and the type of record selection:
- Load List → Selection of a list view of the respective module
- Load Report → Selection of a report
- Select Records → Manual selection of records in a displayed popup
After selection, the recipients are added to the list:
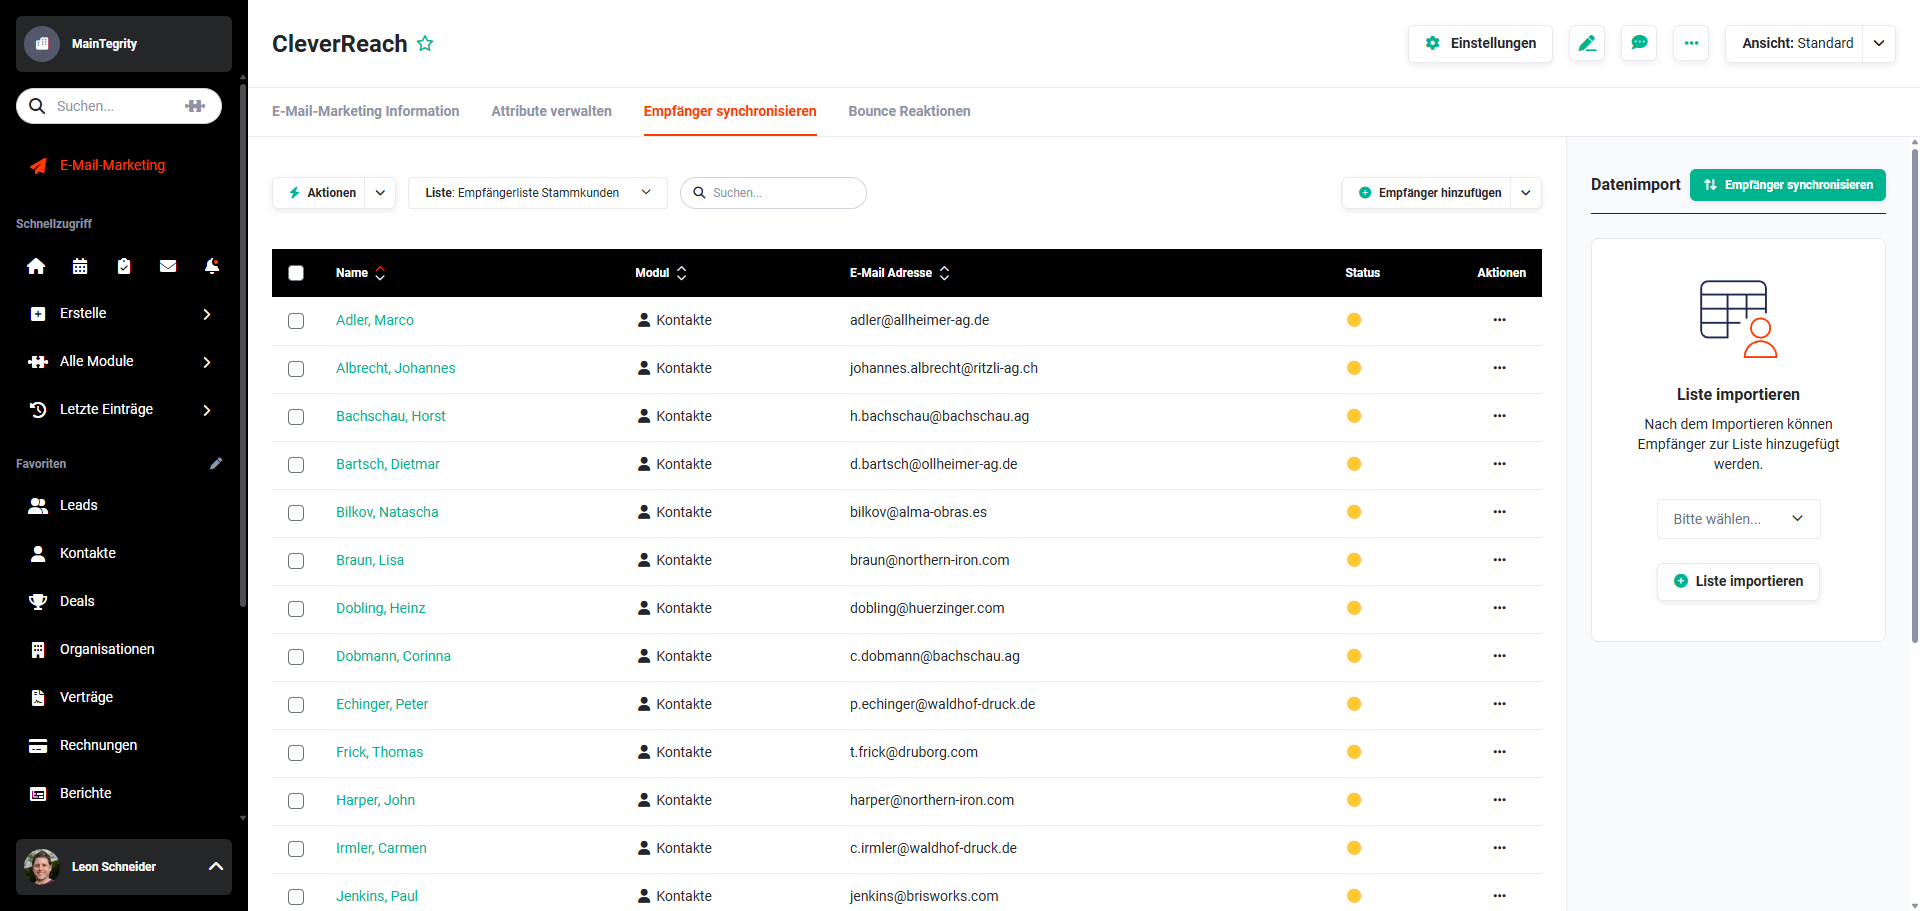 Unsynchronized recipient list
Via the "Synchronize Recipients" button, the synchronization is started. The progress is displayed.
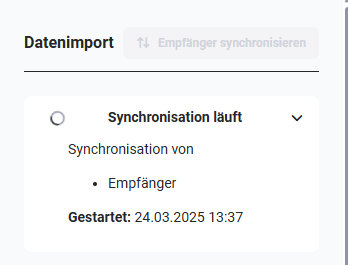 Synchronization in progress
Successfully synchronized recipients are identified in the list view by a green checkmark.
On the right side in the "Data Import" area, the "Synchronize Recipients" button is hidden.
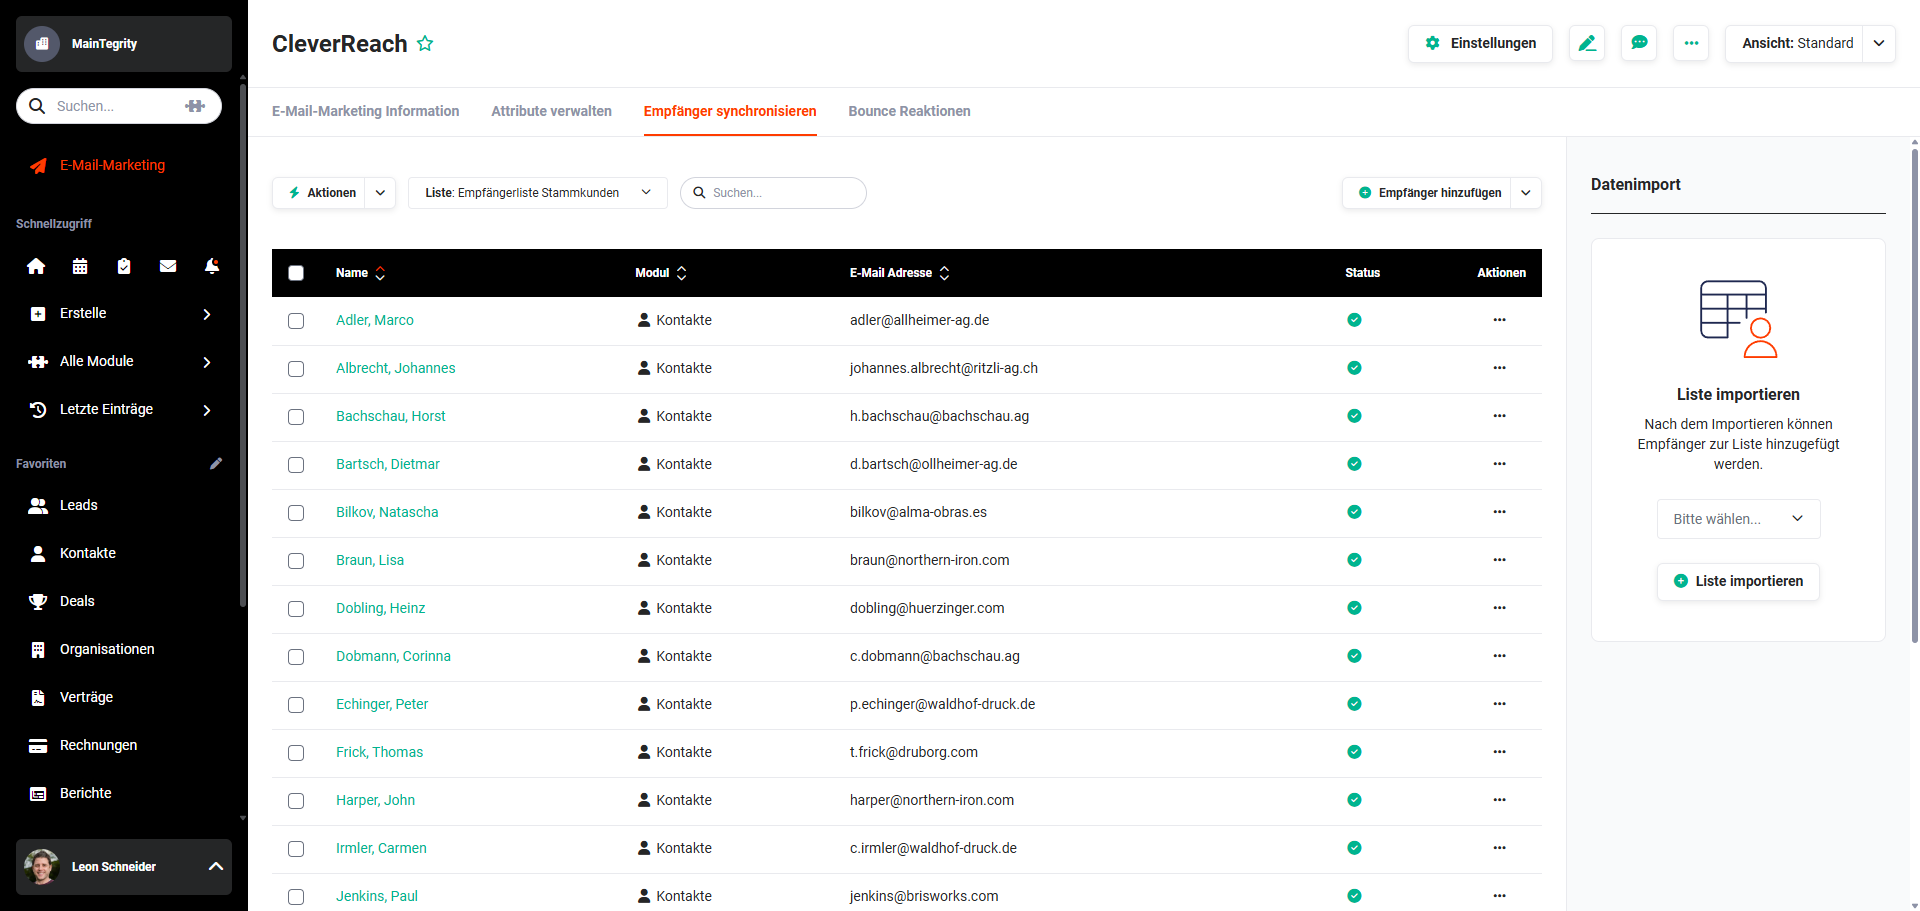 Synchronize Recipients – synchronization completed
Whenever brainX detects an unsynchronized change in the recipient list, an action icon appears. After clicking, the synchronization is started in the background.
Each recipient that has been successfully synchronized can be recognized by the "green checkmark" symbol in the list view.
Contacts, organizations, etc. with identical email addresses cannot be synchronized! Contacts that are unsubscribed or hard bounced are no longer added to a list without further notice!
It may happen that brainX contains more contacts than are actually synchronized. Possible reasons:
- Email field in the brainX record is empty
- Email newsletter has been unsubscribed
- Email address is on the blacklist at the provider
- Email address exists multiple times
7.7. Show Errors
Since the Email Marketing module communicates predominantly via interfaces with providers, errors can occur. In each tab of the account it may therefore happen that a symbol appears indicating occurred errors.
After clicking, a popup opens that lists all errors regardless of the triggering action. These can be deleted individually or completely.
8. Provider Actions
The Email Marketing module offers bidirectional synchronization. brainX is informed by the provider when one of the actions described below is executed.
Not all information is transmitted by all providers!
8.1. Sign-up
When a new recipient registers via the provider, the configured action is executed in brainX. Options are No Action, Create Lead or Notify User or Group – see Section 7.1.3 Sign-ups.
8.2. Unsubscribe
When a recipient unsubscribes at the provider, brainX is notified and the recipient is removed from the corresponding list. It is ensured that this recipient can no longer be added to this list.
Some providers also allow unsubscribing from all lists. In this case, it is excluded that the recipient can ever be added to a list of this provider.
8.3. Hard Bounce
When a newsletter is sent and a recipient cannot be reached because the email address is invalid, this event is called a hard bounce. The recipient is automatically unsubscribed from all lists of this account and – depending on configuration – the responsible user of the account is notified.
In addition to hard bounces, there are also soft bounces. For the providers Brevo and MailChimp, additional options are available for this. How bounces are handled individually can be found in the help section of the respective provider.
8.4. Profile Update
At some providers, the recipient can change their profile on the provider's own website. brainX notifies the responsible user of the account, if configured. They can then take appropriate steps to update the information in brainX if necessary.
8.5. Email Update
Some providers allow the recipient to change their email address on the provider's own website. brainX is notified in this case and automatically changes the address in the configured field to maintain synchronization. Depending on configuration, the responsible user of the account record is notified.
9. Practical Examples
1 – Monthly Newsletter with Contact Synchronization and Campaign Evaluation
The marketing team of a company wants to send a newsletter to all active contacts every month and then view the results in brainX.
First, the provider – e.g., CleverReach – is set up as a new account in brainX and linked with the API key from the provider settings. In the Manage Attributes tab, the recipient fields of the provider (e.g., First Name, Last Name, Company) are linked with the corresponding brainX fields via Import Attribute. In the Synchronize Recipients tab, the desired recipient list is imported and the contacts from the Contacts module are added to the list via Load List or Load Report and synchronized.
The newsletter itself is designed and sent directly at the provider. The statistics – open rate, click rate, bounces – are then automatically synchronized into brainX via the Email Marketing Statistics background task and can be viewed in the account's Dashboard tab.
2 – Automatic Lead Creation on Newsletter Sign-Up
An interested party signs up for the newsletter via a sign-up form on the company website. So that this sign-up does not go unnoticed, a lead record should be automatically created in brainX and the responsible sales employee notified.
In the Settings of the email marketing account, the option New Lead is selected in the Sign-ups section. The responsible sales employee is stored as the responsible user and notification for new sign-ups is activated. The lead source is set to Website.
As soon as an interested party signs up via the provider, brainX automatically creates a lead record, fills in the email address field and notifies the responsible employee. If the lead is later converted to a contact, they are automatically listed as a synchronized recipient in the list.
3 – Automatically Reflecting Bounce Reactions in brainX
After sending a newsletter, the marketing team finds that several email addresses have led to hard bounces. To ensure that the affected contacts in brainX are marked accordingly, bounce reactions are configured.
In the Bounce Reactions tab, the event Hard Bounce is selected via Configure Reactions. As a reaction, it is defined that in the Contacts module the field Email Marketing is set to the value unsubscribed. For unsubscribes, it is analogously configured that the corresponding field is also automatically updated.
From that point on, all hard bounces and unsubscribes registered at the provider are automatically reflected in brainX – without manual effort.
10. Frequently Asked Questions
Can multiple email marketing providers be used simultaneously in brainX?
Yes. The Email Marketing module allows the management of multiple providers and multiple accounts per provider. For example, marketing and sales departments can operate different accounts or providers in parallel in brainX.
Why are fewer recipients synchronized in brainX than contacts exist?
There can be several reasons: The email address field in the contact is empty, the contact has already unsubscribed from the newsletter, the email address is on the provider's blacklist, or the email address exists multiple times in the system. For Brevo, contacts with identical email addresses cannot be synchronized.
Can I change the email address field for synchronization afterwards?
No. The setting of the email address field in the account settings can only be changed as long as no record from the respective module has been synchronized. It is therefore recommended to carefully configure this setting before the first synchronization.
What is the difference between a hard bounce and a soft bounce?
A hard bounce occurs when an email address is permanently invalid – e.g., because the mailbox does not exist. The recipient is automatically unsubscribed from all lists of the account in this case. A soft bounce refers to a temporary delivery problem, e.g., a full mailbox. How soft bounces are handled depends on the respective provider and its configuration.
Are newsletters and campaigns created and sent directly in brainX?
No. Creating and sending newsletters as well as comprehensive campaign evaluations are performed directly at the respective provider. brainX handles the synchronization of contacts, the linking of fields, and the display of basic statistics in the Dashboard tab.
Which background tasks must be enabled for full functionality?
For the full functionality of the module, two cron jobs must be enabled in Global Settings – Background Tasks: Email Marketing Events (synchronizes sign-ups, unsubscribes and hard bounces) and Email Marketing Statistics (synchronizes the campaign statistics of all accounts once daily).