
Admin
Package: BASIC
Before the brainX system is used in production, various settings should be configured by the "admin" user.
1. User "admin" – My Preferences
Every user can configure individual settings for their user account under "My Preferences". This area is accessible for all users, including the "admin" user, via the flyout navigation (User Menu) in the bottom-left corner of brainX.
The individual settings are explained in detail in the My Preferences section, which is divided into the following subsections:
2. Setting Up an Email Account
Every user, including the "admin" user, who wants to send emails from within brainX must first set up at least one email account in the Email Accounts module.
For detailed information about this module and the setup of an email account, please refer to the Email Accounts section.
Regarding the topic of email sending, please also refer to the sections Company Information – Email Settings and Global Settings – System Automation. These sections explain how to set up email accounts, how to send emails via system automation (workflow), and how to send system notification emails.
3. Setting Up a Mail Server
In addition to setting up an email account for users, it is recommended to also configure a central mail server. This central outgoing mail server is used for sending various system notifications.
These include notifications, reminders and meeting invitations, notifications for subscribed records, or status messages for tickets.
For detailed information on setting up the central mail server, please refer to the Global Settings – Company Information – Email Settings section.
4. Setting Up the Dashboard
The dashboard provides you with a summarised overview of your most important data and information from brainX.
This is displayed in Widgets that can contain selected records (special list views of a module or data based on reports), charts (Charts) or country maps.
You can determine the number, content and position of the widgets for your own dashboard.
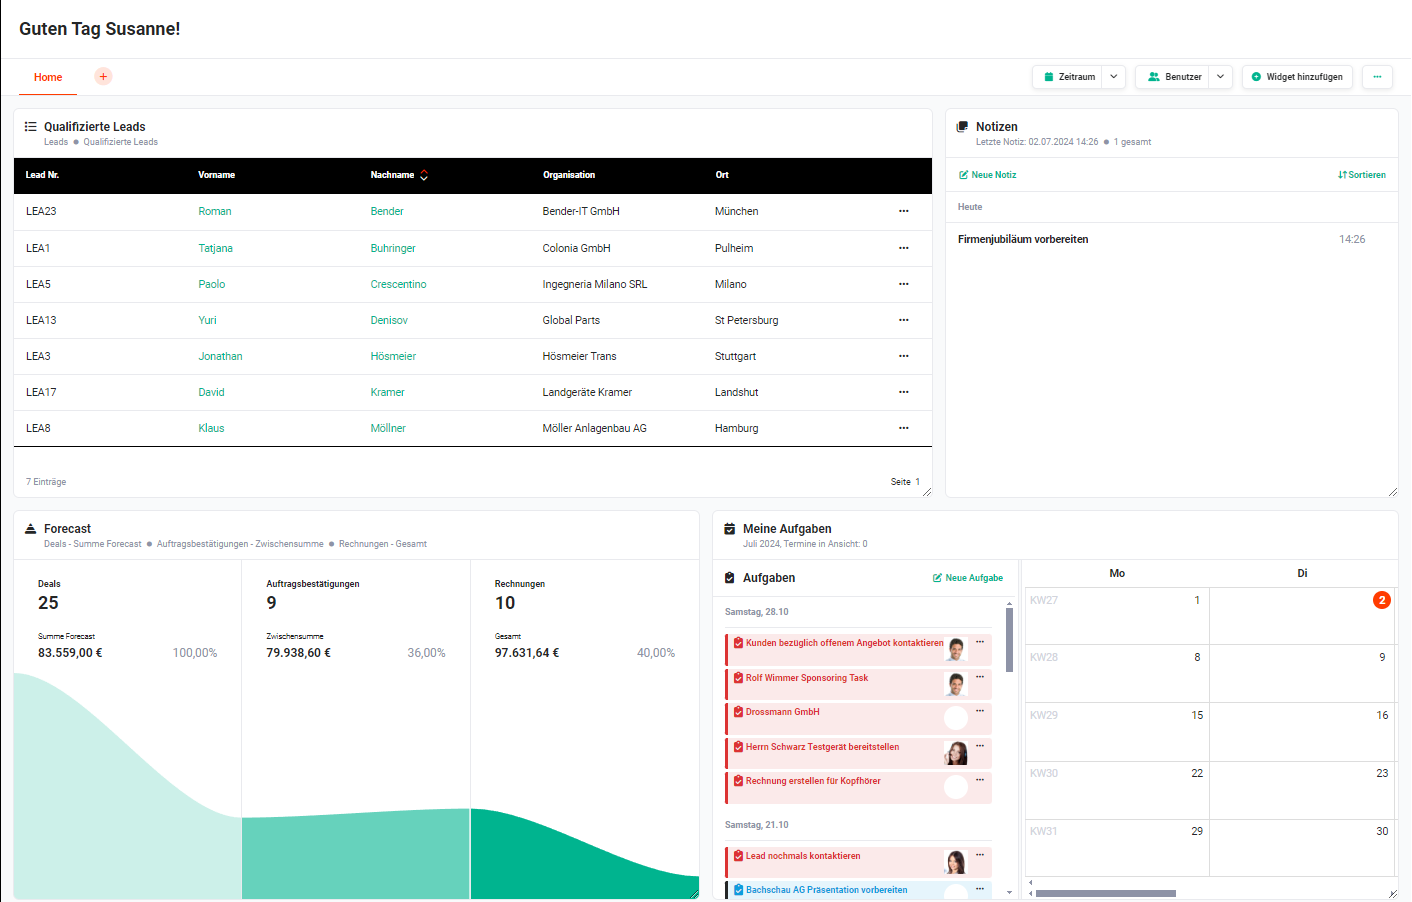
For information on how to create widgets and configure the dashboard, please refer to the Dashboard section.
5. Rights Management
Before new users are created, it is important to think about rights management in a CRM system. This measure ensures the security and efficiency of the system, as you can assign users specific access rights based on their roles and responsibilities.
Through this method, sensitive data can be protected and unauthorised access can be prevented. Rights management allows user activities to be specifically controlled, which improves teamwork and productivity.
Thorough planning of rights management ensures that brainX is used optimally and that data integrity is maintained.
Before creating new users in brainX, the rights management (roles, profiles and groups) should at least be roughly planned and configured, in order to assign new users an appropriate role and a corresponding value (Admin, CustomerAdmin, Superuser or none) in the rights management system.
brainX has a very comprehensive rights management system. Using the rights settings, it is possible to define, among other things:
- which user is allowed to view/edit which modules
- which user is allowed to view/edit which fields within a module
- which user is allowed to perform which actions
- which user is allowed to view/edit/delete which records
The rights settings are configured using Global Permission Assignment as well as Roles, Profiles and Groups.
Quick overview of roles, profiles and groups:
- Roles: Control access to records, to my own records and to subordinate roles. Each role has at least one profile.
- Profiles: Control access to modules and their fields.
- Role + Profile: The sum of positive rights applies.
- Groups: Used to share records. Recommendation: create groups only from users or roles and subordinates.
- Custom Access Rules: Can be used to override part of the permissions/rights.
The fundamental principle is:
- Profiles are for modules
- Roles are for the hierarchy
For detailed information on the individual topics, please refer to the following sections:
6. Creating Users
New users are created in "Global Settings – Users and Permissions – Users and Groups". When creating a new user, all mandatory fields must be filled in and a Role must be selected.
All other fields are optional and can also be entered by the user themselves. The corresponding explanations of the fields, functions and options are described in detail in the My Preferences chapter.
Please note that the username cannot be changed after it has been created!
7. Module Management – Layout and Settings
Module Management lists all available modules in brainX. Modules can be configured, activated or deactivated here.
In Module Management, various layouts/views can be defined, to which specific roles are assigned. This gives users – depending on their role – different detail views of records, for example which fields should be displayed in which blocks.
In addition, Module Management allows settings for record selection in references, configuration of the list view, duplicate checking and further configurations.
For detailed information on all settings, please refer to the Module Management section.
8. Templates – Email and PDF
Global Email Templates
Global email templates are used for emails with standard text, mass emails, campaigns and for Automations.
For detailed information on creating and editing global email templates, please refer to the Templates section.
Global PDF Templates
The Templates module (email + PDF) enables the creation of PDF export templates for almost all modules. Invoices or quotes, for example, can easily be generated as PDF files and sent by email or printed.
For detailed information on creating and editing global PDF templates, please refer to the Templates section.
9. Company Information
The basic company data, such as name, address, telephone number and email address, are configured in a so-called client.
In Global Settings – Company Information, one or more clients can be configured. This data can be included in email and PDF templates via placeholders in the Templates module. When sending emails or creating PDF files, the placeholders are automatically replaced with the data stored in the company information.
For detailed information on the settings mentioned, please refer to the Global Settings – Company Information section.
10. Terms and Conditions
In all billing modules (Sales Orders, Deals, Purchase Orders, Credits, Invoices and Cancellations) – i.e. all modules that have a so-called Product Block – the terms and conditions (T&Cs) are displayed, so that they can also be used in PDF templates.
Before using brainX in production, it is therefore necessary to save the terms and conditions in Global Settings – Company Information.
For detailed information, please refer to the Terms and Conditions section.
11. Background Tasks
A background task (Cronjob) is a task that brainX executes automatically in the background. With scheduled background tasks, you can have specific actions (e.g. automatic email sending, field calculations/updates etc.) executed at defined times.
Before the first productive use of brainX, it makes sense to set up the required background tasks.
The following background tasks are available, for example:
- Reports Scheduling – scheduled sending of reports
- Exchange Online – user authentication and data synchronisation between brainX and Exchange Server
- Billing Contract Invoicing – automated creation of invoices
- PDF Export – mass export of PDF files from list views
For detailed information on creating and configuring background tasks, please refer to the Global Settings – System Automation – Background Tasks section.
12. Tax Settings
In all modules that contain a Product Block, such as Sales Orders, Deals, Purchase Orders, Credits, Invoices and Cancellations, tax rates for products and services must be specified when creating new records.
Before new records can be created in the product-related modules, the tax rates must be defined.
The following settings can be made when configuring taxes on products and services:
- adding new tax rates
- renaming existing tax rates
- changing the tax rates (%)
- locking/allowing existing tax rates
For detailed information on creating and configuring tax rates, please refer to the Global Settings – Currencies & Taxes section.
13. Customising the Numbering
Every newly created record in a module is assigned a record number. The record number consists of a prefix and a sequential number. By default, prefixes are already assigned to modules in brainX.
- Accounts module: prefix ORG
- Contacts module: prefix KON
- Leads module: prefix LEA
When a new record is created in a module, the record numbers are automatically generated.
- Accounts module: ORG1
- Contacts module: KON1
- Leads module: LEA1
Since record numbers are unique and cannot be changed afterwards, we recommend adjusting the record numbers before the first productive use of brainX, if you do not wish to use the default settings.
For detailed information on configuring record numbers, please refer to the Global Settings – Company Information – Record Numbers section.
14. Integrations
In addition to the base package, brainX also offers the option to add additional packages. These additional packages provide extended functions and features as well as modules that are specifically tailored to individual requirements. They can be selected and booked as needed to adapt brainX to your internal processes.
For further information, see:
Before using the brainX system in production, the available functions and integrations should be configured accordingly.
For detailed information on configuring functions and integrations, please refer to the Interfaces/Integrations section.