
Appointments
Package: BASIC
1. General
The Appointments module is used for planning and managing meetings, calls and visits with customers, prospects or team members. It provides the following core functions:
- Calendar and planning view – display appointments in daily, weekly or monthly view
- Link to other modules – link appointments directly to organizations, contacts, deals, tasks and more
- Invite participants – invite users, contacts and leads via notification or email; acceptances and rejections are documented in the appointment
- Recurring appointments – create recurring appointments with configurable interval and end date
- Calendar sharing – share your own calendar with other users or groups with individual permissions
- Group calendar – display appointments from groups and shared calendars in your own view
- Birthdays – display birthdays from the Contacts module as all-day events in the calendar
A sales employee plans a meeting with a customer. A new appointment is created in the Appointments module, linked to the corresponding organization and the responsible contact is invited as a participant. The Send Appointment as Email Message toggle is activated so that the contact receives an email invitation. After the appointment, the status is set to completed and a follow-up appointment is created.
A weekly team meeting is created as a recurring appointment. In the Recurring block, the Weekly interval is selected and an end date is set. All team members are added as participants and receive a notification. Changes to the main appointment automatically affect all future appointments in the series.
This section only describes special fields or functionalities of the module, as all general brainX functionalities are described elsewhere in the manual.
2. Global Settings
2.1. General Module Settings
For the Appointments module, the following settings are available in Global Settings – Module Management:
2.2. Basic Configuration
Via the basic configuration, an administrator can preconfigure the standard calendar settings for all new users. Newly created users adopt these settings but can customize them individually in the Calendar Settings.
The Basic Configuration tab is divided into the following areas:
The following settings cannot be made in the basic configuration, but must be configured individually by the user in the Calendar Settings:
2.2.1. Basic Settings
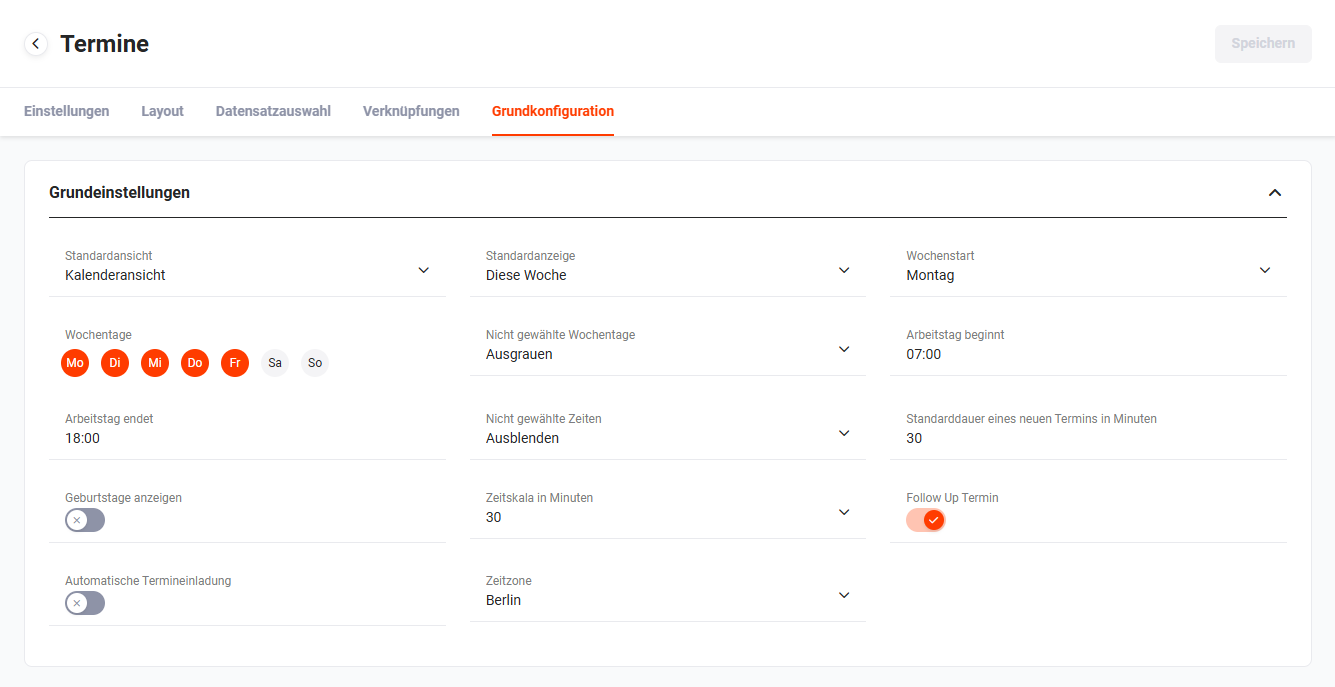 Appointments Basic Configuration
The settings and fields are described in detail in the section Calendar Settings – Basic Settings.
2.2.2. Default References
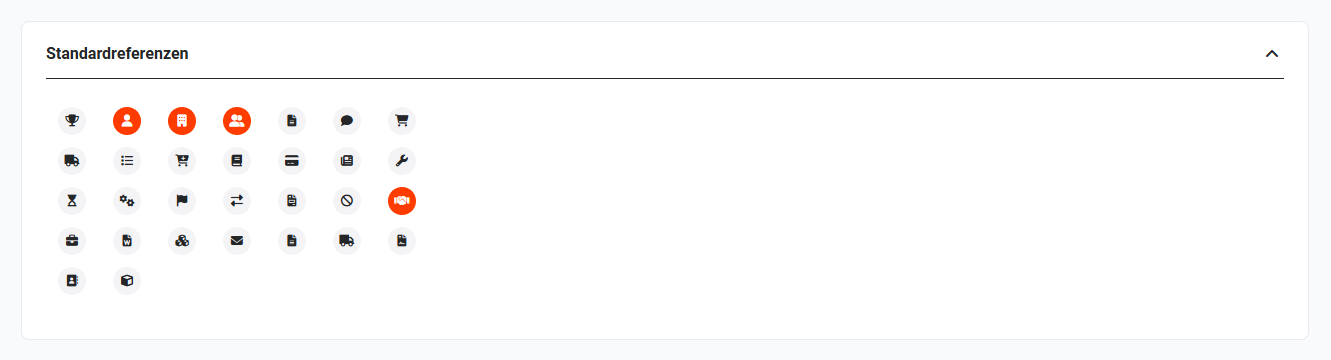 Default References Setting
The settings and fields are described in detail in the section Calendar Settings – Default References.
2.2.3. Calendar Colors
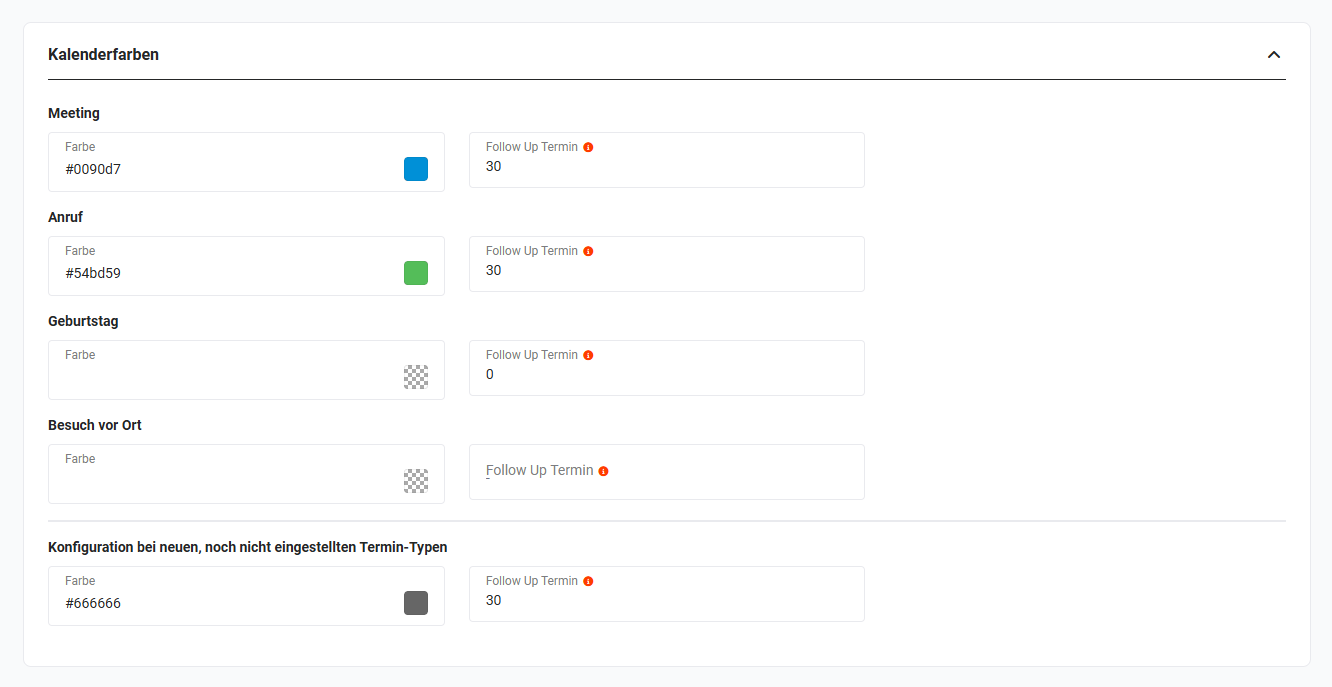 Calendar Colors Setting
The settings and fields are described in detail in the section Calendar Settings – Type Settings.
3. Functional Areas
The Appointments module is divided into the following functional areas:
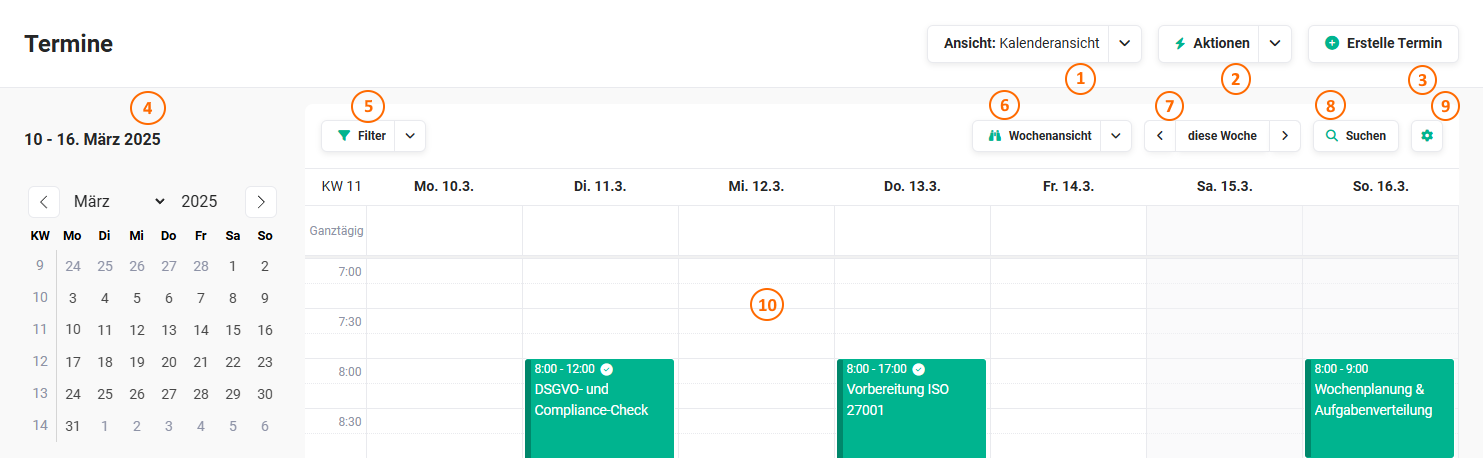 Appointments module – functional areas
- Select Calendar/Planning View → switch between calendar view and planning view
- Actions → general actions of the view
- Create Appointment → opens the creation view for a new appointment
- Calendar Sidebar → sidebar with monthly calendar, calendar, My Groups and Shared Calendars
- Filter → filter settings for the calendar
- Select Daily/Weekly/Monthly View → selection of the displayed time period
- Navigation/Select Time Period → navigation between time periods
- Search → search for appointments
- Calendar Settings → call up calendar settings
- Display area → shows the calendar or planning view
3.1. General Actions
After clicking the Actions button, a flyout menu opens with the following actions:
To use multiple records for the actions, in the calendar in the calendar or planning view, multiple appointments can be marked using the Ctrl + click keyboard shortcut.
3.2. Calendar Sidebar
The calendar sidebar is divided into several functional areas.
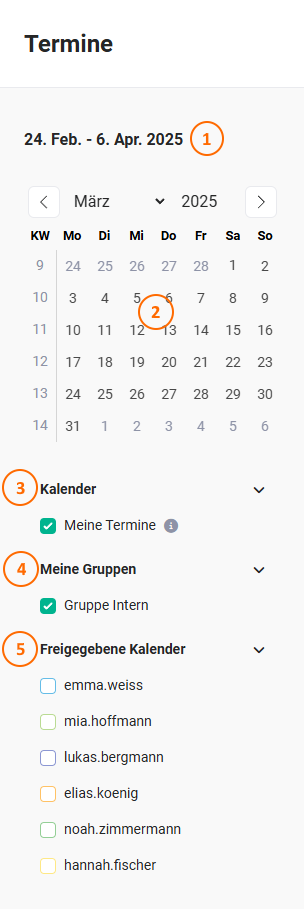 Calendar Sidebar
- Time period displayed in the calendar or planning view
- Monthly Calendar
- Calendar
- My Groups
- Shared Calendars
3.2.1. Monthly Calendar
The monthly calendar always shows the time period currently displayed in the calendar view. By selecting a day, month or year, the corresponding time period is displayed in the calendar view.
3.2.2. Calendar
Via the My Appointments checkbox, you can choose whether your own appointments are to be displayed in the calendar view.
This setting only takes effect if groups or shared calendars are simultaneously selected.
3.2.3. My Groups
In the My Groups area, all groups are displayed in which the user is a member. Via the checkbox, it can be specified whether group appointments are displayed in the calendar view.
3.2.4. Shared Calendars
In the Shared Calendars area, all users who have shared their calendar are listed. Via the checkbox, the respective shared calendar can be shown or hidden.
3.3. Functionalities in Views
The general functionalities in the calendar and planning view are identical. View-specific functionalities are explained in the respective sections.
3.4. Filter
Via the Filter button, temporary filters for the calendar view can be set. After clicking, a flyout window opens; via Add Filter, additional filters are added.
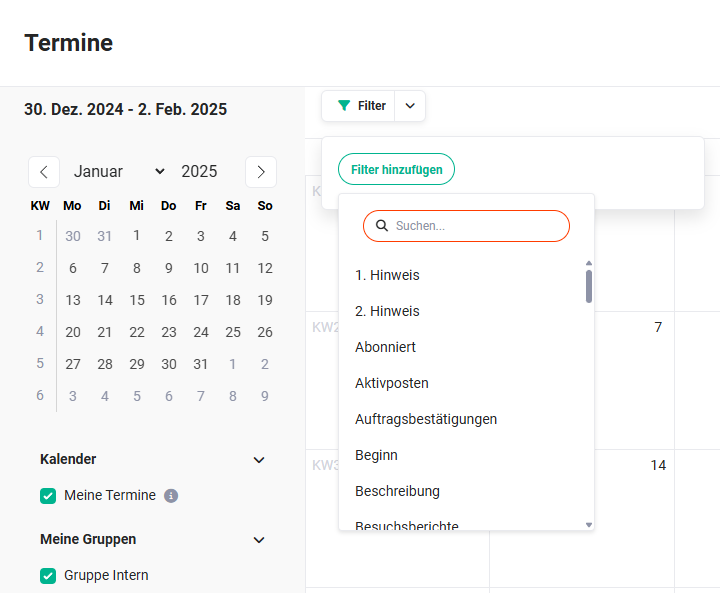 Filter in Views
All fields of the detail view are available as filter options. By clicking the Add Filter button again, additional filters can be added.
The filters are temporary but remain active when switching between the calendar or planning view. Filters are removed by actively clicking on the filter or when reloading or leaving the page.
3.5. Select View Time Period
Via the selection list, a daily, weekly or monthly view can be selected in the calendar or planning view.
3.6. Select/Navigate Time Period
Via the navigation buttons, you can switch to the previous or next month/week/day. If the current time period is not displayed, a button appears to switch directly to today, this week or this month.
3.7. Search
After clicking the Search button, the Search Appointments sidebar opens.
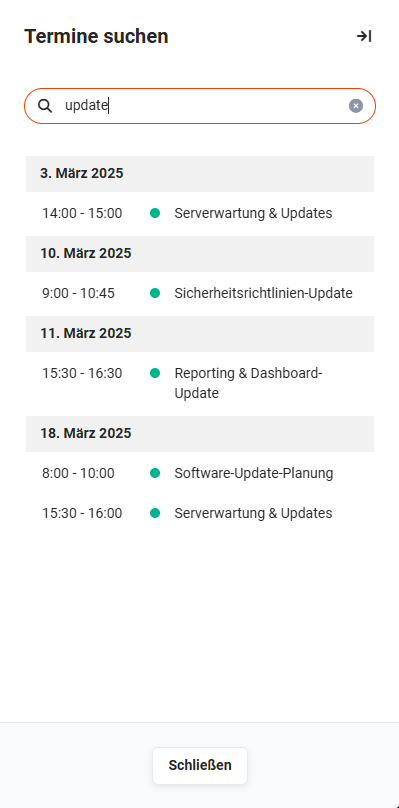 Search Appointments Sidebar
The search starts from the second character entered and searches the fields Subject, Type, Status, Priority and Description. After clicking a search result, the corresponding time section is displayed in the calendar view.
3.8. Calendar Settings
The call is made via the Calendar Settings button (gear icon).
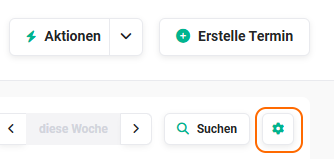 Calendar Settings Button
The Calendar Settings popup is divided into the following areas:
- Basic Settings
- Default References
- Type Settings
- Appointment Sharing
- Task Sharing
- Colors for Group Appointments
3.8.1. Basic Settings
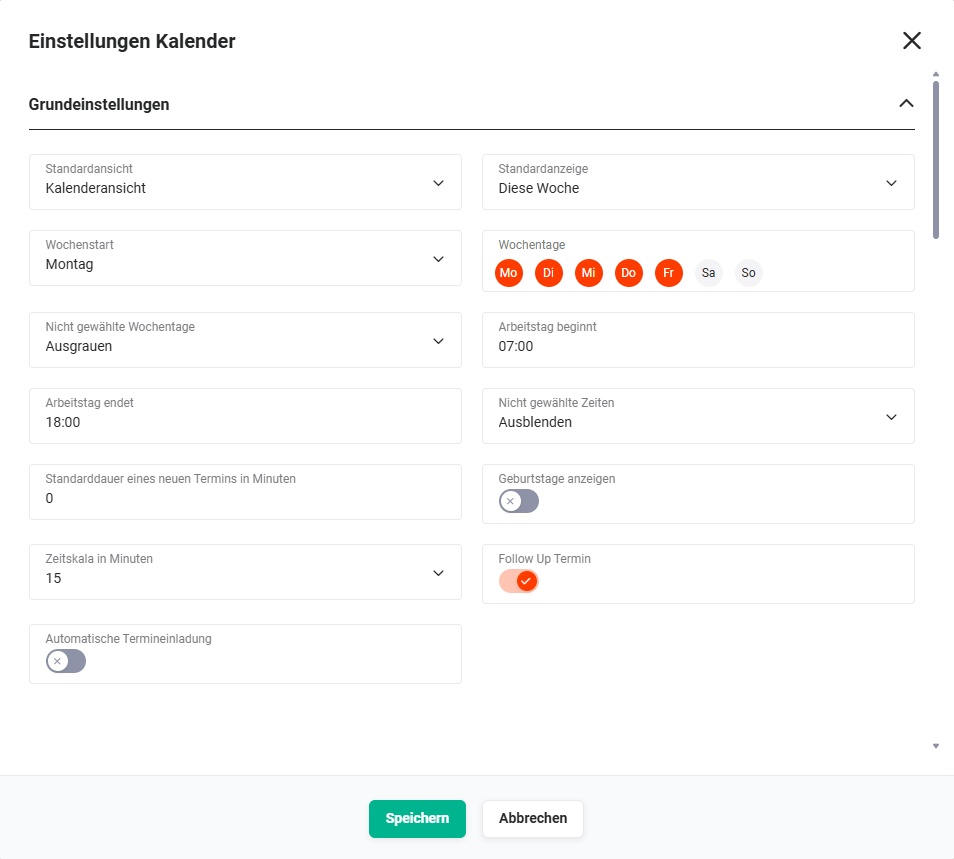 Calendar Settings Popup – Basic Settings
The following table describes fields with non-obvious functions. All other fields are self-explanatory.
| Field | Description |
|---|---|
| Default View | Defines which view is displayed when the module is opened: calendar view or planning view |
| Default Display | Defines which time period is displayed when the module is opened: Today, This Week, This Month |
| Week Start | Day of the week on which the displayed week begins |
| Weekdays | Selection of weekdays displayed in the calendar (any combination Mon–Sun) |
| Non-Selected Weekdays | Display of non-selected weekdays: Hide or Grey out |
| Non-Selected Times | Display of times outside the working day: Hide or Grey out |
| Show Birthdays | When activated, birthdays from the Contacts module are displayed as all-day events in the calendar – see Section 3.8.1.1. |
| Follow-up Appointment | When activated, after setting an appointment to completed, a popup for creating a follow-up appointment is displayed |
| Automatic Appointment Invitation | When activated, added participants are automatically invited when creating a new appointment |
3.8.1.1. Notes on Show Birthdays
If the Show Birthdays toggle is set to active, the following should be noted:
- If the Date of Birth field in the Contacts module is populated, the birthday is automatically displayed in the calendar as an all-day event.
- Each user sees the birthdays of all records they have access to based on the permission settings.
- First and last name as well as age in parentheses are displayed; by clicking the name, the detail view of the record opens.
- The event type Birthday can be used as a filter (e.g., in custom list views or reports).
- In the detail view of a record and on incoming calls, the birthday is signaled by the gift icon.
- The respective birthday appointment is displayed 11 months before and 1 month after the birthday.
- The color can be globally specified by the administrator and individually customized by each user.
3.8.2. Default References
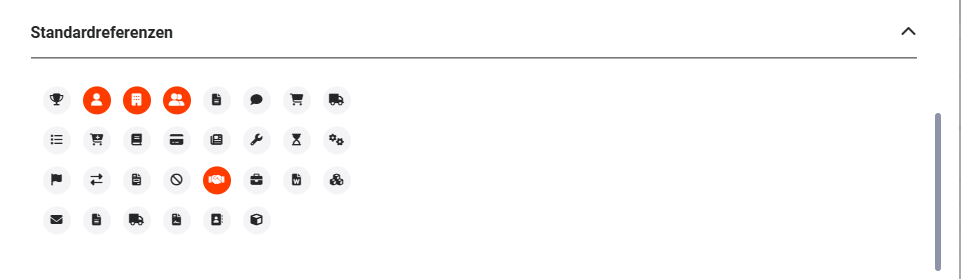 Calendar Settings Popup – Default References
In the Default References area, it is configured which reference fields are displayed when creating a record in the Appointments and Tasks modules in the Relationships block.
Only modules are available for selection that the user is allowed to access based on the Global Permission Assignment.
3.8.3. Type Settings
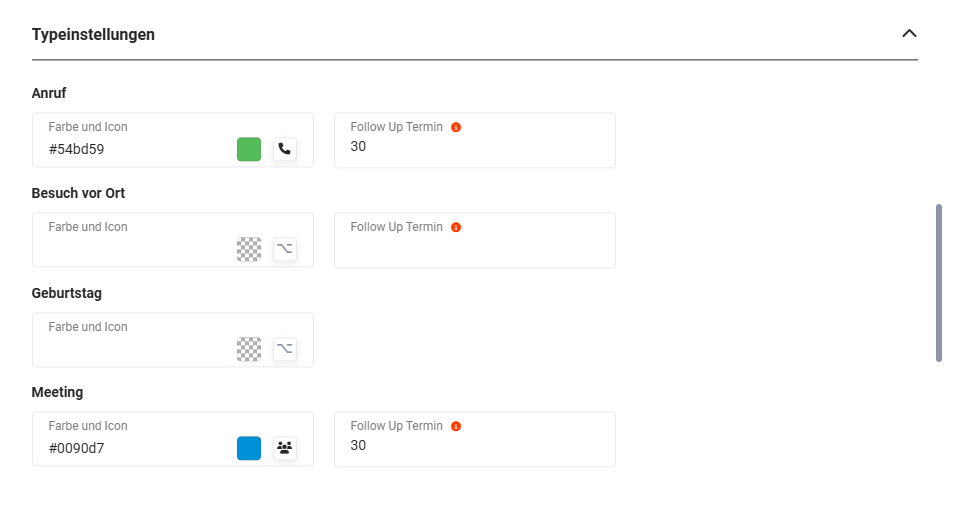 Calendar Settings Popup – Type Settings
A unique calendar color and icon can be defined for each appointment type. After clicking a type, a flyout window opens for color selection and icon selection.
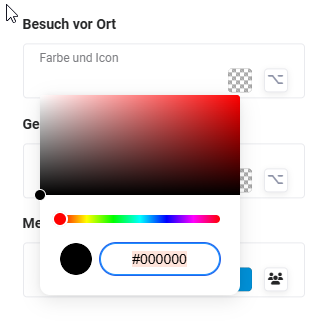 Color Selection Type
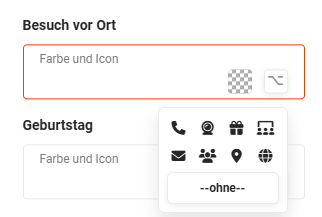 Icon Selection Type
Colors for group appointments are configured in the Colors for Group Appointments area.
3.8.3.1. Configure Follow-up Appointment Duration
In the Follow-up Appointment field, the desired default duration (in minutes) for a follow-up reminder is defined.
3.8.4. Appointment Sharing
Appointment sharing only has an effect when the Appointments module is set to private in the Global Permission Assignment. With public, all users can see all appointments. Private appointments are fundamentally only visible as private entry (incl. time) unless they have been shared via appointment sharing.
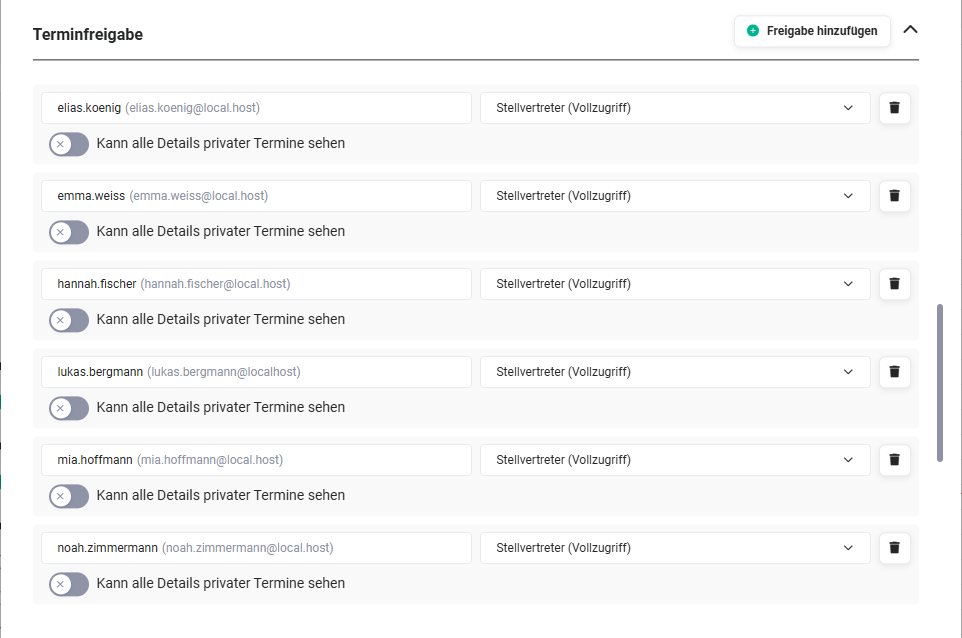 Calendar Settings Popup – Appointment Sharing
Via appointment sharing, users can share their calendar with other users and/or groups.
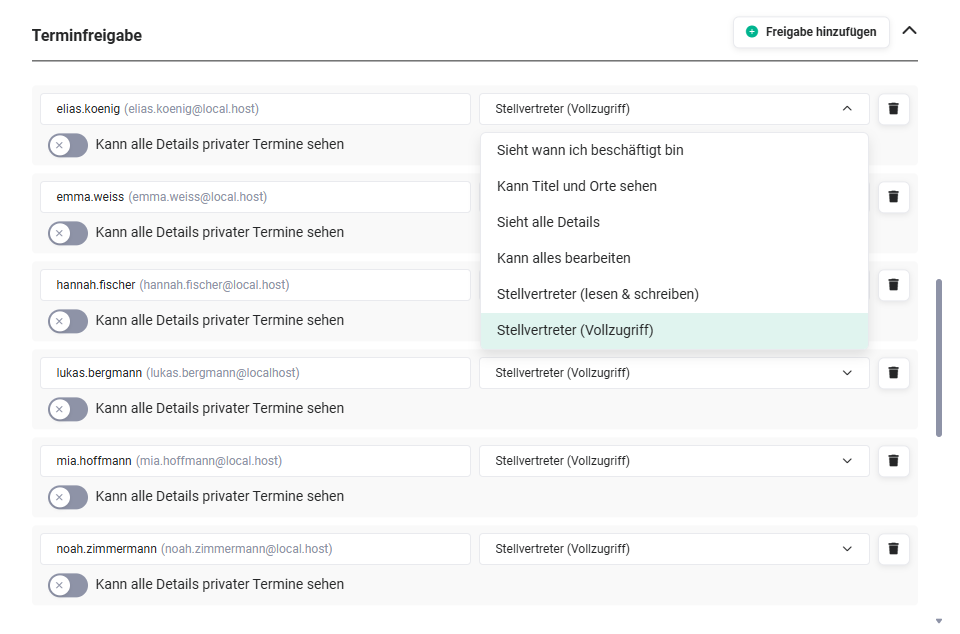 Calendar Settings Popup – Appointment Sharing Permission Selection
The following permission levels are available:
| Permission | Description |
|---|---|
| Sees when I'm busy | Only date and time visible, no further details |
| Can see title and locations | Date, time, title and location visible, no further details |
| Sees all details | All details visible, no editing possible |
| Can edit everything | All details visible and editable |
| Delegate (read & write) | Read and write access |
| Delegate (full access) | Full access to all records |
3.8.4.1. Private Appointments
Via the Can see all details of private appointments toggle (only available with the Delegate (full access) permission), it is defined whether selected users/groups can see all details of private appointments.
Private appointments can only be edited or deleted by the responsible user or group, independent of further permission settings.
3.8.4.2. Additional Sharing
Via the Add Sharing button, additional appointment sharing for other users/groups with individual permissions can be configured.
3.8.4.3. Deleting Sharing
To delete an appointment sharing, click the Delete Sharing actions icon (trash icon) in the corresponding row and then Save.
3.8.5. Task Sharing
Task sharing only has an effect when the Tasks module is set to private in the Global Permission Assignment.
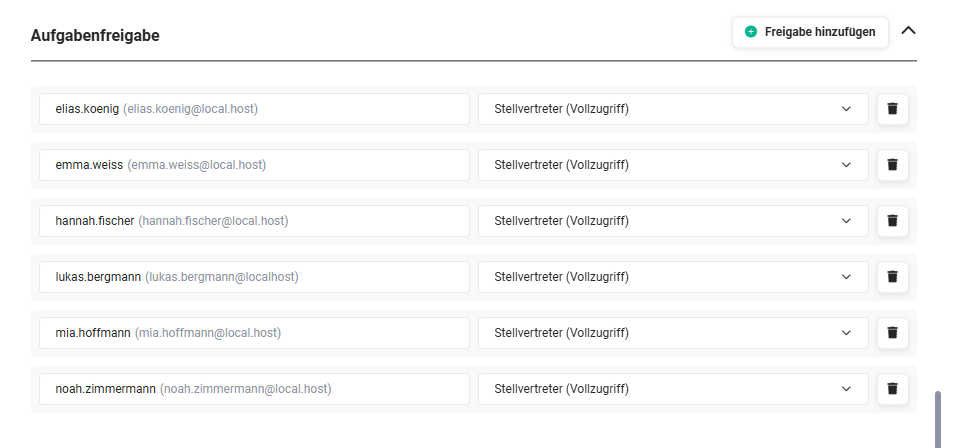 Calendar Settings Popup – Task Sharing
Via task sharing, users can share their tasks with other users and/or groups.
The available permission levels correspond to those of Appointment Sharing.
To be able to create tasks for other users, at least the Delegate (read & write) permission is required.
3.8.6. Colors for Group Appointments
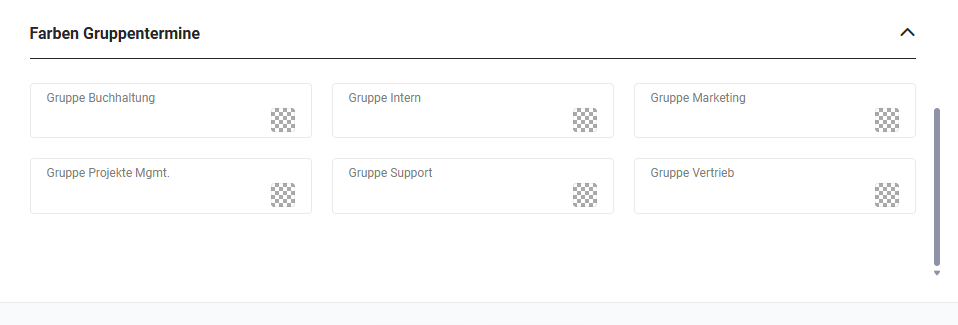 Calendar Settings Popup – Colors for Group Appointments
Individual calendar colors can be configured for groups in which the user is a member. Group appointments without their own color definition appear in the color of the appointment type.
If both a color for a type and for a group is defined, the group color is used.
4. Calendar View
In the calendar view, all appointments are displayed according to the selected time period view (daily, weekly, monthly view) as well as the selection in the sidebar (own appointments, groups, shared calendars).
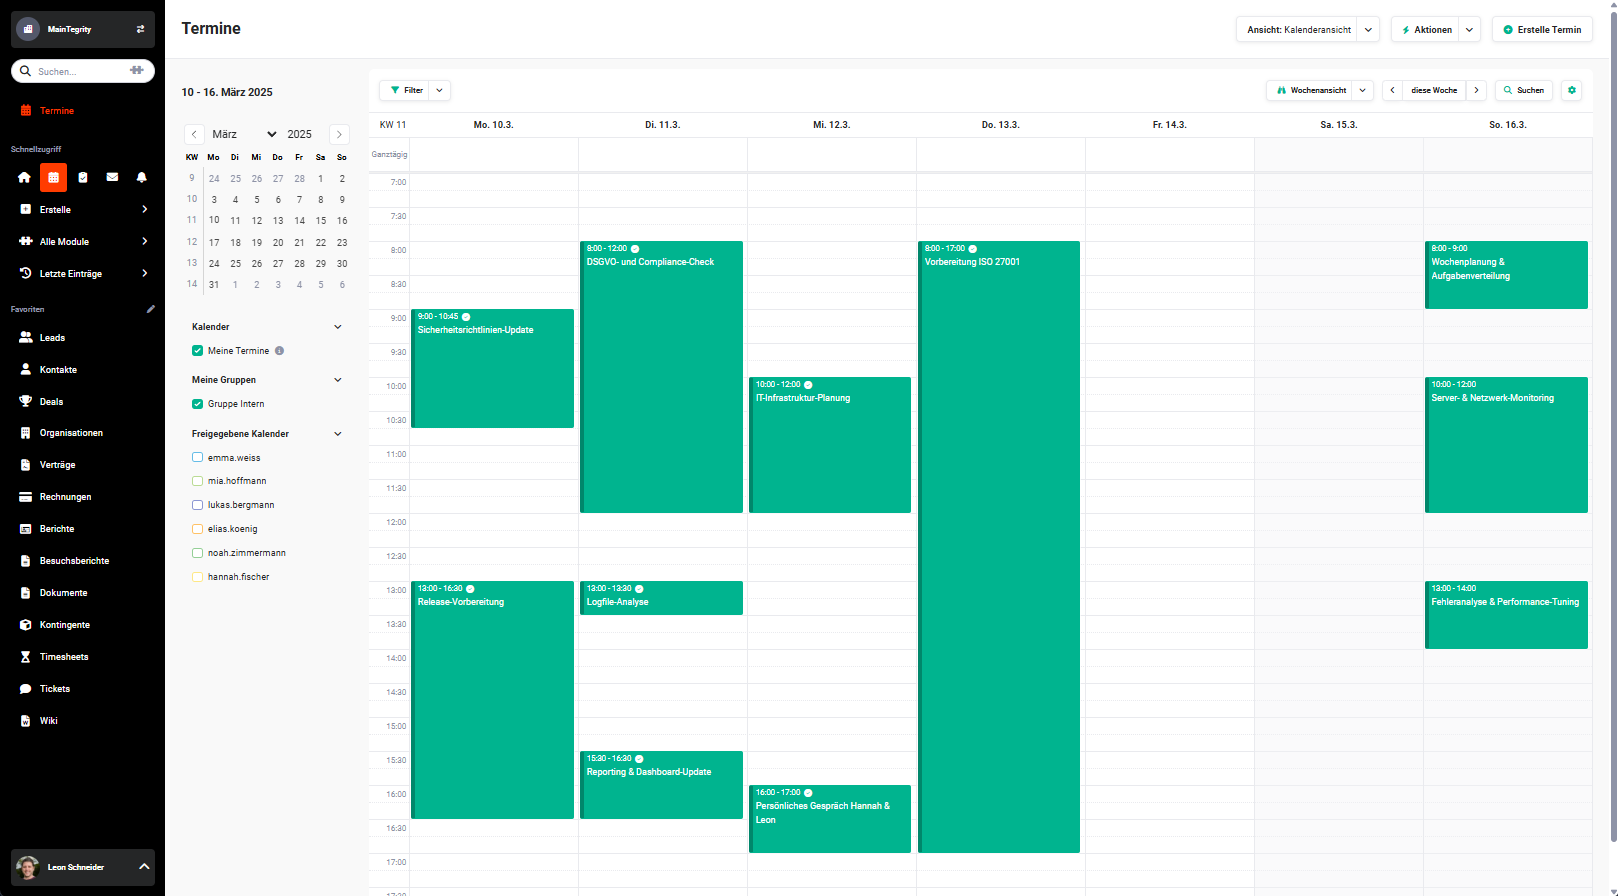 Appointments module – Calendar View
4.1. Opening the Detail View of an Appointment
After clicking an appointment, a flyout opens with the most important details: Subject, Type, Date and Time, Status (directly editable).
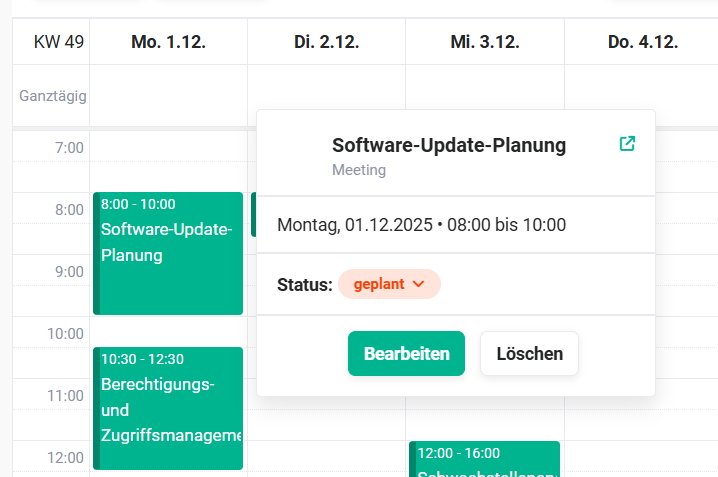 Appointment Details Display
The following actions are available:
- Actions icon Open (square with arrow icon) → opens the detail view
- Edit button → opens the edit view
- Delete button → deletes the appointment
4.2. Edit Appointment
After clicking the Edit button, the edit view of the appointment is opened.
4.3. Delete Appointment
After clicking the Delete button, the appointment is deleted and moved to the Recycle Bin module.
4.4. Create New Appointment
Clicking on any day in the calendar view opens the Create Appointment popup with the most important fields.
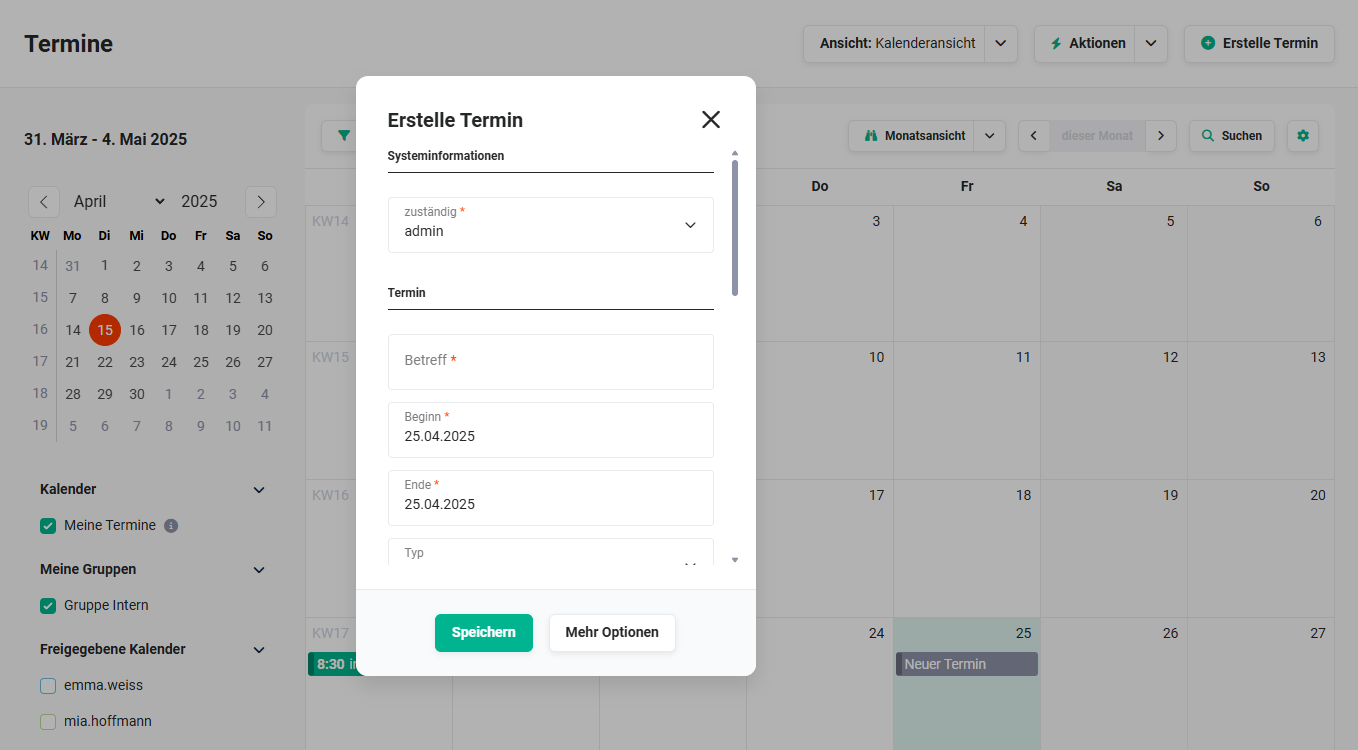 Create Appointment Popup
After filling in the required fields and clicking Save, the appointment is created. Via the More Options button, an extended popup with all available fields opens.
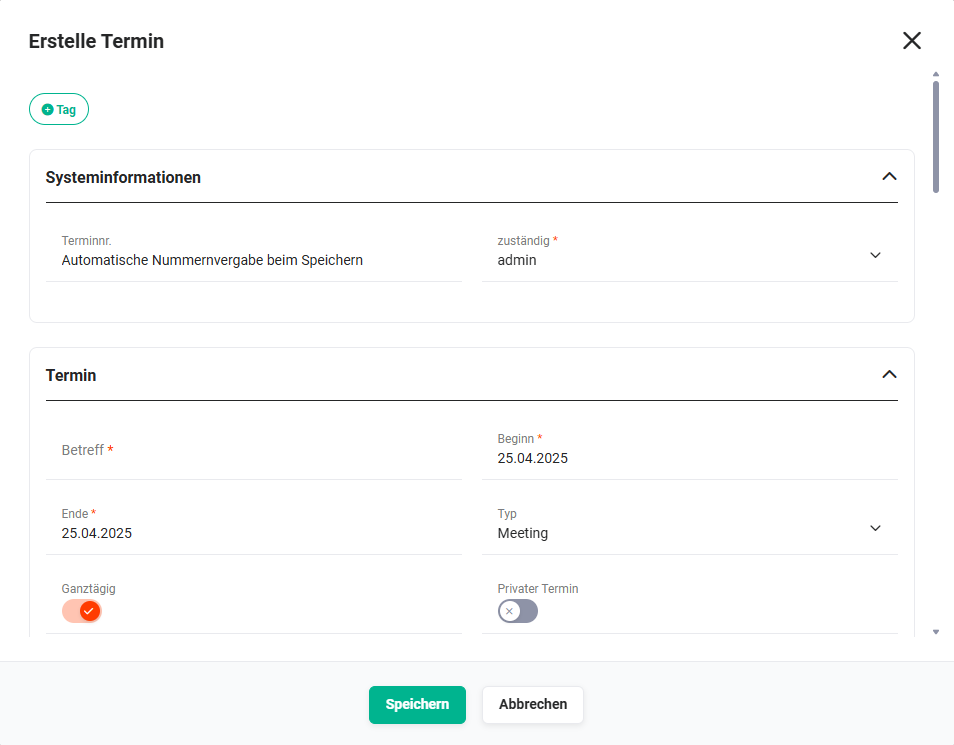 Create Appointment Popup – more options
5. Planning View
In the planning view, all appointments are displayed in list form according to the selected time period view. The selection in the sidebar (own appointments, groups, shared calendars) is taken into account.
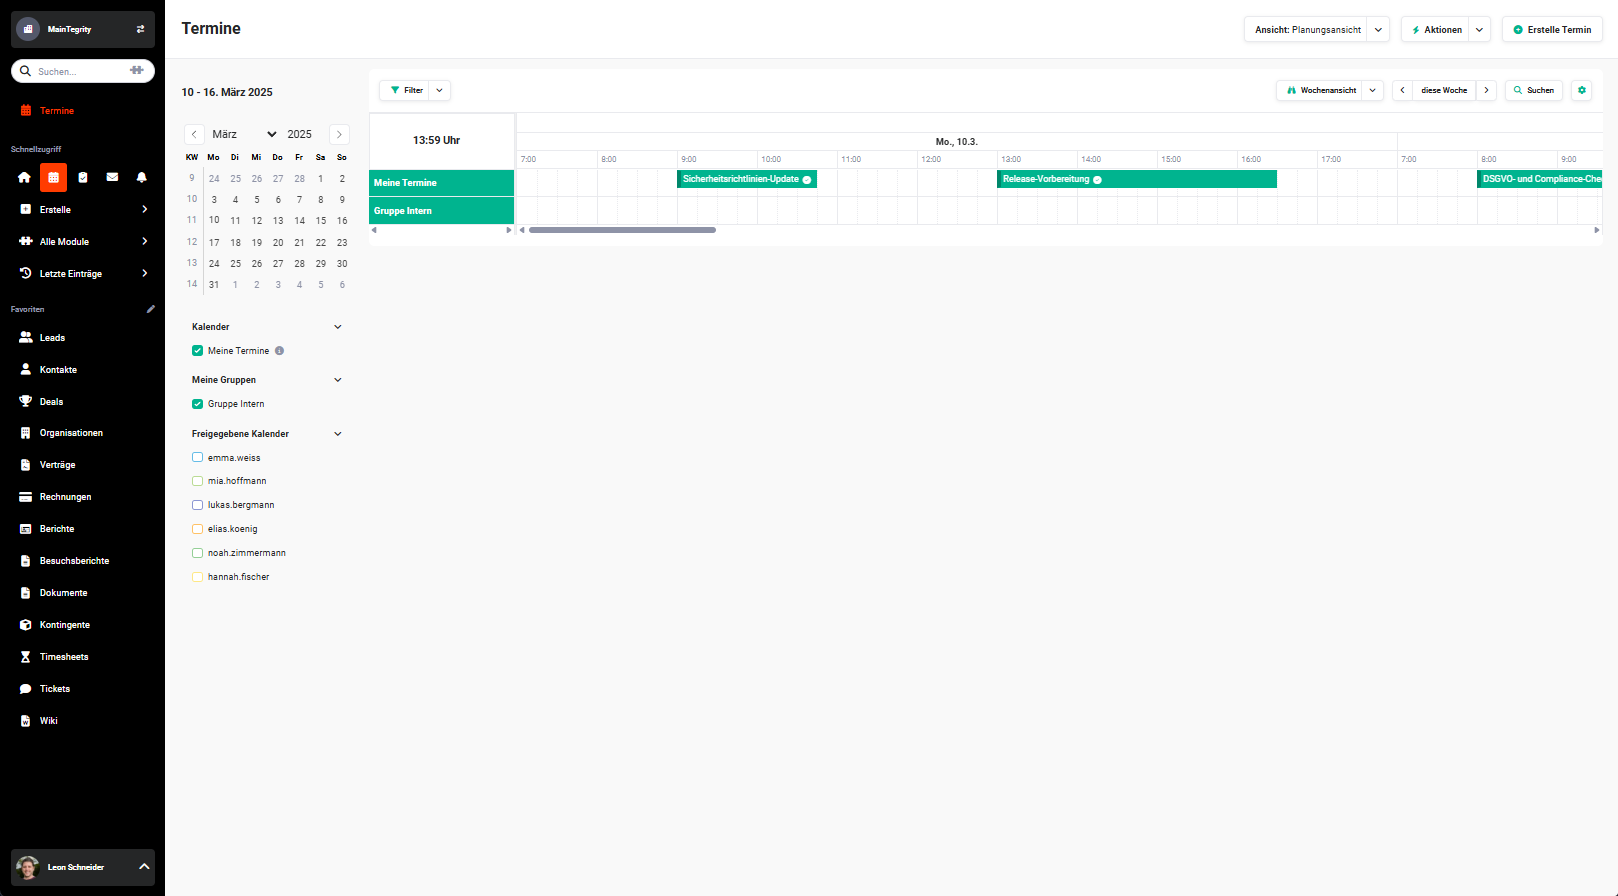 Appointments module – Planning View
The planning view facilitates the overview of upcoming appointments through its clear presentation.
All functionalities of the calendar view (opening the detail view, editing an appointment, deleting an appointment, creating a new appointment) are also available in the planning view.
6. Detail View
The Appointments module has no list view. The detail view of an appointment can only be called up directly from the calendar or planning view.
6.1. Fields
The following table describes required fields and fields with non-obvious functions. All other fields are self-explanatory.
Appointment Block
| Field | Description |
|---|---|
| Start * | Date and time of the appointment start |
| End * | Date and time of the appointment end |
| Type |
|
| All Day | When activated, the appointment is displayed in the weekly/daily view in the All Day row |
| Private Appointment | Marks the appointment as a private appointment; only visible to other users as private entry |
| Status |
|
| Send Appointment as Email Message | When activated, in addition to a notification, email invitations are also sent to all participants |
*Required field
Relationships Block
In the Relationships block, reference fields to other modules are displayed. Unlike other modules, references are not defined in the Relations tab but directly in the Relationships block.
Which modules are displayed by default can be configured individually by each user in Calendar Settings – Default References.
Via the Add More References button (only available in the create/edit view), individual references to additional modules can be added.
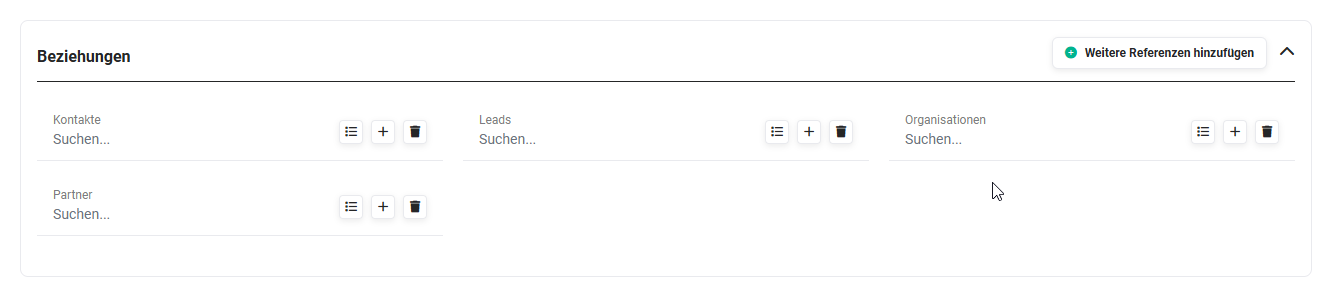 Relationships block in Create/Edit View
After clicking the Add More References button, a popup of the same name opens.
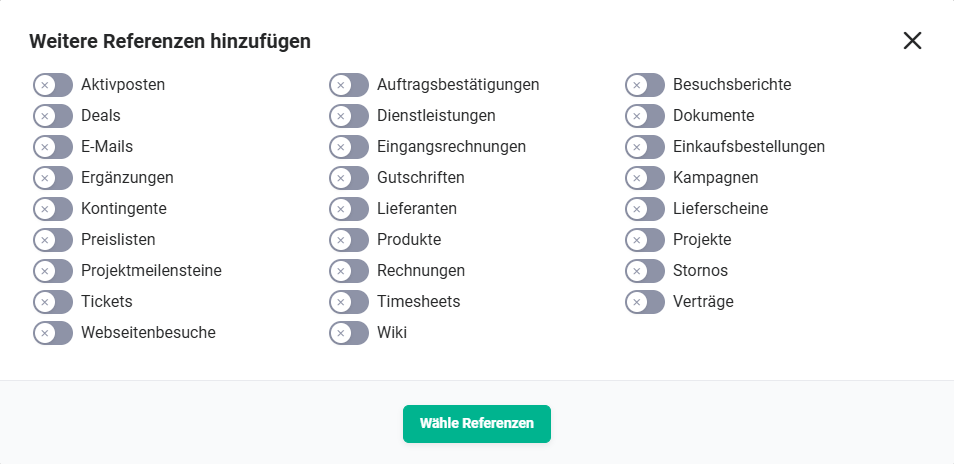 Add More References Popup
After selecting modules and clicking the Select References button, corresponding reference fields are added in the Relationships block.
Follow-up Block
| Field | Description |
|---|---|
| Follow-up | When activated and a Date and Time is entered, a follow-up appointment is automatically created |
| Date and Time | Date and time of the follow-up appointment |
Reminder Block
In the Reminder block, two fields (1st Reminder and 2nd Reminder) are available. After selecting a value, a notification is displayed at the defined time; default values: none, 5 minutes before, 10 minutes before, 30 minutes before, 1 hour before, 2 hours before, 1 day before, 2 days before.
Recurring Block
In the Recurring block, recurring appointments (series appointments) can be configured. After selecting an interval, the Recurrence Rule popup opens, in which interval, time and end date are configured.
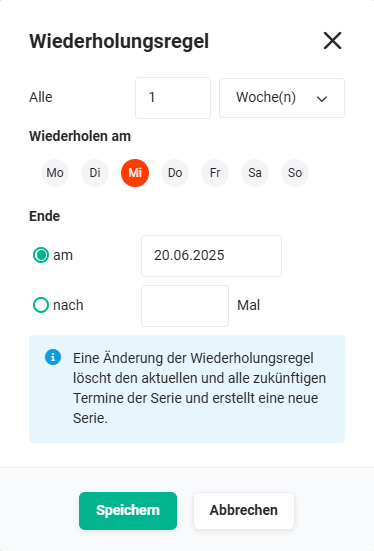 Recurrence Rule Popup – Example Interval "Custom"
When creating a recurring appointment, no appointments are created in the past. If a series is created at 11:00 AM that should start at 10:00 AM, the current day is no longer taken into account.
If the interval is not entered correctly, the following note appears: The configured rule does not generate any appointments. Please check the recurrence rule.
Display of All Appointments in a Series
All appointments in a series are listed in the Relations tab of the detail view of the recurring appointment.
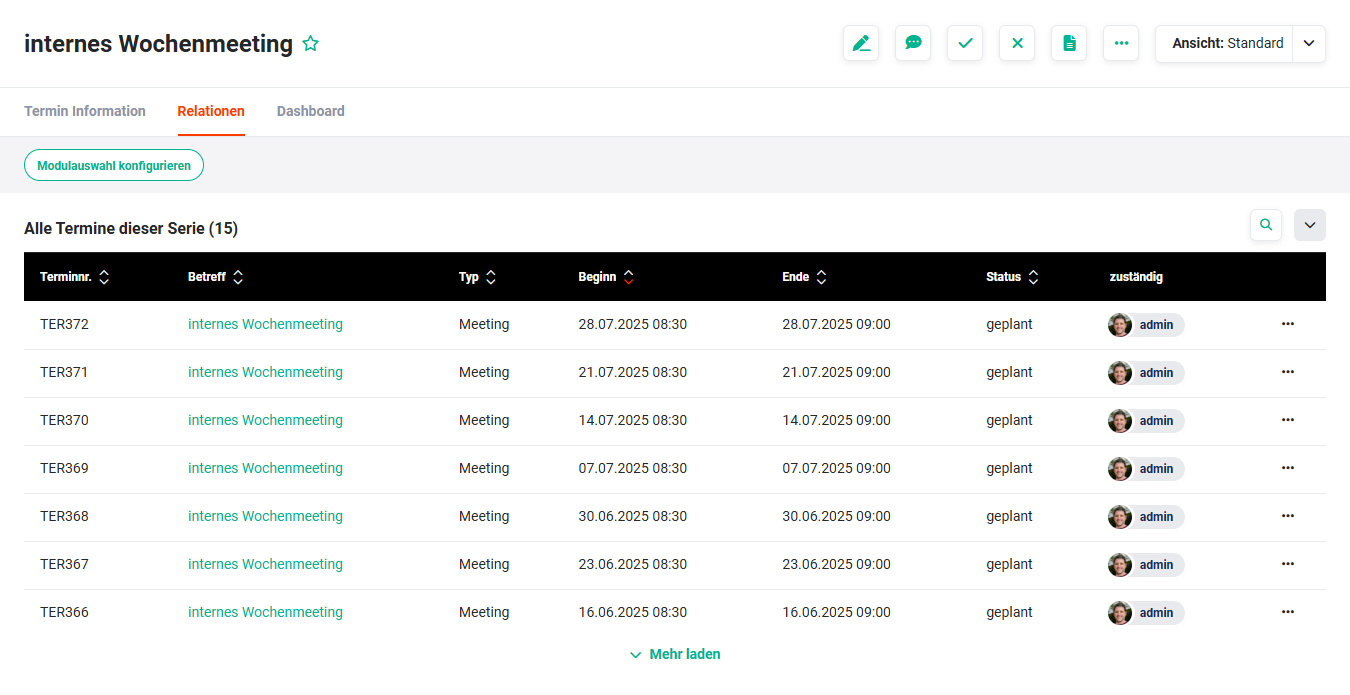 Detail View – Relations Tab – Recurring Appointments
- Changes to the main appointment affect the entire series.
- Changes to a single appointment only affect that appointment. To change all future appointments, the Apply changes to all future appointments in the series checkbox must be activated in the edit view.
- A change to the recurrence rule on the main appointment deletes all future appointments and creates a new series.
Add Participants Block
In the Add Participants block, calendar invitations for other users, contacts and leads are defined, see section Invitation to Contacts/Leads.
Invitation to Users
After clicking the Add Participants button, a popup of the same name opens.
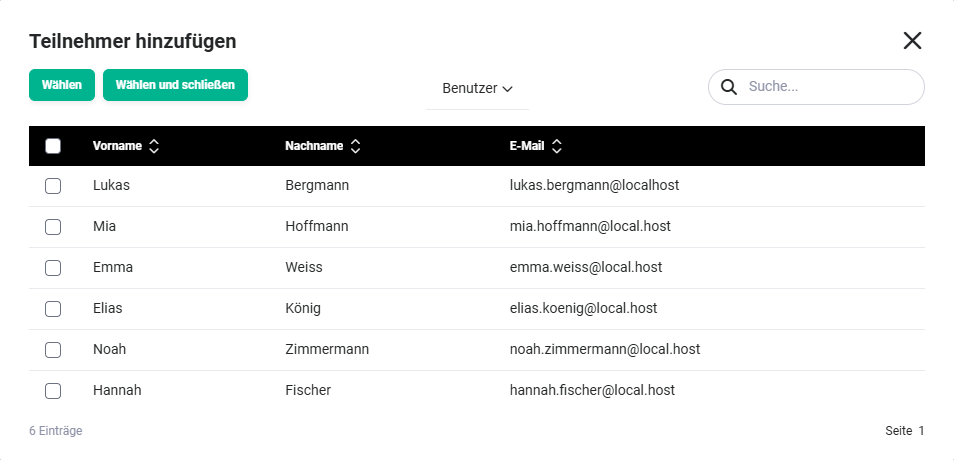 Add Participants Popup – User Selection
Users can be added individually or via multiple selection (checkbox + Select button).
Invited users receive a notification and optionally an email invitation (if Send Appointment as Email Message is active). They can respond with accept, tentatively accept or decline:
| Response | Follow-up Action |
|---|---|
| accept | A new appointment is created in the invited user's calendar |
| tentatively accept | A new appointment is created; in the detail view, the Confirm Acceptance action appears |
| decline | No appointment is created; the inviter receives a note |
The response status is visible in the detail view of the appointment for all parties: green checkmark (accepted), yellow question mark (tentative), red X (declined), grey question mark (no response).
If an appointment is changed, all participants receive a new invitation and can respond again. The invited user's appointment is automatically updated.
To uninvite a participant, click the trash icon next to the name in the edit view. The uninvited user receives a notification and the appointment is removed from their calendar.
After responding to an invitation (accept, tentatively accept or decline), the message is removed from the invited user's message center.
A prerequisite for an invitation to contacts or leads is an active/configured Exchange Connector. If the Exchange Connector is not active/configured, no contacts or leads can be selected in the Add Recipients popup.
Invited contacts/leads receive an invitation via Outlook (Exchange Server). If an appointment relates to an organization, contacts of the linked organization are displayed primarily when selecting contacts.
File Attachments Block
| Field | Description |
|---|---|
| File | Upload file via drag & drop or via the file explorer of the operating system |
If the Exchange Connector has been configured, the attachments are synchronized accordingly.
6.2. Actions
The following actions are available in the detail view:
6.2.1. General Actions
- PDF Export
- Recommend
- Copy
- Mark Appointment as Completed
- Delete
- Mark Appointment as Not Completed
- Change Tracking
For detailed information on the actions, see the section Actions (Detail View).
6.2.2. Module-Specific Actions
| Action | Prerequisite | Functionality |
|---|---|---|
| Create Timesheet | – | Creates a new timesheet and links it to the appointment |
7. Practical Examples
1 – Planning, Inviting and Following Up on a Customer Appointment
A sales employee plans a meeting with an existing customer. A new appointment with the Type Meeting is created in the Appointments module, linked to the corresponding organization and the responsible contact in the Relationships block. The Send Appointment as Email Message toggle is activated so that the contact receives an email invitation in addition to a notification.
Via the Add Participants block, all internal participants are invited as users. They can respond with accept, tentatively accept or decline – the response status is visible in the detail view for everyone. After the meeting, the status of the appointment is set to completed. Since Follow-up Appointment is activated in the calendar settings, a popup for creating a follow-up appointment automatically opens.
2 – Creating a Weekly Team Meeting as a Recurring Appointment
A weekly team meeting is to be managed as a recurring appointment in brainX. In the Recurring block, the Weekly interval is selected and in the Recurrence Rule popup, the day of the week and an end date are defined. All team members are invited via the Add Participants block.
Changes to the main appointment – e.g., a time shift – automatically affect all future appointments in the series. If an individual appointment needs to be handled differently, it can be edited separately without changing the entire series. All appointments in the series are listed in the Relations tab of the main appointment.
3 – Sharing a Calendar for a Substitute and Using Group Calendars
An employee is substituting for a colleague during their vacation and needs access to their calendar. The colleague shares their calendar in the calendar settings under Appointment Sharing with the Delegate (read & write) permission for the substitute.
The substitute sees the shared calendar in the sidebar under Shared Calendars and can show it via checkbox. This way, the colleague's appointments are displayed in their own calendar view. Additionally, in the sidebar under My Groups, all groups in which the user is a member can be shown – the group's appointments appear in the configured group color.
8. Frequently Asked Questions
What is the difference between calendar view and planning view?
The calendar view shows appointments in a graphical daily, weekly or monthly display. The planning view shows the same appointments in a clear list form – ideal for a quick overview of upcoming appointments without graphical display. Both views can be selected as the start view via the default view in the calendar settings.
Can I invite contacts and leads directly to an appointment?
Yes, but only if the Exchange Connector is configured and active. Invited contacts and leads receive the invitation via Outlook (Exchange Server). Without an active Exchange Connector, no contacts or leads can be selected in the Add Recipients popup.
What happens when I change a recurring appointment?
Changes to the main appointment of a series affect all future appointments. Changes to an individual appointment in the series only affect that appointment – unless the Apply changes to all future appointments in the series checkbox is activated in the edit view. A change to the recurrence rule on the main appointment deletes all future appointments and creates a new series.
How are birthdays displayed in the calendar?
If the Show Birthdays toggle is activated in the calendar settings, birthdays from the Contacts module are automatically displayed as all-day events in the calendar – provided the Date of Birth field is populated in the contact record. Each user sees the birthdays of all contacts they have access to.
How does appointment sharing work?
In the calendar settings under Appointment Sharing, your own calendar can be shared with individual users or groups. Various permission levels are available – from Sees when I'm busy to Delegate (full access). Appointment sharing only takes effect when the Appointments module is set to private in the global permission assignment.
Can I bill an appointment directly from the Appointments module as a timesheet?
Yes. Via the module-specific action Create Timesheet in the detail view of an appointment, a timesheet is created directly and linked to the appointment. This allows the time spent on a customer appointment to be directly recorded and assigned to a project or contingent.